
Master Dormer Vent Installation for Maximum Attic Ventilation

How to Install a Dormer Vent Without Blocking Attic Airflow
Start with the airflow plan, not the roof cut. Make sure air can enter at the soffits, travel through open channels beneath the roof deck, and exit through a vent high on the dormer. Then check the vent maker's opening size, mark a spot clear of rafters, cut the decking, and fasten and flash the vent as instructed. Keep insulation out of the air path. If the work involves a steep roof, changes to framing, or tricky flashing, hire a roofer.
I'm Jacolyn Gleason, a public relations professional experienced in making detailed guidance clear for homeowners. In this Dormer vent installation guide, I'll walk you through the vent choices, installation steps, and mistakes to avoid.
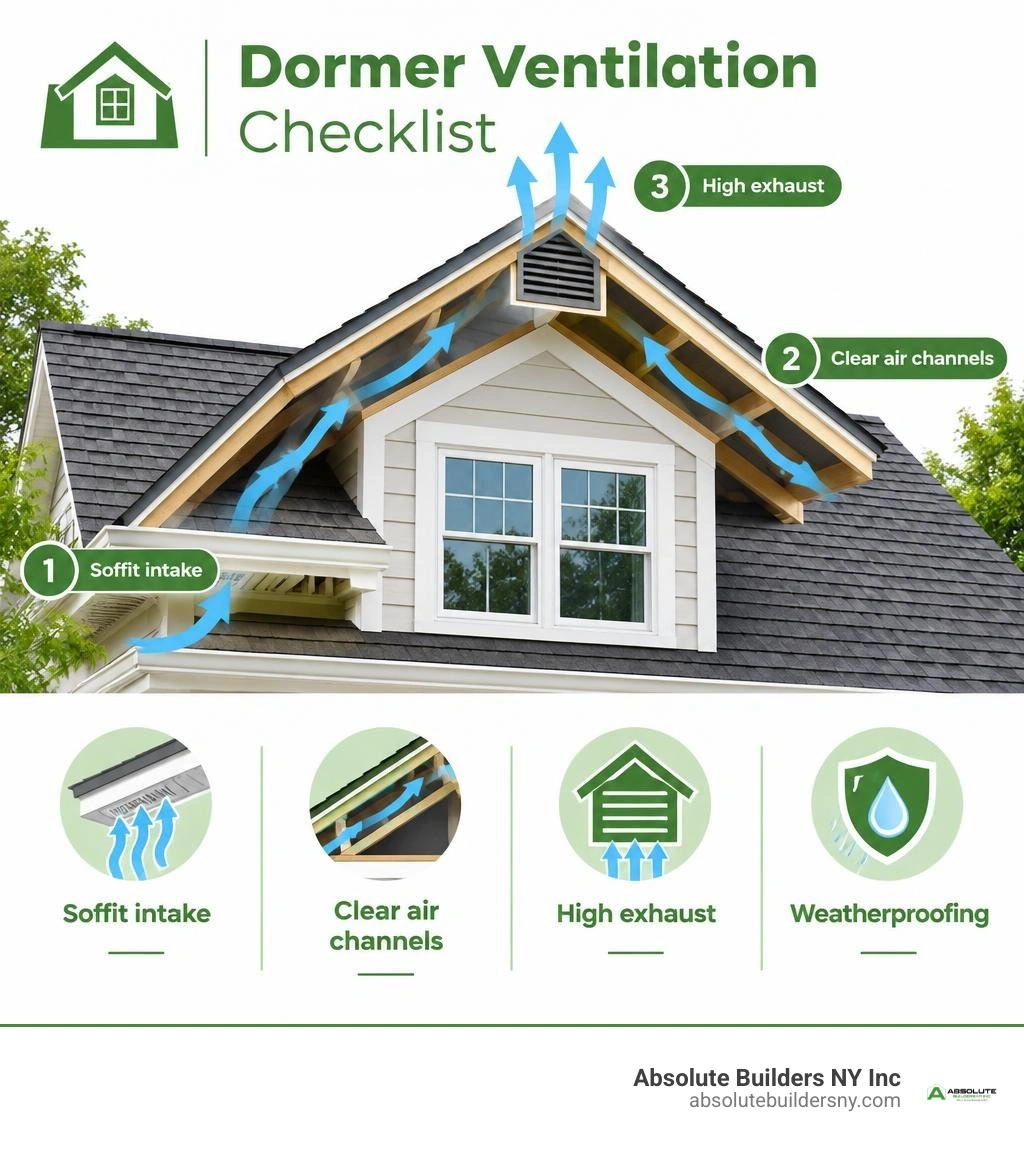
Dormer vent installation terms to know:
Understanding Dormer Ventilation Systems and Net Free Vent Area
A well-planned ventilation system relies on natural convection: warm, moist air naturally rises and escapes through high exhaust points, drawing fresh, cooler outside air in through the lower eaves. If you are planning a complete guide to dormer additions, getting this balance right from day one is essential to avoid trapped heat and winter moisture issues.
Building codes establish ventilation capacity via Net Free Vent Area (NFVA), which is the total unobstructed area through which air can pass. The International Residential Code (IRC) generally specifies a minimum ventilation ratio of 1:150 (1 square foot of NFVA for every 150 square feet of attic floor space). This ratio can be reduced to 1:300 if a balanced system is used (where 40% to 50% of the ventilation area is in the upper portion of the attic and the rest at the eaves) or if a Class I vapor retarder is installed on the warm-in-winter side of the ceiling.
For a dormer, continuous airflow paths beneath the roof deck are critical. Dormer roofs create complex framing pockets that easily trap heat if rafter bays are choked off by insulation. Choosing the right dormer-type roof vent helps ensure each architectural segment exhausts air smoothly.
| Vent Type | Airflow Mechanism | Best Roof Pitch | Typical Cost (Installed) |
|---|---|---|---|
| Ridge Vent | Passive continuous exhaust | 3/12 and steeper | $150 – $600 |
| Soffit-to-Ridge System | Balanced passive intake/exhaust | 3/12 to 12/12+ | $250 – $1,100 |
| Gable / Wall Vent | Passive cross-ventilation | Steep pitches (4/12+) | $150 – $450 |
| Turbine / Box Vent | Passive wind-assisted / static | 3/12 to 12/12 | $150 – $400 |
| Powered Attic Fan | Active motorized exhaust | 3/12 to 8/12 | $400 – $1,200 |
Types of Dormer Vents and Architectural Compatibility
Different dormer shapes demand specific venting strategies to keep air moving:
- Gable Dormers: Triangular gable dormers naturally accommodate gable-end wall louvers or compact ridge vents along their small peaks.
- Shed Dormers: Featuring a single sloping roof plane, shed dormers often pair well with low-profile off-ridge box vents or specialized transition vents along the top seam where the dormer meets the main roof plane. If you have a flat roof dormer design, membrane-compatible vents or fascia edge vents maintain necessary airflow without puncturing shallow slopes.
- Eyebrow & Hipped Dormers: Curved eyebrow dormers and multi-sloped hip dormers benefit from discreet low-profile static box vents placed on the rear slope to preserve sightlines from the street.
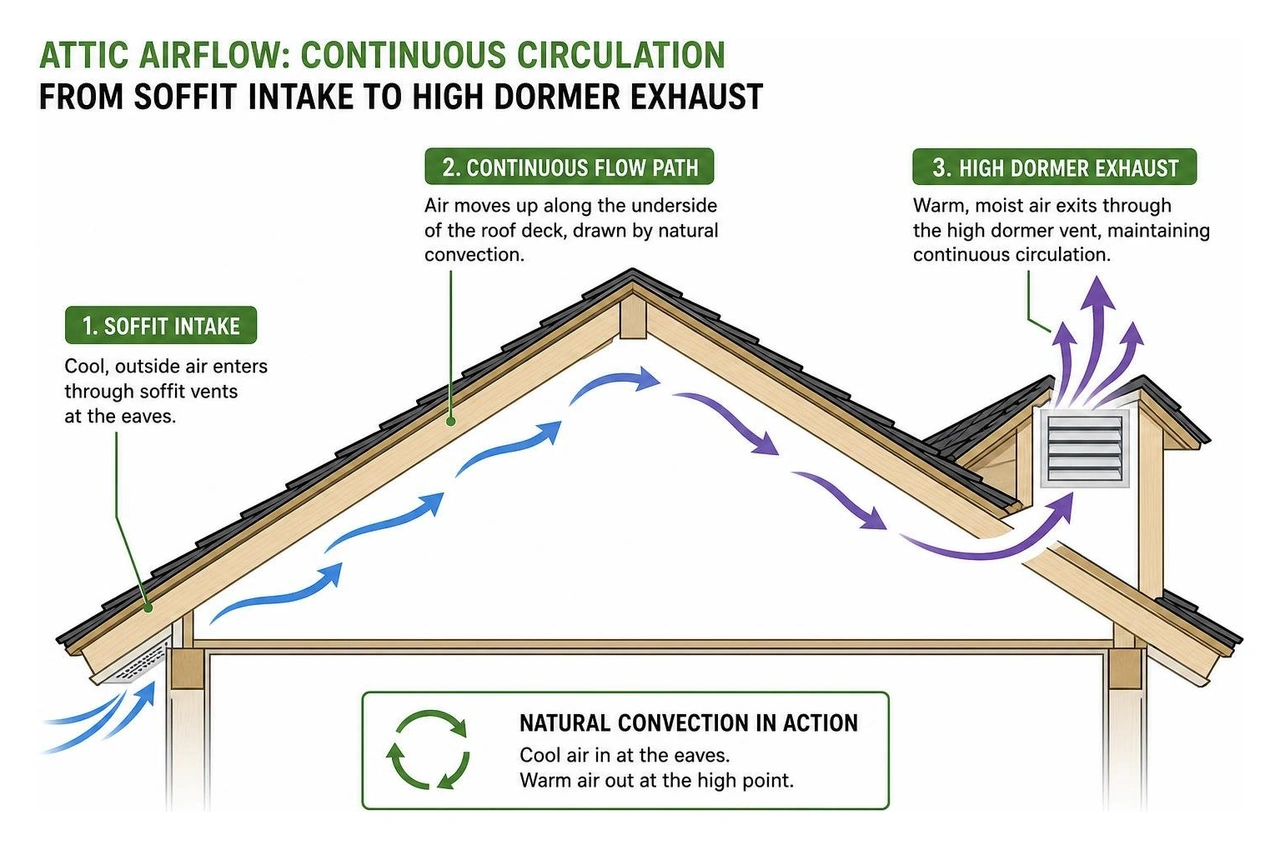
Step-by-Step Dormer Vent Installation for Standard Roof Vents
Installing a static box dormer vent requires clean cuts, proper rafter spacing, and watertight flashing layers. Placing vents high on the roof plane—within 3 to 4 feet of the ridge—maximizes exhaust efficiency. When we evaluate projects across Long Island in communities like Huntington and Massapequa, maintaining uniform vent height across the roof plane is our top rule of thumb. For broader structural context on framing layouts, review our complete dormer house overview.
Refer to the standard dormer vent installation manual for foundational placement guidelines.
Preparing for Dormer Vent Installation: Codes, Safety, and Tools
Before making modifications, verify local building permits and review the BH24-1/8 installation specifications for your chosen vent model.
Required Safety Gear & Tools:
- Fall-arrest harness, roof anchor, and safety rope
- Safety glasses and heavy-duty work gloves
- Reciprocating saw or circular saw with carbide blade
- Drill with 1/2-inch starter bit
- Hammer and pry bar
- Chalk line and measuring tape
- High-grade asphalt roofing cement and caulking gun
- Galvanized roofing nails (1½-inch to 2-inch)
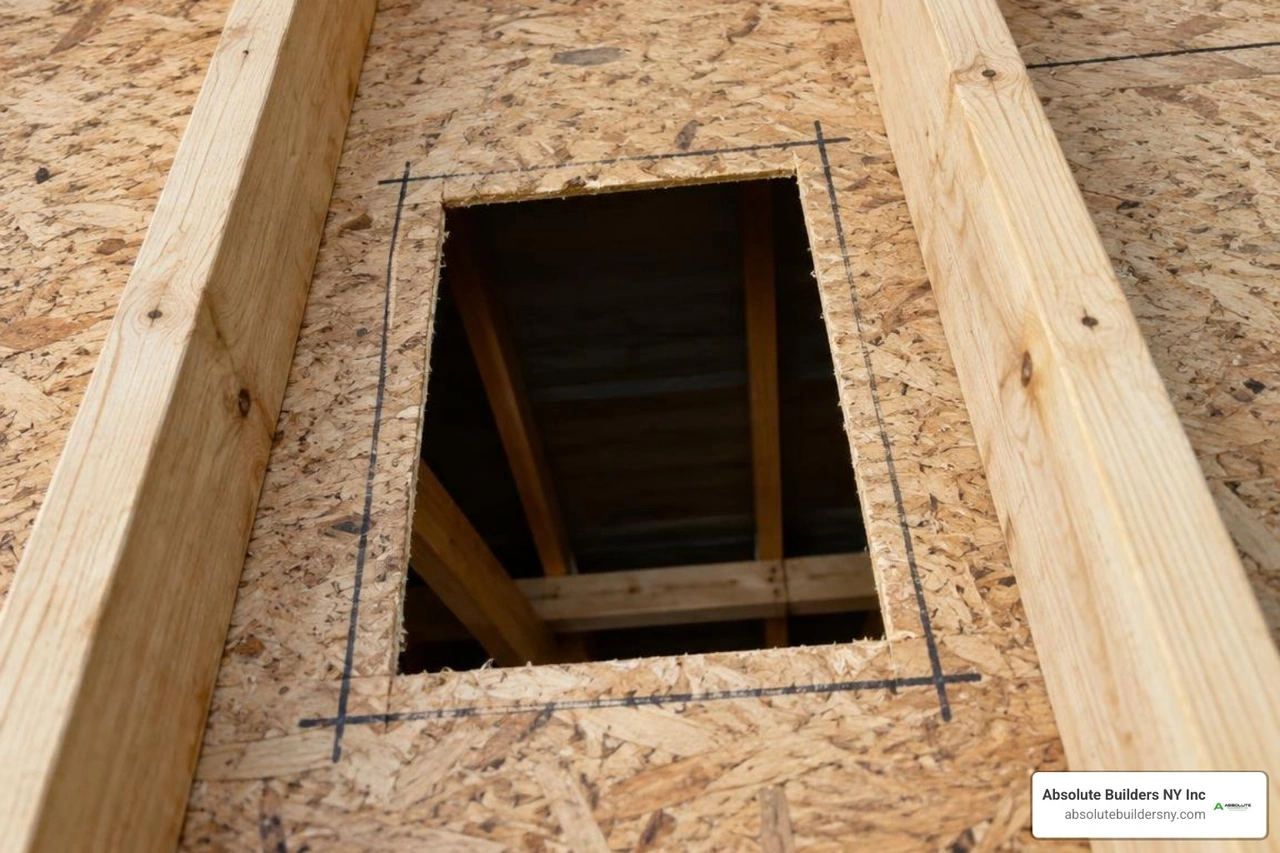
Rough Opening Dimensions:Nominal vent sizes correspond to specific rough cutout sizes:
- 9 in. x 18 in. or 12 in. x 24 in. nominal vents typically require a 12 in. x 9 in. rough opening.
- 14 in. x 12 in. nominal vents require a 14 in. x 14 in. rough opening.
Build a cardboard or thin plywood template of your required opening to keep cuts straight and accurate.
Cutting, Fastening, and Weatherproofing the Vent Opening
Follow this procedural sequence aligned with STDS24-8 manufacturer guidelines to ensure structural safety and leak protection:
- Locate Rafters: Working on the rear slope of the dormer, locate the structural rafters from inside the attic or using a stud finder on the roof deck. Center your cutout template between rafters to avoid cutting load-bearing lumber.
- Mark and Expose Decking: Trace your template onto the roof. Carefully loosen surrounding asphalt shingles with a flat pry bar, removing nails from shingles that overlap the top and side flange areas.
- Drill and Cut: Drill a 1/2-inch starter hole in one inside corner of the marked rectangle. Insert your reciprocating saw blade and cut along the lines, removing the decking cutout.
- Bed Flange in Cement: Apply a generous bead of asphalt roofing cement around the underside of the vent's perimeter flange.
- Slide and Center: Slide the top edge and side edges of the vent flange under the upper shingle courses. The bottom flange must sit on top of the lower course of shingles to ensure water drains naturally over the roof face.
- Fasten Flange: Secure the flange using 7 galvanized roofing nails spaced evenly along the pre-drilled flange holes.
- Seal Fasteners & Seams: Cover all exposed nail heads, flange seams, and loosened shingle tabs with roofing cement.
Specialized Peak and Ridge Ventilation Techniques
Dormer peaks, particularly on low-slope dormers (under 4/12 pitch), require negative-pressure exhaust systems that prevent wind-driven rain infiltration while drawing trapped heat from tight rafter bays. If you are completing a dormer window loft conversion, proper peak ventilation prevents stale air and moisture pockets from accumulating near vaulted ceilings.
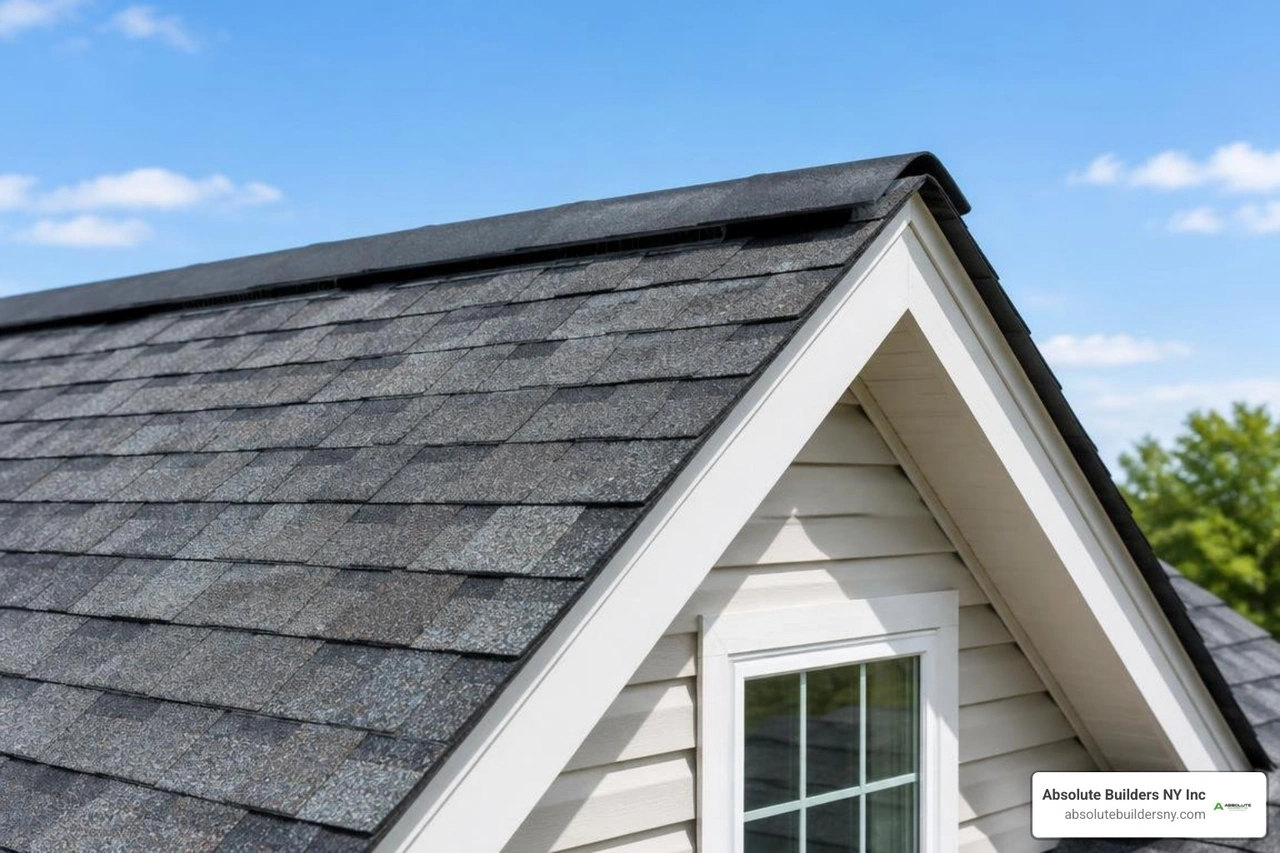
SmartVent Dormer Vent Installation on Low and Steep Pitch Peaks
The SmartVent system creates negative static pressure along dormer peaks and can be installed on shingled roofs with a minimum pitch of 3/12, with no upper pitch limit. As detailed in the Dormer Peak system overview and SmartVent installation instructions, follow these exact manufacturer specifications:
- Decking Slit Preparation: Cut a 1-inch slit through the roof decking on each side of the dormer roof peak, creating a total opening width of 3½ inches across the ridge. Stop your cut at least 12 inches away from dormer gable ends, sidewalls, or roof valleys.
- Lift-Side Shingle Base: Install standard roofing underlayment and shingles on the steeper (lift) side up to the bottom edge of the cutout slit.
- Mounting the Vent: Position the SmartVent roll or section over the peak. Fasten using four 1½-inch to 2-inch galvanized roofing nails per side per piece, placing fasteners 2 inches in from the product edges. Ensure nails penetrate the roof decking fully.
- End-Cap Fabric Sealing: Wrap the supplied 10½-inch square weather-resistant fabric end caps tightly over the exposed cut ends at gable edges, nailing them securely to prevent wind-driven rain and insect intrusion.
- No-Lift Side Completion: On the no-lift (lower slope) side, extend roofing underlayment, shingles, or rubber membrane at least 9 inches over the top of the vent.
- Cap Shingles: Nail cap shingles along the dormer peak, ensuring a ½-inch to ¾-inch overhang past all vent edges to shield the internal ventilation openings.
Dormer Ventilation Costs, Common Mistakes, and Maintenance
Neglecting ventilation leads to ice damming in winter, attic mold during humid summers, and shingle deterioration. In coastal areas like Westhampton and Bayville, salt air accelerates corrosion, making aluminum or heavy-duty polymer vents and hot-dipped galvanized fasteners essential.
Common Mistakes to Avoid:
- Choking Eaves with Insulation: Blown-in insulation frequently blocks intake air at the dormer knee walls. Always install rigid polystyrene or cardboard eave baffles in every rafter bay.
- Mixing Different Exhaust Types: Never mix powered fans with passive ridge or dormer vents on the same shared attic plane. The powered fan will pull outside air backwards through the dormer static vent rather than drawing air from the soffits.
- Unscreened Vents: Always verify that vents feature built-in 1/8-inch or 1/4-inch corrosion-resistant mesh to block bats, squirrels, and wasps.
When budgeting for whole-home updates, utilize our dormer window cost calculator and review factors influencing dormer addition cost on Long Island.
| Ventilation Project Scope | Material Cost Range | Labor Cost Range | Total Estimated Cost |
|---|---|---|---|
| Dormer Ridge Vent Installation | $50 – $150 | $100 – $450 | $150 – $600 |
| Soffit Intake Vent Retrofit | $30 – $100 | $70 – $400 | $100 – $500 |
| Powered Attic Fan Installation | $150 – $400 | $250 – $800 | $400 – $1,200 |
| Complex Dormer Retrofit / Flashing Repair | $200 – $800 | $600 – $2,700 | $800 – $3,500+ |
Frequently Asked Questions About Dormer Venting
Can operable dormer windows replace roof vents for attic ventilation?
No. While operable sash windows bring fresh air into living spaces, they do not provide continuous, passive roof cavity ventilation. Unconditioned rafter bays require 24/7 convective airflow governed by IRC standards to evacuate moisture and equalize roof deck temperatures, regardless of whether windows are open. If you are updating windows, consult our dormer window installation guide 2026.
Why must all exhaust vents on a dormer roof plane be installed at the same height?
When exhaust vents are installed at different elevations along the same roof plane, the higher vent creates stronger thermal buoyancy and negative pressure. Instead of drawing intake air from the low soffit vents, the higher vent pulls air backward through the lower exhaust vent. This short-circuits the airflow path, leaves the lower attic unventilated, and can pull rain or snow backward into the lower vent throat.
When should a professional contractor be hired for dormer ventilation?
Hire a licensed roofing professional if your project involves:
- Cutting through or modifying roof rafters and structural framing.
- Working on steep pitches (8/12 or greater) where standard footing is unsafe.
- Integrating complex step flashing along dormer sidewalls and valleys.
- Diagnosing recurring moisture, attic mold, or chronic winter ice dams.
Conclusion
Balanced attic ventilation protects your roofing materials, controls indoor temperatures, and prevents structural wood rot. Whether you are adding static box vents or integrating a continuous ridge system across a dormer peak, precise cutting, proper nail placement, and watertight flashing ensure your roof performs reliably year-round.
If you are planning home remodeling in Nassau County, Suffolk County, or anywhere on Long Island, our team at Absolute Builders NY Inc brings precision craftsmanship to every project. Contact us today for expert dormer addition and roofing services.