
Attic to Haven: How to Plan a Dormer Window Conversion
Why a Dormer Window Loft Conversion Could Be Your Home's Best Upgrade
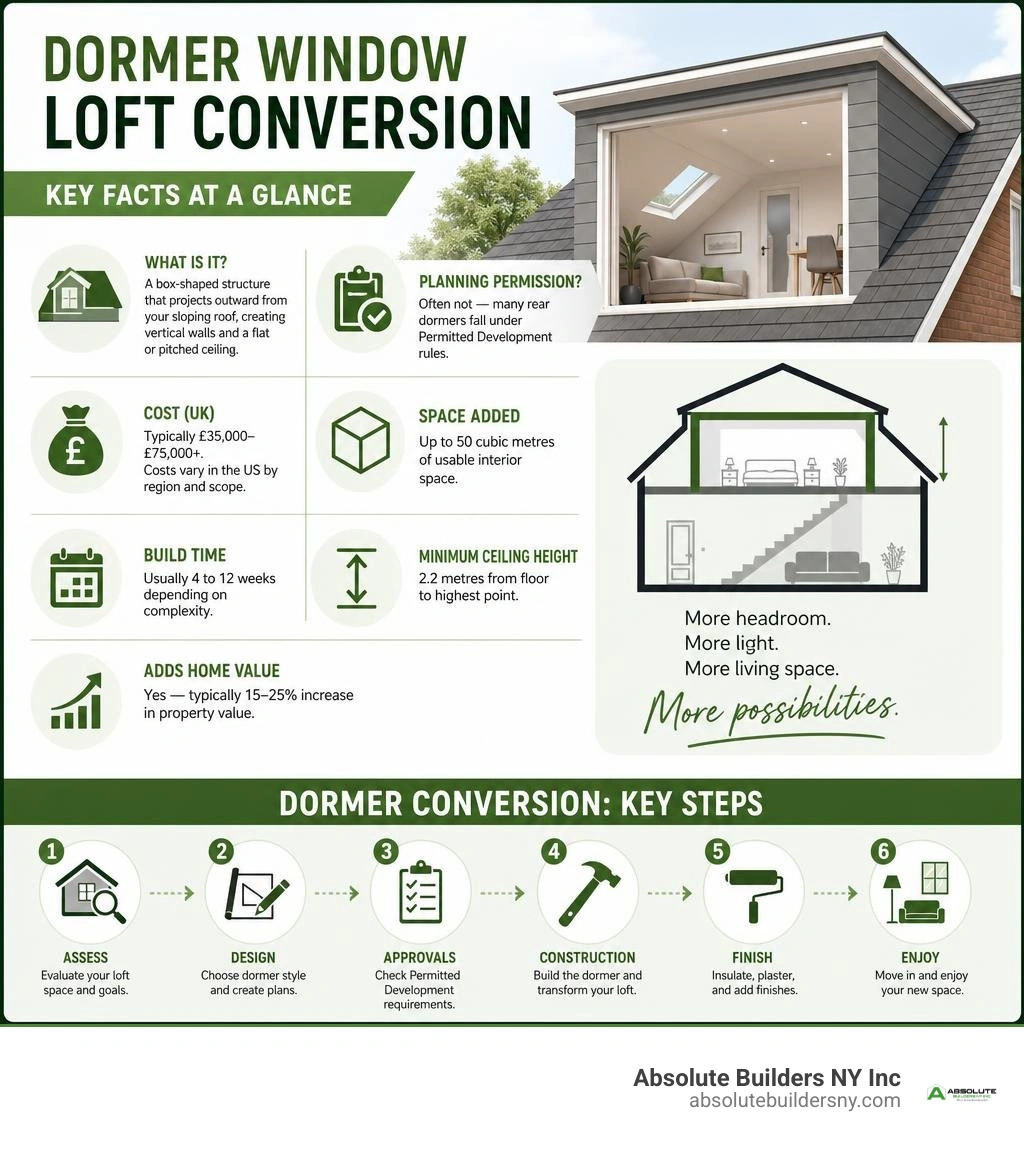
A dormer window loft conversion is one of the most effective ways to turn wasted attic space into a fully livable room — adding headroom, floor area, and natural light without touching your garden or footprint.
Here's what you need to know at a glance:
| Question | Quick Answer |
|---|---|
| What is it? | A box-shaped structure that projects outward from your sloping roof, creating vertical walls and a flat or pitched ceiling |
| Do I need planning permission? | Often not — many rear dormers fall under Permitted Development rules |
| How much does it cost? | Typically £35,000–£75,000+ in the UK; costs vary in the US by region and scope |
| How much space does it add? | Up to 50 cubic metres of usable interior space |
| How long does it take? | Usually 4 to 12 weeks depending on complexity |
| Minimum ceiling height needed? | 2.2 metres from floor to highest point |
| Does it add home value? | Yes — typically 15–25% increase in property value |
For Long Island homeowners, a cramped or sloped attic often means unusable square footage sitting right above your head. A dormer conversion changes that — permanently.
This guide walks you through every stage of the process: from choosing the right dormer style for your roof, to understanding structural requirements, permits, costs, and interior design options. Whether you're dreaming of a master suite, a home office, or an extra bedroom, you'll find clear, practical answers here.
I'm Jacolyn Gleason, a Senior Vice President at 5W Public Relations with extensive experience translating complex project decisions — including home improvement and construction — into clear, actionable guidance for homeowners considering a dormer window loft conversion. My background in consumer-facing communications means I cut through the jargon so you can make confident decisions for your home.
Simple guide to dormer window loft conversion terms:
Fundamentals of a Dormer Window Loft Conversion
When you peek into an unconverted attic, you are usually greeted by low, angled roof rafters, dusty floorboards, and a lot of dead space near the eaves where you can barely crouch, let alone stand. A dormer window loft conversion fundamentally changes this geometry.
Instead of working entirely within the awkward slope of your existing roofline, a dormer is a structural box built directly outward from the roof slope at a right angle to the floor. By pushing the roof out vertically, it creates straight, upright walls and a horizontal flat or pitched ceiling. This single alteration transforms unusable roof slope into genuine, full-height usable floor area.

Understanding how these elements work together is essential before picking out paint colors or bedroom furniture. For a deeper breakdown of how structural boxes operate on various roof shapes, check out our resource on Understanding dormer structures.
A common question we hear from homeowners across Long Island, from Massapequa to Westhampton, is whether they should opt for standard roof lights (skylights) or construct a structural dormer. While roof windows sit flush along the existing slope of the roof, a dormer physically extends the home's architectural envelope. Before choosing between these two paths, take a look at this comparison detailing Comparing roof windows and dormer windows. In short: skylights deliver sunlight, but dormers deliver both sunlight and physical headroom.
Key Advantages of a Dormer Window Loft Conversion
Why is a dormer window conversion consistently one of the most popular home improvement projects? It comes down to five distinct living benefits:
- Massive Gains in Usable Floor Space: By extending out to the building lines, a dormer opens up up to 50 cubic metres of additional interior volume. Areas under the roof where head height was previously under 1.5 metres (around 5 feet) become standard furnishable floor area.
- Abundant Natural Daylight and Ventilation: Standard vertical windows fitted into dormer walls capture daylight directly without screen glare, boosting interior illumination by up to 60% compared to dark attic corners.
- Full Standing Head Height: Instead of dodging sloped rafters, a dormer provides standard residential vertical ceiling heights between 2.2 and 2.5 metres across the majority of the new room.
- Flexible Interior Layouts: Straight vertical walls allow you to push standard-sized beds, tall wardrobes, vanity mirrors, and walk-in showers right against the perimeter—things nearly impossible under angled eaves.
- Exceptional Return on Investment (ROI): Independent financial studies show that converting unused roof space into a livable double bedroom with an ensuite bathroom adds between 15% and 25% to a property's market value.
Headroom and Minimum Height Requirements
Before committing to architectural blueprints, the first thing we check is existing vertical clearance. Under standard building regulations and codes, a habitable room requires a minimum finished ceiling height of 2.2 metres (7 feet, 2 inches) measured from the top of the existing ceiling joists to the underside of the top roof ridge beam.
Why is this 2.2m threshold so critical? Once we install new structural floor joists (which are thicker than original ceiling ties to support live residential loads), soundproofing, insulation, and drywall overhead, you will lose roughly 20 to 25 cm of total clear height.
To measure your existing space accurately, grab a tape measure and open your attic hatch:
- Extend the tape measure directly from the top of the horizontal wood floor joists straight up to the peak of the ridge beam.
- If your measurement meets or exceeds 2.2 metres, your attic is an ideal candidate for a straight-forward conversion.
- If your measurement is between 2.0 and 2.2 metres, a dormer can still be built, but structural adjustments—such as lowering the ceiling joists on the story below or raising the exterior roof ridge—may be necessary.
If your home was constructed after the 1960s, it likely utilizes modern "W-shaped" factory trusses. While traditional rafters leave the central attic open, W-trusses web through the middle. Converting a trussed roof requires installing structural steel beams (RSJs) to support the load before those wood webs can be safely cut away.
Popular Dormer Styles and Architectural Choices
No two roofs are identical, and choosing the proper dormer layout depends heavily on your home's current roofline, local zoning limits, and space goals.
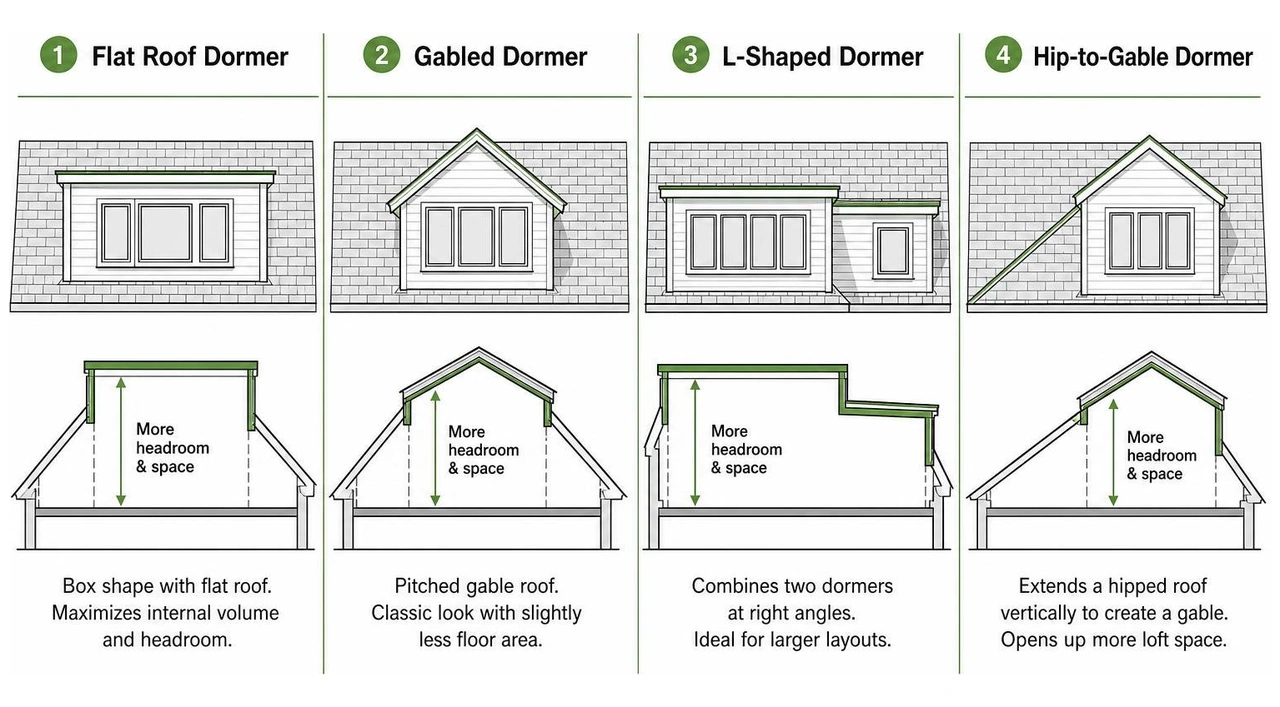
- Flat Roof Dormer: The most widely built dormer style. It features a box-like structure with a flat top slightly pitched for drainage. It delivers the absolute maximum internal volume, headroom, and floor area for your dollar.
- Rear Dormer: Constructed on the rear slope of the house, keeping the front facade completely untouched. This is ideal for maintaining neighborhood aesthetic appeal while maximizing space at the back.
- Gabled Dormer (Doghouse Dormer): Features a classic pitched gable roof sloping away on two sides. While it provides slightly less square footage than a flat roof box, its traditional triangular front adds charming character that perfectly matches historic or traditional homes.
- L-Shaped Dormer: Created by joining two dormers together—one over the main house roof and another over a rear outrigger extension. Common on Victorian and Edwardian properties, this design offers massive square footage (often up to 40 square meters), fitting two full rooms or a sprawling master suite.
- Hip-to-Gable Dormer: Ideal for homes with a hipped roof (where the roof slopes inward on all four sides). The sloping side edge (hip) is extended vertically into a vertical brick wall (gable), creating a much larger internal loft space that can then accommodate a grand rear dormer.

Matching Architectural Style to Your Home
Selecting the right style requires matching your dormer to your home's original architectural character. For instance, classic Cape Cod style homes across Long Island look stunning with double gabled front dormers, preserving historic street charm. Conversely, semi-detached or terraced homes usually opt for full-width rear flat-roof dormers to get every possible square inch of interior living space.
If you are evaluating whether to stretch an existing window cutout into a multi-room dormer space, explore our detailed advice on Extending dormer window layouts.
Exterior Materials and Cladding Options
The exterior cheeks (sides) and face of your dormer must be weatherproof, highly insulated, and visually integrated with the rest of your home:
- Fiber Cement & Composite Cladding: Extremely popular due to rot resistance, low maintenance, and a wide array of timber-look colors.
- Slate or Clay Tiles: Matching the existing roof shingles or slate tiles creates a seamless blend where the dormer appears built into the original house.
- Zinc and Metal Standing Seam Cladding: Offers a sleek, contemporary architectural aesthetic with exceptional durability lasting over 50 years.
- Glass Reinforced Plastic (GRP) / Fiber Glass Roofing: Applied to flat dormer roofs to create a seamless, leak-free membrane with a lifespan exceeding 20 to 25 years.
- Timber Cladding (Cedar or Larch): Adds natural warmth and modern texture, though it requires periodic staining or treatments over time.
Structural Engineering, Permits, and Regulations
Converting an attic involves far more than putting up drywall; it alters your home's structural framing and load distribution.
Original attic floor joists were built only to hold up ceiling drywall below—not furniture, plumbing fixtures, and people. A structural engineer must design a network of heavy-duty floor joists and steel I-beams (RSJs) resting on load-bearing internal walls or external party walls to support the new live load safely.
Before starting any cutting or framing, structural calculations are required. Learn how engineers design steel load points in this overview on Structural engineering calculations. For a complete step-by-step regulatory walkthrough, consult our Complete guide to dormer additions.
When planning your project, legal permissions and municipal codes vary based on construction parameters:
| Legal Pathway | Standard Criteria | Common Requirements |
|---|---|---|
| Permitted Development / Exemption Rights | Rear or side position; under 40m³ extra volume for terraced homes, or under 50m³ for semi-detached/detached homes; materials matching existing home; set back at least 200mm from eaves. | Lawful Development Certificate (LDC); compliance with energy codes and fire safety egress. |
| Full Planning Permission / Municipal Permits | Front-facing dormers on street elevations; homes in historic or conservation districts; dormer exceeding ridge height; structures on multi-family flats. | Formal architectural drawings; neighbor notification process; local zoning board approvals. |
In urban settings or attached properties, building codes also require compliance with shared wall regulations (such as Party Wall agreements) to protect structural integrity and soundproofing between adjoining homes.
Cost Analysis and Project Timelines
Understanding the financial investment and construction phase schedule ensures your dormer project runs smoothly from start to finish.
A typical standard rear flat-roof dormer build takes approximately 4 to 8 weeks on site, though complex L-shaped or hip-to-gable designs can extend up to 8 to 12 weeks.

- Phase 1: Scaffolding & Structural Framing (Weeks 1–2): External scaffolding is built; roof tiles are opened; steel beams (RSJs) and new floor joists are lifted into place. Weatherproof temporary plastic tarps or crash decks protect the lower levels.
- Phase 2: External Shell & Roofing (Weeks 3–4): Wall studs, dormer cheeks, window installation, outer cladding, and GRP flat roof membranes are completed to make the space 100% watertight.
- Phase 3: First-Fix Electrics, Plumbing & Insulation (Weeks 5–6): Internal wiring, heating ducts, ensuite plumbing lines, and high-performance rigid thermal insulation boards are fitted.
- Phase 4: Drywall, Plastering & Second-Fix (Weeks 7–8): Sheetrock installation, plastering, interior stair construction, door hanging, plumbing trim, and final electrical fix.

Budget Factors for a Dormer Window Loft Conversion
Average standard dormer conversions range between $45,000 and $75,000+ (or £35,000 to £65,000+ in UK standards), with high-end master suites equipped with luxury bathrooms topping $80,000+.
Primary pricing factors include:
- Structural Engineering and Steel Requirements: Heavy steel beams required for wider spans or truss roof removals increase structural material costs.
- Ensuite Bathrooms: Adding a bathroom adds $6,000 to $12,000+ for plumbing extensions, tiling, waterproofing, and fixtures.
- Staircase Placement: Designing a custom staircase that seamlessly matches your home's existing floorplan requires precision carpentry.
- Cladding and Glazing Upgrades: Custom floor-to-ceiling glass picture windows, sliding door panels, or zinc cladding command premium pricing over standard vinyl/composite materials.
For local pricing estimates tailored to New York and Long Island municipalities, review our comprehensive Long Island dormer cost breakdown.
Avoiding Common Project Pitfalls
Home expansion projects can stall if simple errors occur during planning. Here are four common mistakes to avoid:
- Unrealistic Timelines: Weather delays happen during roofing stages; build contingency padding into your schedule.
- Improper Attic Ventilation: Trapping air without proper ridge vents or soffit airflow leads to moisture buildup and condensation rot under roof decking.
- Undersized Insulation: High-performance insulation (like foil-faced rigid PIR board) is vital because attic rooms absorb high summer sun and cold winter winds.
- Ignoring Egress and Eaves Rules: Fire safety codes mandate proper egress windows or dedicated fire doors along stairwells for converted habitable lofts.
Maximizing Light, Space, and Storage Interior Designs
Once structural framing is complete, interior layout design is where your vision comes to life. To create an open, airy feeling, target a glazing ratio where window glass represents at least 15% to 20% of the room's total floor area. Combining a vertical dormer window with sloped roof skylights floods deep corners with daylight while providing cross-ventilation.
When planning interior zones:
- Master Suites: Position the bed frame along the flat dormer wall to maximize head clearance when getting up, reserving sloping eave angles for low furniture.
- Ensuite Bathrooms: Place full-height standing walk-in showers against the tallest dormer wall, positioning bathtubs or low vanities under sloped ceilings where lower height isn't an issue.
- Custom Eave Storage: Don't let low sloping eaves go to waste! Install bespoke push-to-open low cupboards, pull-out shoe drawers, or built-in clothes rails into awkward under-roof angles.
Gather visual layout inspiration and clever floorplans from these Creative dormer layout ideas. For detailed custom closet techniques, check out our favorite Clever dormer storage solutions.
Frequently Asked Questions about Dormer Loft Conversions
How much ceiling height is required for a loft conversion?
A minimum finished ceiling height of 2.2 metres (7.2 feet) measured from floor joists to ridge beam is recommended. After adding new floor joists, overhead insulation, and drywall, this leaves a comfortable 2.0 to 2.1 metres of finished standing headroom.
Do I need planning permission for a dormer addition?
Many rear flat-roof dormers fall under Permitted Development rights (or regional residential code exemptions) provided they do not exceed 40 to 50 cubic metres of added volume and remain below the existing roof ridge. However, front-facing dormers or homes in historic districts almost always require formal municipal planning permits.
How long does a typical dormer conversion take?
A standard dormer conversion generally takes between 4 and 8 weeks of on-site construction. Phase one structural roof work is usually complete and weatherproofed within the first 2 to 3 weeks, minimizing living disruption downstairs.
Conclusion
A dormer window loft conversion is one of the smartest home investments you can make—expanding your family's living footprint upward without sacrificing an inch of precious lawn or garden space below. By adding full standing headroom, generous natural daylight, and versatile square footage, an underutilized attic becomes your home's most popular room while yielding a powerful 15% to 25% bump in market value.
At Absolute Builders NY Inc, our dedicated partnership and precision craftsmanship ensure your home transformation moves smoothly from structural calculations to flawless interior finishes. Ready to unlock the true potential sitting under your roof? Transform your attic space with a dormer addition and let our team bring your vision to life.