
Master Your Dormer Window Installation Project from Start to Finish
Plan Your Dormer Window Installation the Right Way
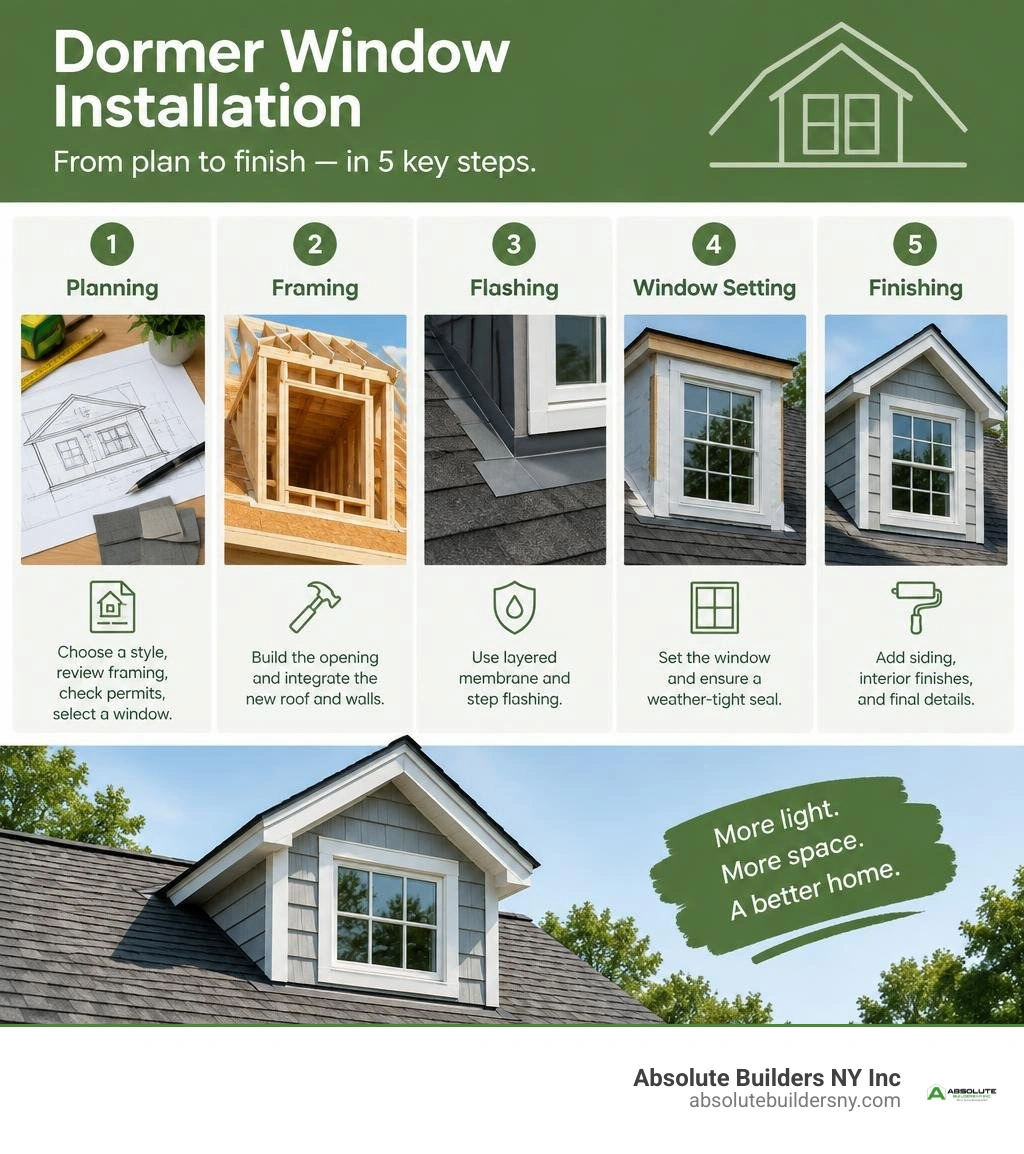
A successful dormer window installation starts with a sound plan, not a saw cut in the roof. First, choose a dormer style that suits your roof pitch and space goals. Next, have the existing framing reviewed, confirm local permit requirements, and select an energy-efficient window. Then frame the opening, integrate the new roof and walls, and use layered membrane and step flashing before siding and interior finishes.
A dormer is a roofed structure that projects from a sloped roof. It can turn a cramped, dark attic into a brighter room with more headroom, airflow, and usable floor space. But because the work changes roof framing and creates new roof-to-wall joints, careful engineering, weatherproofing, and skilled installation matter.
For Long Island homeowners, a well-designed dormer can also update an older layout while improving curb appeal. The key is balancing the new addition with the home's architecture and making water management a priority from the first design drawing.
I am Jacolyn Gleason, a public relations professional with experience translating complex home, wellness, and consumer topics into clear, practical content. In this guide to dormer window installation, I will help you understand the decisions, process, and risks to discuss with a qualified building professional.
Dormer window installation word guide:
Understanding Dormer Types and Window Styles
Dormers are often jokingly called "the eyes of your home," but they do far more than add visual interest. Adding a dormer creates vertical wall space in areas previously limited by sloping rafters, expanding usable square footage by up to 30%. Beyond extra headroom, a well-planned dormer brings cross-ventilation, expansive outdoor views, and an abundance of natural light to top-floor spaces.
Before cutting into roof sheathing, you must choose a dormer structure that matches your architectural profile and roof pitch. Familiarizing yourself with understanding what dormers are allows you to determine whether your goal is primary curb appeal, maximizing usable floor space, or creating an accent feature.
| Dormer Style | Optimal Roof Pitch | Primary Benefit | Recommended Window Match |
|---|---|---|---|
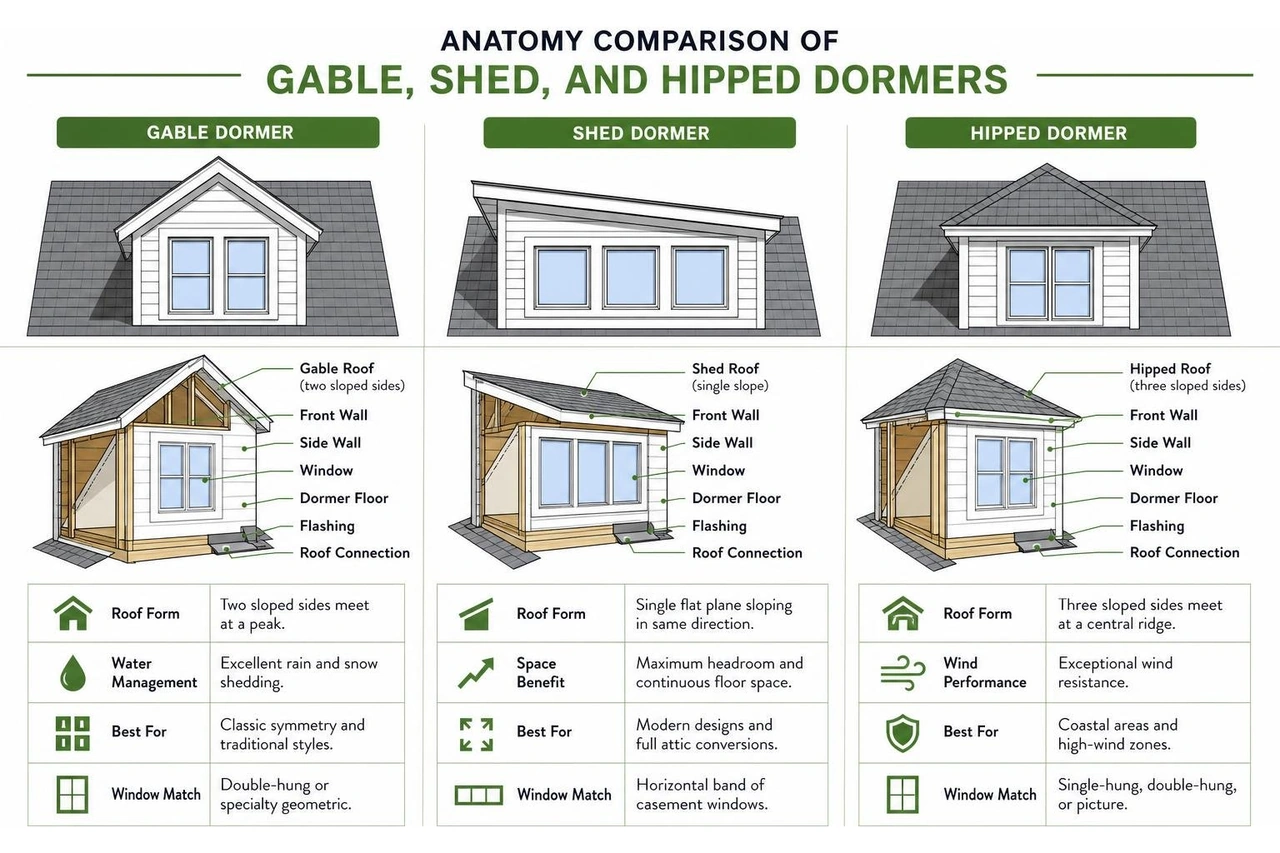
| Gabled Dormer | 8/12 or steeper | Classic symmetry, water runoff | Double-hung or specialty geometric |
| Shed Dormer | 4/12 to 8/12 | Maximum headroom, continuous floor space | Horizontal band of casement windows |
| Hipped Dormer | 6/12 or steeper | Multi-directional wind resistance | Single-hung, double-hung, or picture |
| Eyebrow Dormer | 6/12 to 9/12 | Soft, flowing architectural focal point | Custom curved, awning, or fixed |
Gable, Shed, and Hip Dormer Variations
Every dormer design serves a distinct structural and aesthetic purpose:
- Gabled Dormers: The quintessential choice for Cape Cod and colonial designs. Built with a classic triangular peaked roof, gable dormer framing sheds rain and snow effectively while enhancing exterior symmetry.
- Shed Dormers: Featuring a single flat roof plane sloping in the same general direction as the main roof (at a shallower angle), modern shed dormer designs are the gold standard for full attic conversions and expanding upstairs living areas.
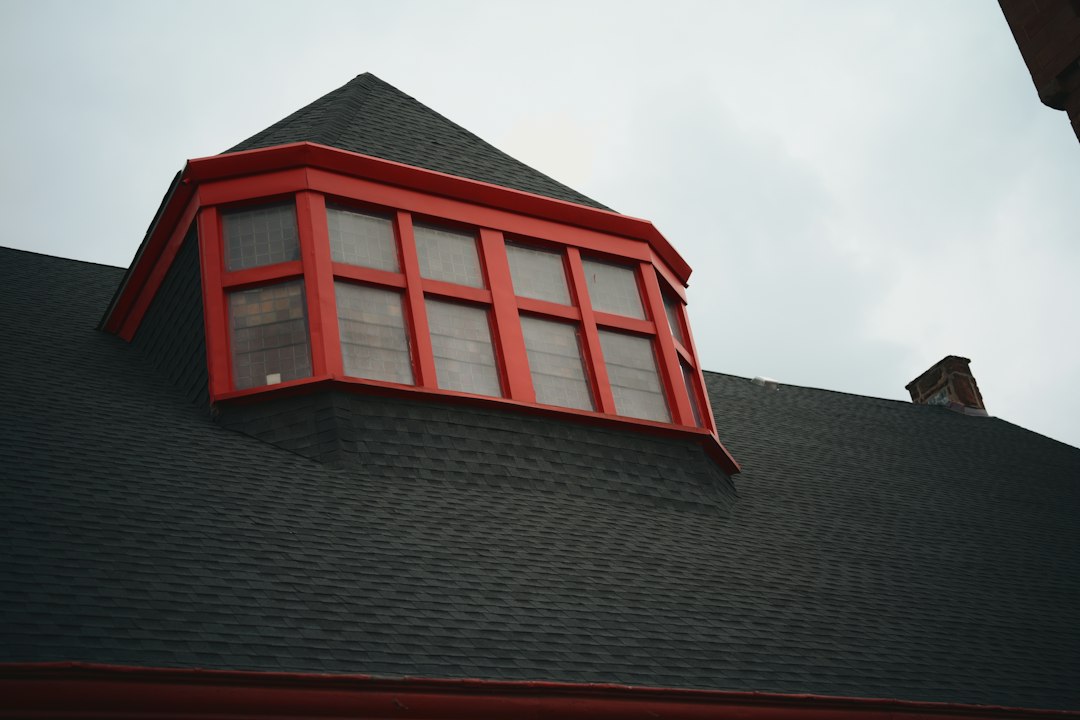
- Hipped Dormers: Incorporating three sloping roof planes that meet at a central ridge point, hipped variations offer exceptional wind resistance against coastal gusts across Massapequa and Bayville.
- Eyebrow and Curved Dormers: Providing a subtle, wavy roofline without sharp angles, eyebrow dormers resemble eyelids on a house, adding classic character without harsh vertical breaks.
- Side Dormers: Homeowners often explore side dormer window options to bring light into narrow upstairs hallways, stairwells, or compact bathrooms.
Homeowners sometimes confuse entire roof gables with dormer projections. When planning renovations, distinguishing dormers from gables is essential: a gable is the triangular end-wall of an entire pitched roof, whereas a dormer is a separate framed structure that juts out from the existing slope.
Choosing the Best Window Styles and Materials
Because dormers sit high on the roofline, they experience intense sun exposure, driving rain, and strong wind currents. Picking high-performance materials and functional window operating styles is vital:
- Casement Windows: Side-hinged units crank outward to catch passing breezes and funnel fresh air indoors. They compress tightly against weatherstripping when locked, making them exceptionally weather-tight for elevated exposures.
- Double-Hung Windows: Featuring upper and lower sashes that slide vertically, these traditional units preserve historic charm. Look for tilt-wash models so you can clean the exterior glass safely from inside the attic without setting up tall ladders outside.
- Picture Windows: Fixed glass maximizes daylight in reading nooks or accent dormers where active ventilation is handled by other openings.
For frame materials, vinyl and fiberglass are ideal choices. Vinyl offers low maintenance, moisture resistance, and solid thermal efficiency. Fiberglass provides high structural strength and minimal thermal expansion, keeping tight seals intact through hot summers and freezing winters. Pairing these frames with Low-E, multi-pane insulated glass helps keep upper-floor rooms comfortable year-round, creating the perfect foundation for functional dormer interior design ideas.
Costs, Permits, and Structural Planning
Installing a dormer is a major structural alteration requiring careful financial budgeting, engineering assessments, and local municipal permits. Nationally, building a dormer averages roughly $12,000, with typical projects running $120 per square foot. Most completed dormer additions deliver a strong 65% to 70% return on investment (ROI) by boosting usable living area, brightening upper levels, and enhancing overall resale value.
Estimating Costs and Budgeting for Dormer Window Installation in 2026
Actual project budgets cover a wide spectrum based on scale, structural requirements, and interior finishing:
- Single Compact Window Dormer: Costs generally fall between $2,500 and $10,000 for standard gable accents.
- Large Shed Dormer Additions: Extensive conversions spanning wide sections of roof typically run from $12,000 to $30,000 or more when incorporating multiple windows, insulation, electrical wiring, and custom millwork.
- False or Decorative Dormers: Non-functional decorative units that sit on top of roof sheathing without opening the attic space below generally cost between $65 and $90 per square foot (averaging around $5,300 for an 8' x 8' unit).
- Site Logistics: Budgeting for exterior access, scaffolding setups ($500 to $1,500), and job-site debris disposal is essential.
When assessing your overall budget, using an interactive dormer window cost calculator planning tool and reviewing attic remodel budgeting resources will help you estimate labor and materials accurately for your specific home layout.
Building Codes, Permitting, and Engineering Requirements
Modifying a roof requires cutting structural rafters, which changes load distribution across exterior walls. You must obtain formal building permits from your local building department across Suffolk County or Nassau County before work begins.
A licensed structural engineer or architect must calculate roof dead loads (shingles, rafters, drywall) and environmental live loads (heavy snow accumulations and wind pressures up to coastal design standards). Key requirements include:
- Trimmer and Header Sizing: Doubling or tripling surrounding rafters to carry the loads diverted by cut rafters.
- Fastening Schedules: Using heavy-duty hurricane-rated metal ties and framing anchors at every plate-to-rafter junction.
- Egress Compliance: If the dormer serves a bedroom, local building codes mandate minimum window opening dimensions (typically at least 5.7 sq. ft. of clear opening, with a minimum height of 24 inches and width of 20 inches) for emergency escape.
- Ceiling Clearances: Many local codes require at least 50% of the finished room ceiling to sit at or above 7 feet. In tight attics, planning roof elevation considerations may be necessary to meet legal height minimums.
Comprehensive Step-by-Step Dormer Window Installation Guide
Executing a structural roof cutout demands precision carpentry, rigorous fall protection, and thorough staging. Before breaking the roof plane, ensure you have all essential materials ready: a reciprocating saw, circular saw, pneumatic framing nailers, level, chalk lines, self-adhered waterproofing membrane, aluminum step flashing, 2x6 framing lumber, 1/2-inch exterior OSB sheathing, and manufacturer dormer kit assembly specifications if installing a prefabricated system.
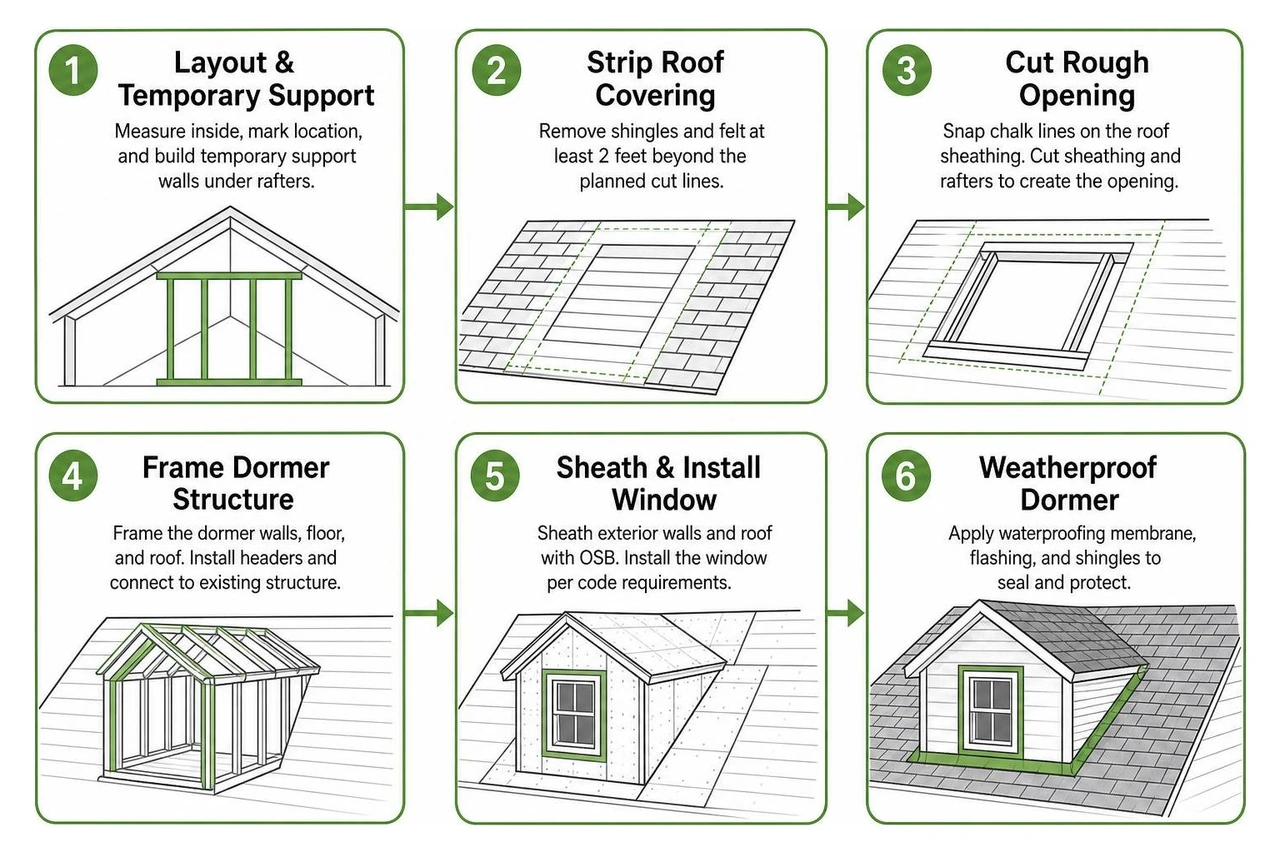
Preparing the Roof and Framing for Dormer Window Installation
- Interior Layout & Temporary Support: Measure and mark your dormer location from inside the attic. Before making cuts, build temporary 2x4 load-bearing support walls underneath the existing roof rafters to prevent sagging.
- Stripping the Roof Covering: Working from secured roof scaffolding, strip shingles and roofing felt at least 2 feet beyond your planned cut lines.
- Cutting the Rough Opening: Snap chalk lines on the roof sheathing. Cut through sheathing and rafters using a circular saw set to the exact sheathing depth, finishing rafter cuts with a reciprocating saw.
- Installing Trimmer Rafters & Headers: Reinforce the opening by doubling up the uncut rafters on both sides (forming side trimmers). Secure double horizontal headers across the top and bottom of the opening to support severed rafters.
- Erecting Side Walls: Build 2x4 or 2x6 vertical sidewalls on top of the doubled side trimmers. Plumb and brace each wall, securing the bottom plates with structural framing screws or 16-d galvanized nails.
- Setting the Ridge Board and Dormer Rafters: For a gabled design, mount the central ridge board between the front dormer wall and the upper header using structural metal hangers. Lay out common rafters at 16 or 24 inches on center, cutting plumb cuts at the ridge and birdsmouth notches over the side wall plates. For hands-on framing techniques, review framing a gable dormer structure and our DIY step-by-step roof framing guide.
Weatherproofing, Flashing, and Window Placement
Proper weatherproofing prevents structural water intrusion. Because dormer walls meet sloping roofs at sharp angles, layered water management is critical:
- Wall and Roof Sheathing: Fasten 1/2-inch exterior grade OSB or plywood to the dormer framing using 8-d common nails spaced every 6 inches along edges and 12 inches in the field.
- Waterproofing Underlayment: Wrap the entire dormer with housewrap, integrating it with a self-adhering, rubberized ice-and-water shield membrane. Extend this membrane at least 12 to 24 inches up dormer sidewalls and out onto the main roof deck.
- Installing the Window: Apply a thick bead of high-grade exterior polyurethane or silicone caulk along the window sill and side flanges. Slide the window into the rough opening, checking for square, level, and plumb. Shim the side jambs as needed and secure the unit through the exterior nailing flanges with corrosion-resistant screws.
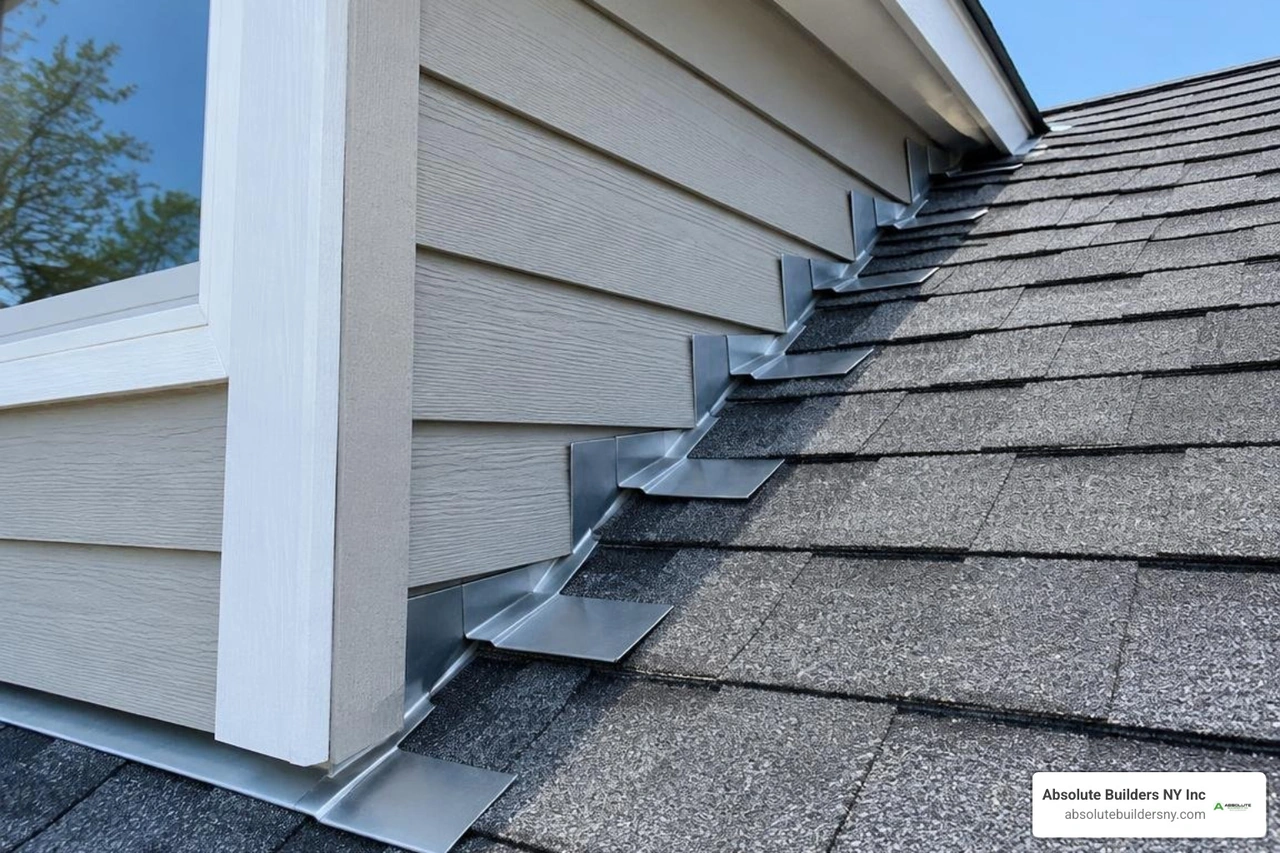
- Step Flashing Interleaving: Along both side walls where the dormer meets the main roof deck, install L-shaped metal step flashing (minimum 7" x 7" or 4" x 4" bent aluminum). Every single row of roof shingles must receive an overlapping piece of step flashing, nailed only to the roof deck—never to the dormer wall—to accommodate natural wood settling.
- Apron and Valley Flashing: Install an apron flashing across the front base of the dormer, overlapping the shingles below. Along the dormer roof intersections, lay continuous valley flashing channels to manage runoff.
- Sidewall Clearances: When applying exterior siding integration, maintain a 1-inch to 2-inch gap between the bottom edge of your siding and the roof shingles. This gap prevents water from wicking into siding ends and rotting the wall bottom plate.
Exterior Siding, Roofing, and Interior Finishing
With weatherproofing complete, focus shifts to completing exterior trim and interior finishes:
- Roof Shingle Integration: Shingle the dormer roof using materials that match the main house. Weave dormer valley shingles smoothly into the existing roof covering for clean drainage.
- Eaves, Fascia, and Soffit: Install matching fascia boards, drip edge metals, and vented soffits along dormer overhangs to ensure balanced attic air exchange.
- Interior Insulation: Proper roofline insulation prevents ice dams in winter and reduces attic heat in summer. Install dense-pack mineral wool or spray foam insulation that meets target R-values, following proven attic insulation methods to keep utility bills low.
- Drywall and Millwork: Hang 1/2-inch moisture-resistant drywall, apply joint compound, and trim out the interior window frame with custom wood casing. Build deep window sills, recessed bench seats, or custom dormer storage under the flanking side slopes to make the most of every square foot.
Post-Installation Care, Longevity, and Value Impact
A newly installed dormer window provides decades of dependable light and energy performance when properly maintained. Establishing a biannual maintenance routine preserves your investment:
- Spring and Fall Seal Checks: Inspect perimeter window caulking and exterior flashing seams for cracking, peeling, or sealant degradation. Re-seal gaps with premium exterior-grade sealants.
- Debris Removal: Clear out leaves, pine needles, and roof moss from side flashing channels and valleys. Blocked drainage paths can force pooling water beneath shingles during heavy storms.
- Interior Condensation Monitoring: If you notice moisture fogging between insulated glass panes, the factory seal may have failed, requiring sash replacement. Condensation forming on the interior glass surface indicates high room humidity; improve attic ventilation to protect surrounding trim.
A weather-tight, insulated dormer significantly reduces energy consumption on upper levels, keeping rooms comfortable whether you are converting attics to office space or creating a master bedroom suite. When hiring a contractor, confirm that your project is protected by comprehensive dormer warranty protections covering both structural framing and exterior waterproofing.
Frequently Asked Questions About Dormer Windows
Can I install a dormer window myself or should I hire a contractor?
While experienced DIYers can handle non-structural finishes, framing a new dormer requires cutting roof rafters, recalculating structural loads, and installing complex flashing. An error during framing or waterproofing can lead to sagging roof structures and costly water damage.
Furthermore, homes built with prefabricated engineered roof trusses should never be cut without an engineer's design, as modifying a truss web compromises the roof's structural integrity. Hiring a licensed, insured contractor ensures code compliance, structural stability, and watertight results.
How long does a typical dormer installation take?
A single gabled or hipped dormer installation generally takes 1 to 2 weeks from initial framing to final interior drywall:
- Days 1–3: Roof strip, structural framing, exterior sheathing, and dry-in waterproofing.
- Days 4–6: Window placement, flashing integration, roof shingles, and exterior siding installation.
- Days 7–10: Interior insulation, rough electrical, drywall hanging, taping, painting, and trim.
Large-scale rear shed dormers or full multi-room additions may require 3 to 6 weeks depending on project complexity and weather conditions.
Are dormer windows more vulnerable to roof leaks?
Dormers have a reputation for leaks only when improperly flashed. Because a dormer introduces multiple vertical-to-horizontal roof junctions, valleys, and wall corners, water will exploit any gap in the weatherproofing.
When installed with self-adhering membranes, interlaced metal step flashing at every shingle row, and an adequate siding-to-roof gap, a dormer is just as weather-tight and durable as any standard roof.
Conclusion
A thoughtfully planned dormer window turns underutilized, dark attic space into a bright, functional, and valuable living area. Success comes down to early planning: choosing the right architectural style, securing structural engineering and municipal permits, selecting weather-resistant window materials, and installing layered flashing.
At Absolute Builders NY Inc, we bring precision craftsmanship and dedicated partnership to homeowners across Long Island, Huntington, Westhampton, West Babylon, and surrounding communities. Whether you want to add a classic gabled accent or a full-width shed dormer to expand your second floor, our team delivers structural integrity and lasting beauty.
Ready to expand your upper level? Connect with our team to discuss your project and schedule a consultation for expert dormer addition and installation services today.