
Gable Dormer Framing Details Every Builder Needs to Know
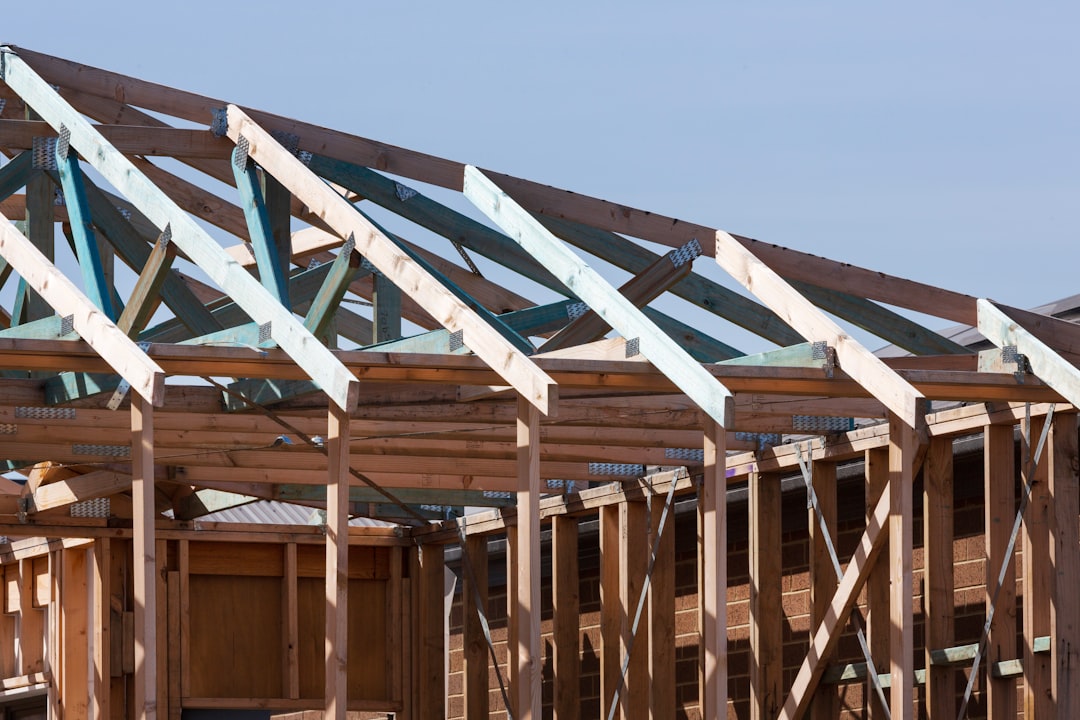
Build a Gable Dormer With a Safe, Continuous Load Path
Gable dormer framing starts with an engineered plan, reinforced roof opening, and a clear path for every new load to reach bearing walls or the foundation. Before cutting the roof, confirm permits, roof and floor framing capacity, header and trimmer sizes, window layout, and the dormer roof pitch. Then frame the opening, build the load-bearing side walls, install the ridge and valley rafters, and dry in the structure with sheathing, membrane, flashing, and roofing.
A gable dormer has a peaked roof with two sloping sides. Unlike a shed dormer, which carries much of its roof load at the front wall, a gable dormer transfers roof loads through its side walls and into reinforced rafters or supporting framing below. That difference makes the rafter cutout, doubled or tripled trimmers, headers, and point-load review especially important.
For Long Island homes, this is not a project to size by guesswork. Snow, wind, existing roof geometry, and any load from nearby valleys or dormers can change the structural design. A well-planned dormer can add light and roughly 30 square feet of standing headroom, but only if framing and weatherproofing are handled as one system.
I am Jacolyn Gleason, a public relations professional experienced in translating detailed home-improvement topics into clear, useful guidance for homeowners. In this guide to gable dormer framing, I focus on the planning and construction details that help turn an attic-expansion vision into a sound, weather-tight project.
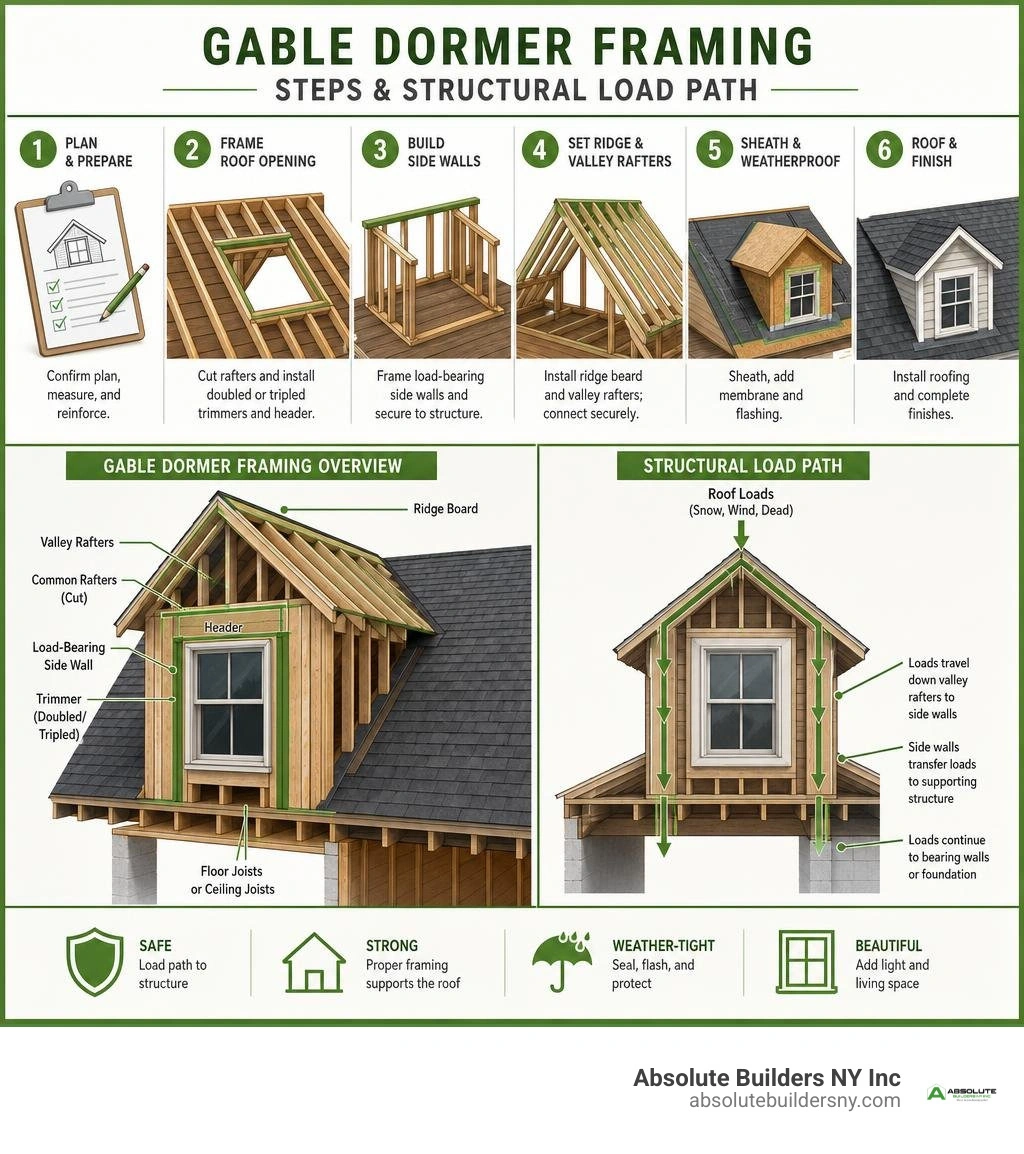
Gable dormer framing terms to remember:
Structural and Architectural Differences in Dormer Styles
When choosing how to expand an upper level, understanding what is the difference between a gable and a dormer helps clarify both architectural form and framing needs. A standard gable is a wall terminating in a peaked roof, whereas a dormer is a separate framed entity projecting out from an existing sloping roof deck.
The two most common styles are gable dormers and shed dormers. They behave completely differently from a structural engineering standpoint:
| Structural Feature | Gable Dormer | Shed Dormer |
|---|---|---|
| Roof Geometry | Dual-pitched A-frame roof meeting at a central ridge | Single sloped plane falling in one direction |
| Primary Load Distribution | Side cheek walls carry the roof load onto trimmer rafters or floor framing | Front wall bears the downward roof load onto floor joists or bearing walls |
| Framing Complexity | Higher (valley rafters, valley jacks, compound bevel cuts) | Lower (straight rafter runs tied into the main roof or ridge) |
| Architectural Impact | Traditional curb appeal, classic symmetry, balanced roof massing | Maximized interior volume, wide horizontal pop-out profile |
| Usable Space Added | ~30 sq. ft. of vertical headroom per dormer unit | Up to full-room expansion across large roof widths (12–20+ feet) |
Many homeowners across Nassau and Suffolk counties choose a classic architectural balance: installing multiple gable dormers across the front facade for traditional curb appeal, while building a shed dormer or a full rear dormer along the back of the house to maximize living space for master suites, home offices, or extra bathrooms.
Structural Load Path and Sizing in Gable Dormer Framing
Because a gable dormer carries roof weight across its two sloping sides, the loads travel directly down into the dormer’s sidewalls (often called cheek walls). These sidewalls rest either directly on doubled or tripled trimmer rafters in the roof or down on reinforced attic floor joists.
In classic carpentry practices outlined in Framing Gable and Shed Dormers, maintaining a continuous load path down to bearing walls and the foundation is essential. Severing existing common rafters to make room for a dormer creates interrupted spans. The weight carried by those cut rafters must be transferred sideways through double upper and lower headers into the adjacent trimmer rafters.
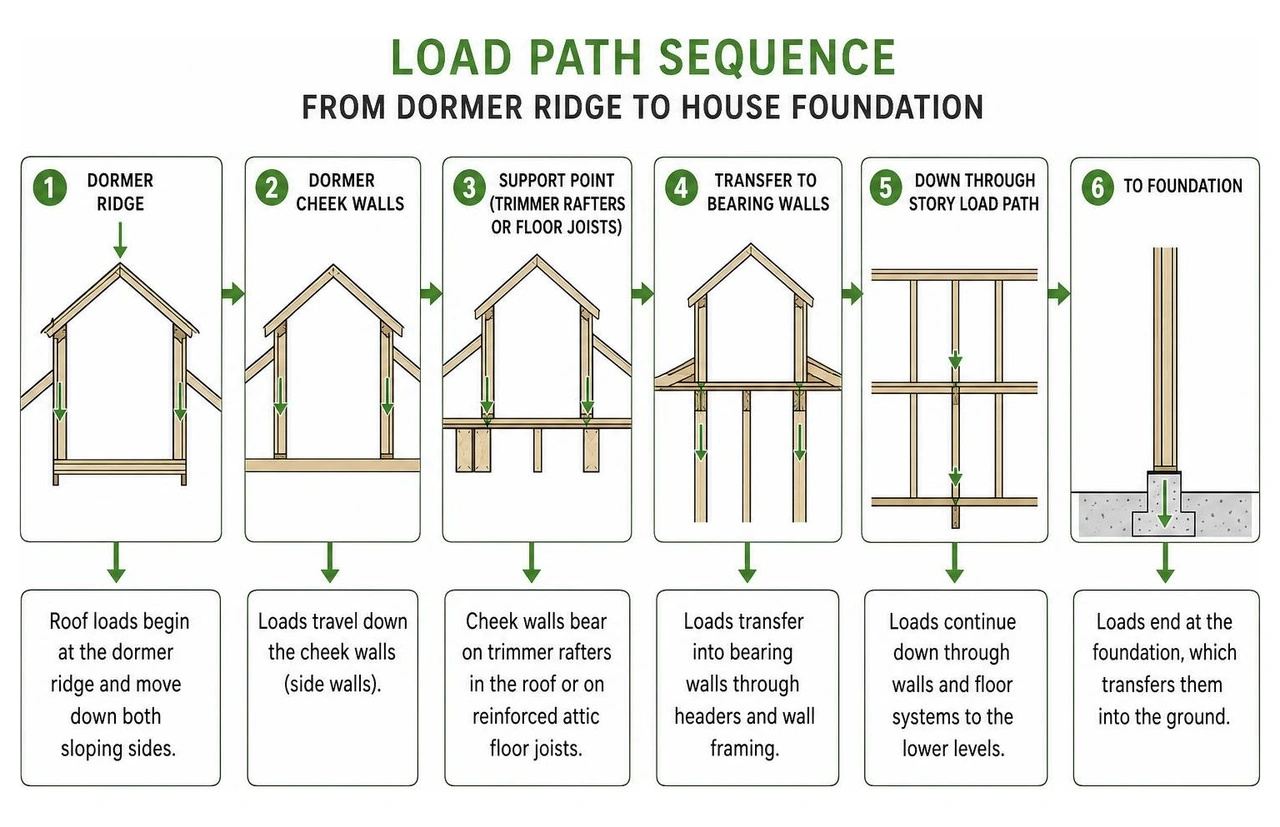
If the dormer walls bear on floor joists rather than roof rafters, the underlying floor framing must be evaluated to ensure it can resist both the dead load of the structure and regional live snow loads without excessive deflection.
Architectural Proportions and Roof Slope Matching
The most common visual mistake in dormer construction is making the dormer too large, creating a top-heavy look that overpowers the lower facade. Right-scaled dormers maintain symmetry and restraint.
Key design rules of thumb include:
- Roof Pitch: Match the main roof pitch (commonly 8-in-12 to 10-in-12). For classical pediment-style dormers, pitches can drop lower (down to 5-in-12) to create an elegant architectural accent.
- Trim and Rakes: Reduce exterior dormer trim by 10% to 25% and scale rake overhang depths down by 25% to 50% compared to the main roof trim to prevent bulky shadow lines.
- Window Sizing: Scale dormer windows down by 10% to 25% relative to first-floor windows while keeping the same aspect ratio.
- Sill Clearance: Frame the dormer window sill so that it sits at least 2 inches above the finished roof deck. This prevents snow and ice accumulation at the base and blocks wind-driven rain from penetrating the sill.
These proportion rules are especially valuable when adapting a dormer ranch style house, where rooflines sit lower to the ground and dormers are visible from street level.
Step-by-Step Guide to Gable Dormer Framing

Framing a gable dormer requires careful coordination. Having materials staged, cuts calculated, and weather protection ready ensures the framing process runs smoothly from rough cut to dry-in.
Essential Tools and Structural Materials for Gable Dormer Framing
Having the right tools and materials on site before cutting into the roof deck saves time and protects the home from unexpected weather changes:
- Lumber: 2x4 or 2x6 framing lumber for wall studs and plates; 2x6, 2x8, or 2x10 dimensional lumber or engineered LVL beams for headers, trimmers, and valley rafters.
- Hardware: Simpson Strong-Tie framing connectors, double joist hangers, hurricane ties, and 16d common and 8d sheathing nails.
- Tools: Circular saw, reciprocating saw, framing nailer, 4-foot level, framing square, chalk line, plumb bob, and personal fall arrest harnesses with secure roof anchors.
- Underlayment: 1/2-inch or 5/8-inch CDX plywood or OSB sheathing, self-adhering ice-and-water shield, drip edges, and step flashing tins.
Cutting Rafters and Installing Doubled Structural Trimmers
- Layout and Interior Prep: Snap layout lines inside the attic on the floor and underside of the roof framing. Before cutting any structural members, install temporary 2x4 shoring walls beneath the rafters to carry roof loads.
- Sistering Trimmer Rafters: Double or triple the common rafters running along both sides of the planned opening. Nail them securely with 16d nails spaced 16 inches on center.
- Roof Cutout: From the exterior, strip shingles back past the work area. Plumb up from floor layout marks and snap chalk lines. Cut through the roof sheathing from bottom to top using a circular saw set to the exact sheathing depth.
- Severing Rafters: Cut out the existing common rafters within the dormer opening using a reciprocating saw, leaving adequate space for the double headers at the top and bottom.
- Header Installation: Fit double structural headers at the top and bottom of the opening between the reinforced trimmer rafters. Fasten headers using double shear joist hangers. As detailed in practical tutorials like How to Frame a Gabled Dormer (DIY) | Family Handyman, beveling the top edge of upper headers to match the roof pitch creates a flush surface for roof sheathing and interior wallboard.
Erecting Front Cheek Walls, Ridge Board, and Valley Rafters
- Stand the Front Wall: Pre-assemble the front wall on the floor with window rough openings, king studs, and jack studs. Stand the wall, plumb corners with a level, and brace it temporarily with 2x4s.
- Cheek Wall Framing: Fasten bottom plates to the reinforced trimmer rafters or floor framing. Install plumb studs spaced 16 inches on center, cut to fit beneath the sloped top plates.
- Ridge Board Installation: Erect a temporary center post to hold the dormer ridge board at the proper height. Secure the ridge board level from the front gable wall back to the upper roof header using metal hangers.
- Rafter and Valley Layout: Build a rafter cutting jig to cut common dormer rafters at the required pitch (spaced 24 inches on center). For valley rafters, lay out cuts using a 17-inch run ratio with a 45-degree compound bevel.
- Sheathing and Tie-In: Fasten 1/2-inch plywood sheathing to the cheek walls and dormer roof using 8d nails spaced 6 inches on edges and 8 inches in the field. Alternatively, frame a blind valley by laying sleeper plates directly over the existing sheathing to tie the dormer roof into the main roof plane without cutting open a true valley.
Critical Weatherproofing, Flashing, and Building Code Requirements
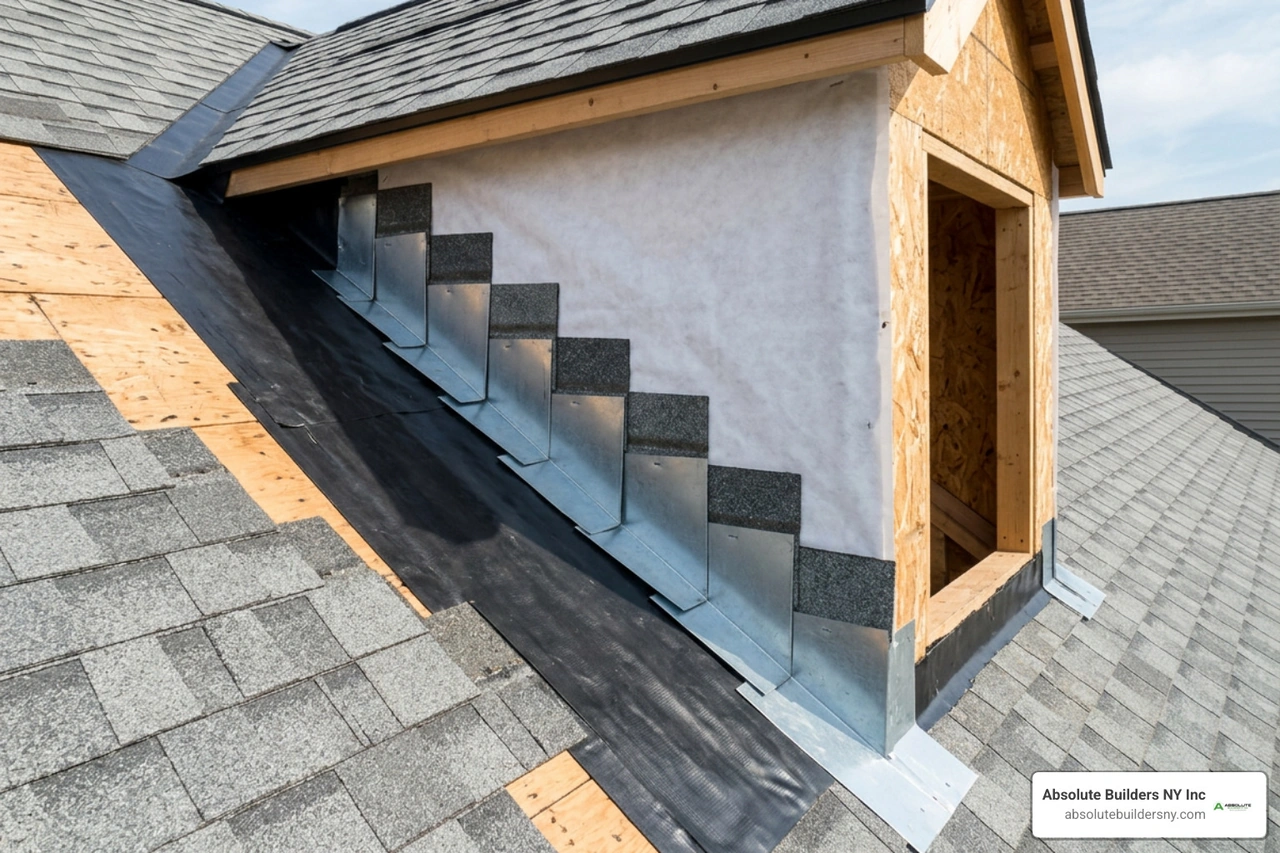
Water management is the most critical phase of dormer construction. When water flows down the main roof, it encounters the vertical cheek walls and valleys of the dormer. Always follow the golden rule of roofing: overlap materials from the bottom up so water sheds away naturally.
- Ice-and-Water Membrane: Apply a 36-inch wide strip of self-adhering waterproof membrane up each dormer valley and extend it at least 24 inches up the cheek walls and 24 inches onto the roof deck.
- Step Flashing: Install individual L-shaped metal step flashing tins with every course of shingles along the cheek walls. Each piece must overlap the lower one by at least 2 inches and be fastened to the roof deck, not the wall studs, to accommodate settling.
- Counter Flashing and Housewrap: Lap exterior housewrap over the upright legs of the step flashing. Install counter-flashing over siding transitions to create a redundant moisture barrier.
- Dill Pan Flashing: Install a continuous sill pan under the dormer window rough opening to catch any moisture that gets past window casing joints.
Emergency Egress and Window Sizing Standards
When framing a dormer for a habitable bedroom or a dormer window loft conversion, local building codes enforce strict emergency escape and rescue opening (egress) standards:
- Net Clear Opening: Minimum 5.7 square feet of openable area (reduced to 5.0 sq. ft. for grade-floor windows).
- Minimum Dimensions: Minimum clear opening height of 24 inches and minimum clear opening width of 20 inches.
- Sill Height: Maximum 44 inches from the finished attic floor to the bottom of the clear opening.
Carpentry Tip: A window measuring exactly 20 inches by 24 inches yields only 3.33 square feet, failing egress code. Standard double-hung windows only open half their area at a time. To fit egress requirements within a narrow dormer opening, install an out-swinging casement window styled to match double-hung proportions.
Attic Ceiling Height and Energy Code Insulation
For an attic conversion to be legally considered habitable space under residential building codes, review our dormers guide homeowners 2026 for updated space requirements:
- Ceiling Height: Habitable rooms must provide at least 7 feet 6 inches of ceiling height over at least 50% of the required floor area. Ceilings sloping down below 5 feet cannot be counted toward minimum room square footage.
- Insulation Values: Vaulted dormer ceilings generally require R-30 to R-38 insulation, while vertical cheek walls require R-19 to R-21.
- Ventilation: Maintain a 1-inch continuous air gap above batt insulation using ventilation baffles, allowing air to flow freely from exterior soffits to the dormer ridge vent to prevent summer heat buildup and winter ice dams.
Frequently Asked Questions About Gable Dormers
How long does it take to complete rough gable dormer framing?
Basic rough framing for a single gable dormer typically takes a professional two-person crew approximately four continuous days to reach a fully weathertight, dried-in stage. Finishing the interior insulation, drywall, trim, windows, and exterior siding usually spans several additional weekends for DIYers or one to two weeks for dedicated finish carpenters.
How much headroom and usable space does a gable dormer add?
A standard gable dormer measuring roughly 6 feet wide and set back 2 feet from the exterior wall adds approximately 30 square feet of usable standing headroom. Beyond square footage, it brings natural daylight, cross-ventilation, and functional floor space for desks, reading nooks, or egress windows.
What size header is required when cutting roof rafters for a dormer?
Header sizing depends on the dormer width and local design snow loads:
- Spans up to 4 feet: Double 2x8 headers
- Spans 4 to 6 feet: Double 2x10 headers
- Spans 6 to 8 feet: Double 2x12 headers
- Spans over 8 feet: Triple 2x12 headers or engineered structural LVL beams
Always verify local structural load requirements with an engineer or municipal building department before purchasing structural lumber.
Conclusion
Framing a gable dormer is one of the most rewarding home improvement projects, transforming dark, cramped attics into bright, livable rooms while adding exterior character. Achieving a long-lasting dormer requires careful structural load calculations, precise rafter cuts, and water-shedding flashing assemblies.
At Absolute Builders NY Inc, we specialize in precision carpentry and custom dormer additions across Long Island, including Huntington, Massapequa, Westhampton, Bayville, and surrounding Nassau and Suffolk County communities. Whether you are planning a single architectural gable dormer or a full upper-level conversion, our team brings dedicated partnership and craftsmanship to every roofline.
Ready to transform your home with a beautiful, structurally sound dormer addition? Reach out to our team today to discuss our expert dormer addition services and schedule an on-site consultation.