
Practical Advice for Planning Your First Dormer Bathroom Addition
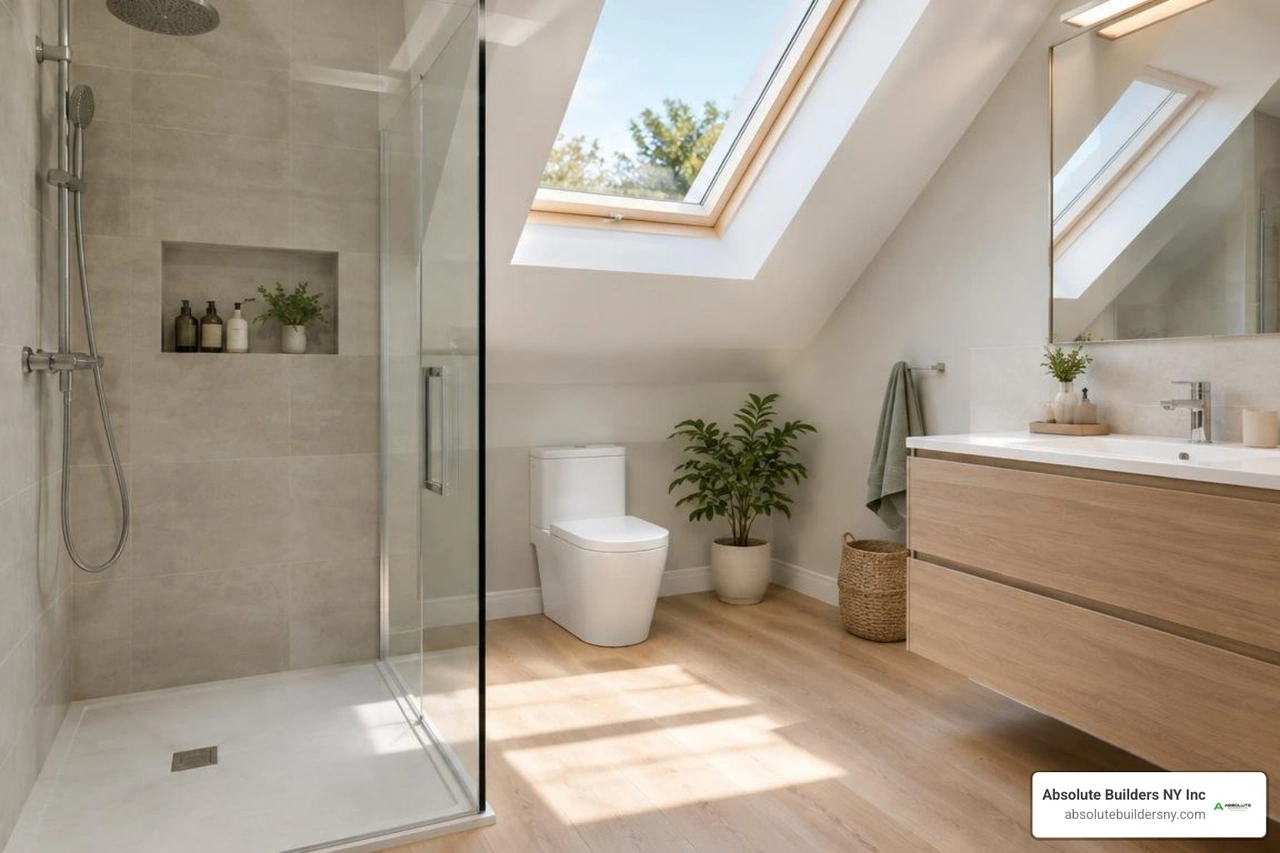
Plan Your Dormer Bathroom Around the Space You Can Use
For a dormer bathroom addition, check three things before choosing fixtures: finished headroom, floor strength, and a workable route to the main waste stack. Put the shower where the ceiling is tallest, and use lower space for a tub or storage. Have a local contractor review the layout, structure, and permits before you commit to a design.
I’m Jacolyn Gleason, a public relations professional who makes complex planning topics easier to understand. In this dormer bathroom addition guide, I’ll help you frame the right questions for qualified local pros.

Dormer bathroom addition terminology:
Structural Codes and Feasibility: Can Your Attic Support a Bath?
Before falling in love with brass fixtures or freestanding soaking tubs, you have to determine whether your roof framing and floor system can safely handle the physical realities of a functioning bathroom. An attic is often built only to keep the ceiling below from sagging and to hold light storage boxes, not to bear the concentrated weight of plumbing, subflooring, tile, and water.
Under the International Residential Code (IRC), habitable rooms and attic bathrooms must maintain a minimum ceiling height of 7 feet over at least 50% of the usable floor area. Spaces with ceiling heights below 5 feet cannot be counted toward the required floor area calculations. Reviewing an attic dormer addition guide helps clarify how ceiling slopes intersect with code standards.
When converting upper levels, floor deflection limits are equally critical. Ceramic and stone tile require rigid subflooring—typically an L/360 deflection rating—to prevent movement that cracks grout and breaks waterproof membranes. Following a technical structural guide for attic dormers ensures your project incorporates proper framing, continuous vapor retarders, and adequate subfloor thickness before decorative work begins.
Structural Feasibility for a Dormer Bathroom Addition
Standard unfinished attic floor joists are typically engineered to support a live load of just 10 to 20 pounds per square foot (psf). In contrast, building codes mandate that residential bathroom floors support a minimum of 40 psf live load. Consider that a standard cast-iron or acrylic bathtub filled with water and an adult occupant easily exceeds 1,000 pounds. Concentrating that weight onto undersized 2x6 framing spaced 24 inches on center will cause severe structural sag or catastrophic failure.
To meet code, we reinforce existing framing by "sistering" joists—fastening new full-length 2x8 or 2x10 lumber directly alongside the existing joists—or by installing structural Laminated Veneer Lumber (LVL) beams. When framing a gable dormer, bridging and solid blocking must also be installed between joists to distribute rotational forces and eliminate floor bounce.
| Floor Application | Typical Design Load Capacity | Framing Requirements | Primary Risk Factors |
|---|---|---|---|
| Unfinished Attic Storage | 10–20 psf Live Load | 2x6 lumber @ 24" O.C. | Ceiling drywall cracking below, floor bounce |
| Standard Habitable Room | 30 psf Live Load | 2x8 lumber @ 16" O.C. | Mild deflection under heavy furniture |
| Dormer Bathroom (Standard) | 40 psf Live Load | Sistered 2x8 or 2x10 @ 16" O.C. | Tile/grout failure if deflection exceeds L/360 |
| Luxury Bath with Soaking Tub | 40+ psf Concentrated Load | Engineered LVL beams / double sistering | Structural sag under 1,000+ lb point loads |
Dormer Roof Types and Framing Strategies
The structural style of your dormer dictates both your exterior curb appeal and interior layout flexibility:
- Shed Dormer: A shed dormer features a single roof plane sloping in the same general direction as the main roof but at a much shallower pitch. Shed dormers provide the greatest interior volume, maximizing vertical wall space and ceiling height from wall to wall.
- Gable Dormer: A classic gable dormer has a pitched, triangular roof with two sloping sides. While visually symmetrical and traditional, it creates interior valley slopes on both sides, making fixture placement tighter.
- Full Rear Dormer: A full rear dormer extends across nearly the entire width of the home's rear roofline. This option maximizes headroom, allowing you to design a spacious full bath alongside an adjacent primary bedroom suite.
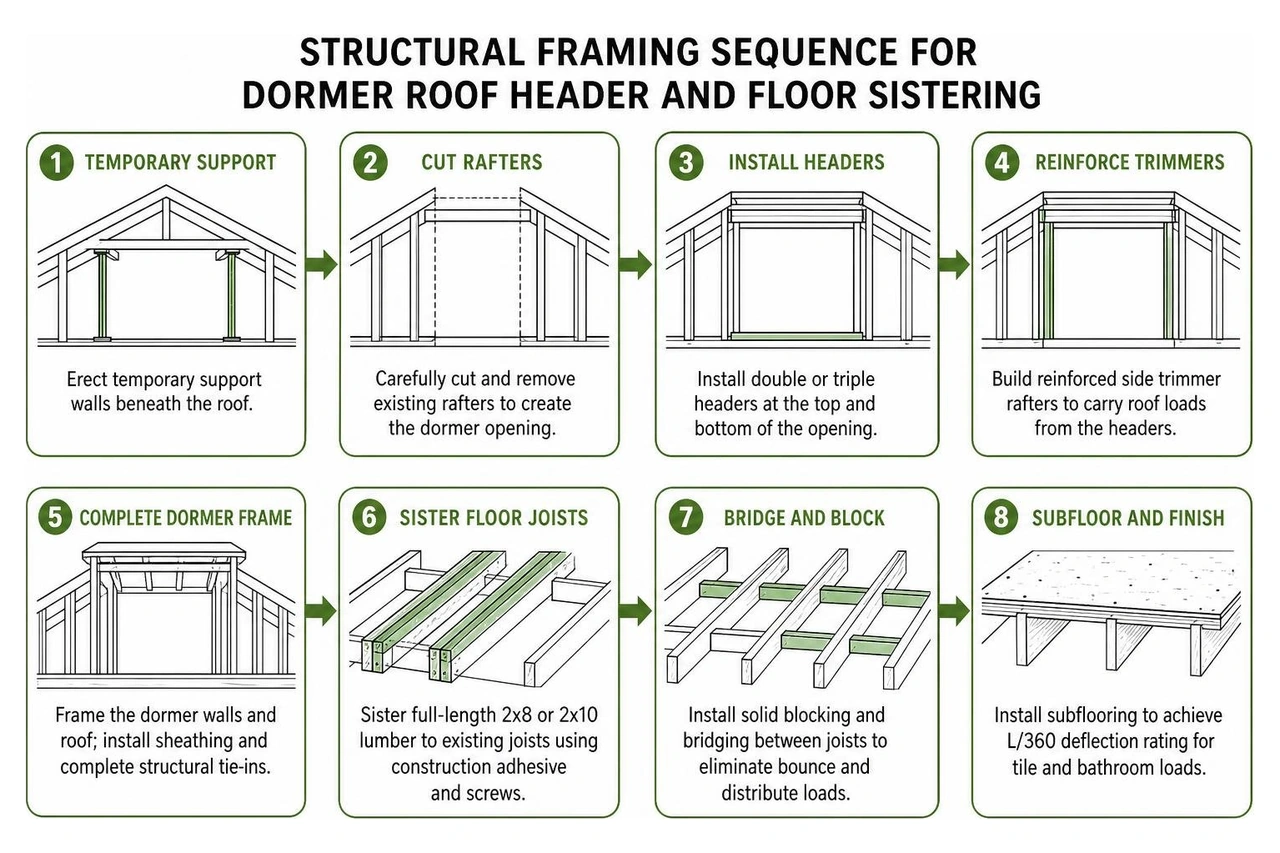
Framing an opening into an existing roof requires cutting multiple structural rafters. Before these cuts occur, temporary support walls are erected beneath the roof. Double or triple headers are installed across the top and bottom of the opening to carry the interrupted roof loads out to reinforced side trimmer rafters, preserving the structural integrity of your home.
Smart Layout Strategies for Sloped Ceilings and Eaves
Designing within the unique geometry of a roof pitch requires working with the slopes rather than fighting them. By integrating knee walls—short vertical walls (typically 3 to 5 feet tall) that wall off the lowest triangular wedge where the roof meets the floor—you transform unusable tight spots into functional assets.

Explore creative dormer interior design tactics to turn lower eave spaces into visual highlights. You can incorporate built-in shelving, low storage drawers, or recessed medicine cabinets by studying clever dormer storage ideas. Natural day-lighting from dormer windows or venting skylights expands the perceived volume of small rooms, as demonstrated in this architectural case study on dormer bathroom design.
Optimizing Fixture Placement Under Slopes
A comfortable bathroom layout aligns specific human movements with the ceiling's slope profile:
- Low Eaves Zone (Under 5 to 6 feet): Place freestanding tubs or standard soaking tubs beneath the lowest ceiling sections. Because you are sitting or reclining when using a bathtub, full standing height is not required across the entire length of the tub. Low eaves are also prime locations for low linen cabinetry, towel bins, and plumbing access panels.
- Mid-Height Zone (6 to 7 feet): Position toilets and vanities in this transition zone. When standing at a sink or rising from a toilet, you need comfortable vertical clearance directly above your head, but the wall behind the fixture can taper downward. Consider pocket doors here to save the 8 to 10 square feet usually consumed by swinging doors.
- Maximum Height Zone (7+ feet): Reserve the tallest portion of the dormer exclusively for the stand-up shower. The IRC mandates a minimum headroom of 80 inches (6 feet 8 inches) directly at the showerhead and over a minimum floor area of 30 by 30 inches.
To bring ample natural light and ventilation into these spaces, review our dormer window installation guide for window placement strategies.
Ventilation, Moisture Control, and Insulation
Upper-level bathrooms are vulnerable to heat buildup in summer and moisture condensation in winter. Moisture trapped in roof rafter cavities leads to mold and rot.
A dedicated mechanical exhaust fan vented directly through the roof or dormer sidewall to the exterior is mandatory—never exhaust bathroom air into an unconditioned attic space. Size your exhaust fan at a minimum rate of 1 CFM per square foot of room area (or 75–100 CFM minimum for smaller dormers). Incorporating proper dormer vent installation maintains healthy airflow across all roof planes.
For thermal performance, dormer roof cavities require high R-value insulation in compact depths. Applying high-density closed-cell spray foam insulation delivers roughly R-6.5 to R-7 per inch, providing both thermal resistance and an air/vapor barrier. This is critical for regional climate control, as detailed in our guide to attic insulation. Before tiling, line shower enclosures with waterproof backer board and sealed waterproofing membranes (such as Schluter Kerdi) to lock out moisture.
Plumbing and Drainage Systems Under the Roof
Plumbing is often the most intricate part of an upper-story addition. Water supply lines enter under pressure, but drainage relies entirely on gravity, requiring precise downward slopes within floor joist spaces.
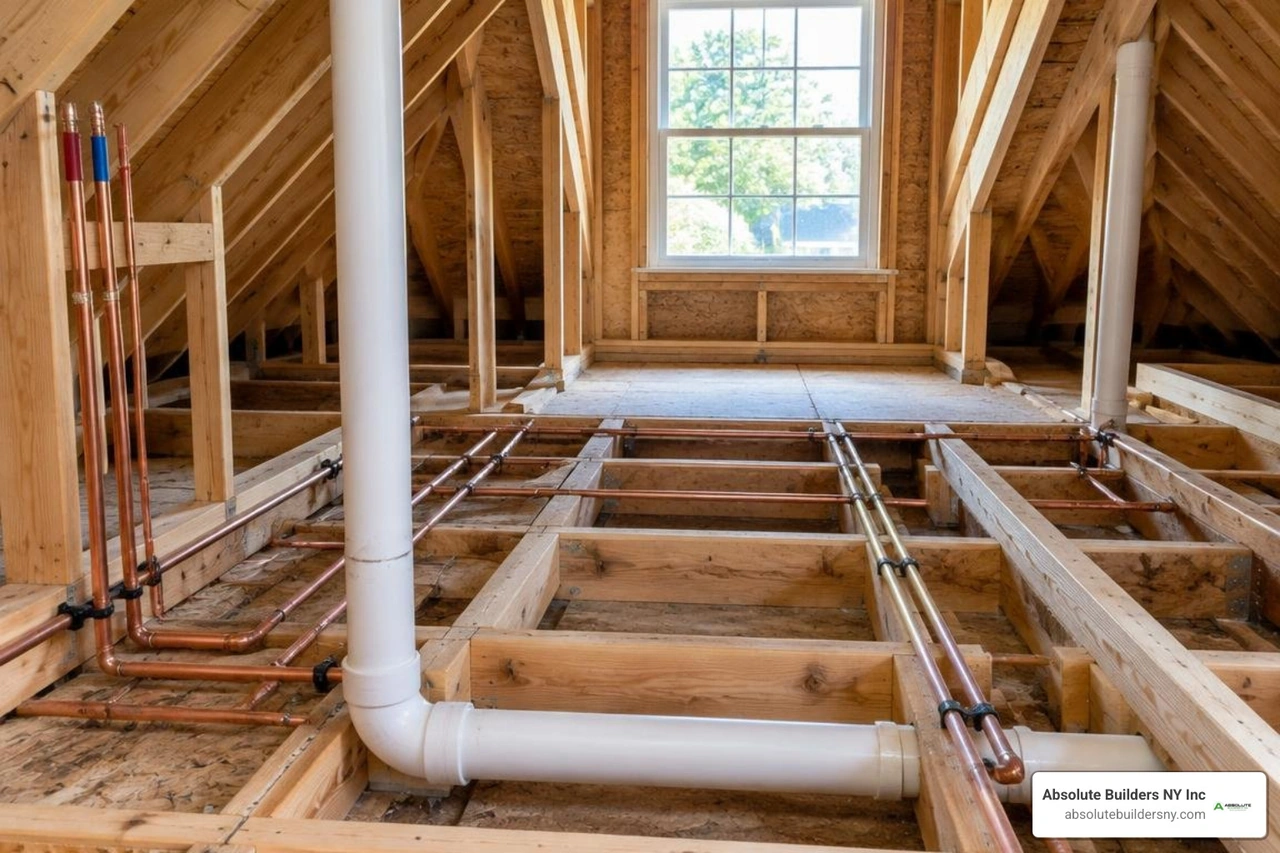
Aligning your new upper bathroom directly above an existing lower-floor "wet wall" (a wall containing kitchen or first-floor bathroom plumbing) keeps installation straightforward. When fixtures stack vertically, branch drains can tie directly into the primary 3-inch or 4-inch soil stack with short pipe runs. As water travels upward, pressure drops approximately 0.43 PSI per foot of vertical elevation; verifying adequate incoming main pressure ensures your new second-floor shower maintains invigorating flow.
Plumbing and Drainage Planning for a Dormer Bathroom Addition
All horizontal drainage pipes must maintain a consistent downward pitch of 1/4-inch per linear foot toward the main waste stack. If your dormer bathroom is positioned 12 feet away from the stack, the drain line will drop 3 full inches over that distance. This slope must fit inside the floor joist depth without requiring excessive drilling or notching that weakens framing members.
Every plumbing fixture also requires atmospheric venting through the roof to prevent trap siphoning and sewer gas intrusion. Electrical wiring must include at least one dedicated 20-amp branch circuit serving GFCI-protected countertop outlets, while flexible PEX tubing simplifies supply routing through tight attic framing.
Gravity Drain vs. Macerating Toilet Systems
If your dormer is located far from the main waste stack (over 20 to 25 feet), running a 3-inch gravity drain with adequate slope across floor joists may be structurally impossible without lowering the ceilings below. In these situations, an upflush macerating toilet system offers an effective solution.
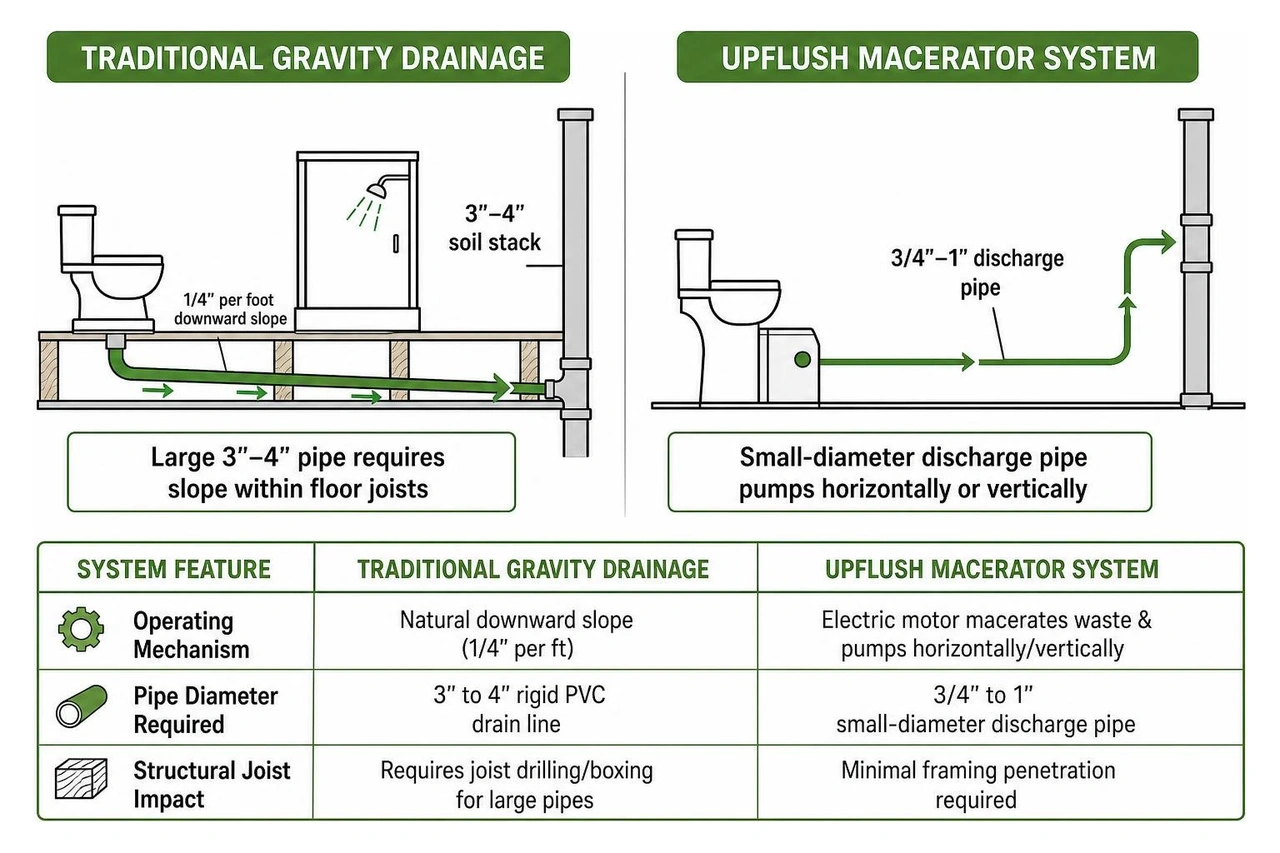
| System Feature | Traditional Gravity Drainage | Upflush Macerating System |
|---|---|---|
| Operating Mechanism | Natural downward slope (1/4" per ft) | Electric motor macerates waste & pumps horizontally/vertically |
| Pipe Diameter Required | 3" to 4" rigid PVC drain line | 3/4" to 1" small-diameter discharge pipe |
| Structural Joist Impact | Requires joist drilling/boxing for large pipes | Minimal framing penetration required |
| Long-Term Reliability | Exceptional; zero mechanical parts to fail | Moderate; pump motor requires power and eventual service |
| Operational Noise | Quiet water flow | Brief electric motor hum during flushing |
| Installation Suitability | Best when located near existing wet walls | Best when fixtures sit far from the main stack |
While traditional gravity systems are preferred for long-term simplicity, modern macerating units reliably handle waste from toilets, sinks, and showers through small-diameter discharge lines when gravity routing isn't feasible.
Cost Breakdown and Budgeting for a Dormer Bathroom Addition
Across the United States, dormer bathroom projects generally range from $25,000 to $95,000, with an overall national average of $45,000. On a unit basis, costs range between $180 and $450 per square foot, driven by structural framing scope, plumbing distances, and interior finish selections.
To understand how complete attic overhauls factor into overall home planning, review our attic remodel cost complete guide along with localized data in our dormer addition cost guide.
Because opening an existing roof and tying into older mechanical systems can uncover framing anomalies or outdated wiring, always maintain a 15% to 20% contingency reserve in your budget.
Cost Drivers and Budget Scenarios
Your choice of bathroom layout directly impacts labor hours (which typically range from 120 hours for compact half-baths to over 360 hours for custom primary suites):
- Half Bath (Powder Room: 5x5 ft): $8,000 – $14,000. Includes toilet, compact vanity, framing tie-ins, and basic ventilation.
- Three-Quarter Bath (Stand-Up Shower: 5x7 to 6x8 ft): $14,000 – $28,000. Includes prefabricated shower pan, glass door, vanity, toilet, and standard ceramic tile.
- Full Bath (Tub/Shower Combo: 8x10 ft): $18,000 – $35,000. Features structural floor reinforcement, full-size tub, surround tile, and double vanity.
- Luxury Primary Wet Room / Spa (10x12 ft+): $22,000 – $40,000+ (can reach $75,000–$95,000 with high-end framing). Features curbless walk-in shower, freestanding soaking tub, radiant heated floors, and custom tile work.
Regional Pricing and Practical Ways to Save
Regional labor markets and climate requirements influence total investment levels. In the Northeast and coastal metro areas, skilled trade rates ($75–$125/hour) and complex snow-load engineering push budgets 10% to 25% higher than in Southern or Midwestern regions.

You can trim costs without compromising safety or structural integrity:
- Use Prefabricated Shower Bases: Choosing a high-quality acrylic shower base instead of a hand-poured, custom-tiled mortar pan saves significant labor costs.
- Standardize Tile Patterns: Straight-lay or standard subway tile installations cost less in labor than intricate herringbone or mosaic patterns.
- Align Near Wet Walls: Placing fixtures directly above lower-floor plumbing lines minimizes horizontal pipe runs.
- Schedule During Shoulder Seasons: Booking projects during late autumn or winter can sometimes secure better scheduling availability.
For a broader perspective on home modifications, read our comprehensive dormer addition complete guide.
Permitting, Timelines, and Resale ROI
Adding a dormer bathroom alters your home’s roofline, structural framing, and mechanical infrastructure. Consequently, building, plumbing, and electrical permits are mandatory. Licensed municipal building inspectors will examine the project at several critical milestones:
- Framing Inspection: Confirms proper header sizing, rafter tie-ins, and joist sistering before insulation covers the framing.
- Rough Mechanical/Plumbing Inspection: Verifies drain line slopes, vent stack penetrations, pressure tests, and electrical rough-ins.
- Insulation Inspection: Checks continuous thermal barriers, vapor retarders, and baffles.
- Final Inspection: Verifies finished fixtures, GFCI operation, working ventilation, and safety clearances before issuing a Certificate of Occupancy.
An active dormer bathroom build typically takes 2 to 6 weeks of on-site construction once framing begins. Weather conditions, permit review timelines, and inspection scheduling can influence the overall calendar.
From an investment standpoint, converting underutilized roof space into a finished bathroom via an attic conversion ranks among the highest-return interior remodeling projects, typically recouping 55% to 70% of its cost at resale. More importantly, adding a second- or third-story bath eliminates morning routines bottlenecks and makes upper-level living spaces significantly more practical.
Frequently Asked Questions about Dormer Bathroom Additions
What is the minimum ceiling height required for a dormer shower?
Under the International Residential Code (IRC), a shower stall must have a minimum finished ceiling height of 80 inches (6 feet 8 inches) measured directly at the showerhead. This vertical clearance must extend over a minimum interior floor area of 30 inches by 30 inches to ensure safe, comfortable standing room.
Can my existing attic floor support a soaking tub?
Standard, unmodified attic floors are typically framed with 2x6 joists engineered for light storage loads of 10 to 20 psf. A standard bathtub filled with water and an occupant can weigh between 800 and 1,200 pounds, requiring a floor system rated for at least 40 psf live load. You will need a structural engineer or licensed builder to calculate load paths and reinforce the floor by sistering joists or installing engineered LVL beams before adding a tub.
How long does it take to complete a dormer bathroom project?
A dormer bathroom addition generally requires between 120 and 360 skilled labor hours. The physical build phase typically takes 2 to 6 weeks, depending on dormer size and finish complexity. Total project time from initial design sketches and architectural permitting through final inspection usually spans 6 to 12 weeks.
Conclusion
Planning your first dormer bathroom addition unlocks valuable living space within your home's existing footprint. By prioritizing structural floor capacity, maintaining code-mandated ceiling clearances, and planning plumbing drainage paths early, you can avoid costly mid-project changes and create an upper-level retreat that adds lasting everyday convenience and real market value.
When you're ready to explore structural options for your home, partner with experienced builders who understand the engineering requirements of roof alterations. Reach out to Absolute Builders NY Inc to explore our professional dormer addition services and begin planning your addition today.