
Stop Crouching Upstairs and Frame a DIY Shed Dormer
Build a DIY Shed Dormer for More Upstairs Headroom
A DIY shed dormer can turn a cramped attic into brighter, more usable space by replacing part of a sloped roof with a vertical wall, windows, and a single-slope roof. It is usually simpler than a gable or hip dormer, but it is still a major structural project.
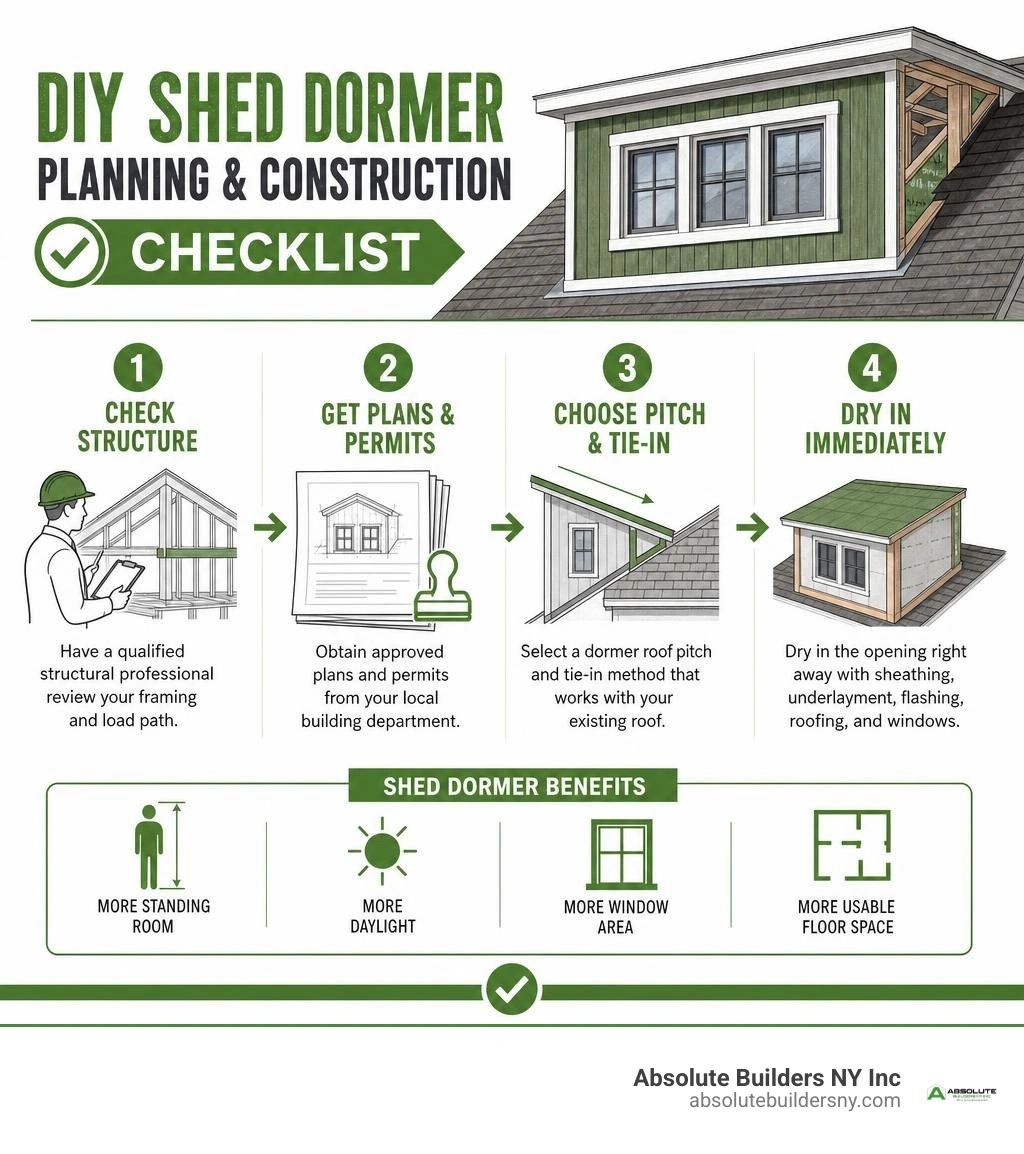
Before cutting anything, take these steps:
- Have the existing rafters, ridge, floor framing, and load path reviewed by a qualified structural professional.
- Get approved plans and permits from your local building department.
- Choose a dormer roof pitch and tie-in method that works with the existing roof.
- Plan to dry in the opening immediately with sheathing, underlayment, flashing, roofing, and windows.
A well-designed shed dormer adds the things many Long Island one-and-a-half-story homes lack: standing room, daylight, window area, and usable floor space. The key is not simply making the dormer wide. It is transferring roof loads correctly and creating layered flashing details that keep wind-driven rain out.
I am Jacolyn Gleason, a public relations professional experienced in translating technical home-improvement topics into clear, practical guidance. For this DIY shed dormer guide, I focus on the planning, structural decisions, and construction steps homeowners should understand before work begins.
Simple guide to diy shed dormer:
Planning, Codes, and Architectural Feasibility
Tackling a dormer project requires balancing grand design ideas with the hard reality of structural physics. Before you buy lumber or strip shingles, you need to understand how cutting into your roof deck shifts structural loads onto existing walls, ceiling joists, and your foundation.
A proper structural assessment starts in the attic. You must inspect the health of your existing roof rafters, the thickness of the subfloor, and whether the ceiling joists below can handle the live loads of an active bedroom or office. In many older 1.5-story homes across Nassau County and Suffolk County, roof framing was designed solely to shed snow and rain—not to support finished living spaces. Reviewing our DIY home addition plans guide can help you organize the design phases before submitting paperwork.
Local municipal building codes dictate everything from minimum ceiling heights to emergency egress window sizing. If you intend to convert attic volume into a legal bedroom, building codes mandate a minimum finished ceiling height (typically 7 feet over at least 50% of the usable floor area) alongside specific window opening dimensions for egress.
You must submit complete architectural drawings—including floor plans, cross-sections, and structural framing spans—to your local town building department to secure valid permits. Architectural balance is equally important; studying the architectural rules for designing shed dormers will ensure your new roof addition complements your home’s existing proportions rather than overwhelming the roofline.
Planning and Designing Your DIY Shed Dormer Project
Careful spatial planning makes the difference between an attic addition that feels like a natural extension of your home and an awkward, boxy afterthought. When setting your dormer's dimensions, factor in exterior setbacks. Holding the dormer cheek walls back from the house gable ends by anywhere from 16 inches to several feet preserves the visual roof plane and keeps the home looking grounded.
One proven layout method is snapping full-scale chalklines directly onto the attic subfloor before demolition. By drawing your existing roof pitch, the new dormer wall height, the proposed dormer rafter slope, and the window rough openings on the plywood subfloor, you can work out exact cuts and verify proportions. Check out our comprehensive attic dormer addition guide for deeper insights into spatial optimization.
When laying out your front wall height, ensure your window headers sit roughly 80 to 84 inches above the subfloor. This places the windows at standard room height and leaves at least 4 to 6 inches of vertical clearance between the exterior windowsill and the roof plane below for step flashing.
Understanding Roof Pitches and Tie-in Options
A critical structural decision is choosing how the high end of the shed dormer roof connects to the main house. You have two primary options: tying directly into the main roof ridge or framing into a header below the ridge line.
| Feature / Detail | Ridge-Tied Shed Dormer | Below-Ridge Header Tie-In |
|---|---|---|
| Connection Location | Fastens directly to the main structural ridge board/beam. | Fastens to a horizontal structural header below the ridge. |
| Framing Complexity | Simpler rafter alignment; fewer intermediate support cuts. | More complex; requires doubling common rafters and cutting cripples. |
| Practical Dormer Width | Nearly unlimited, constrained only by ridge beam load capacity. | Best for dormers up to 6 feet wide unless heavily engineered. |
| Thrust Management | Minimal outward push if ridge is fully structural. | Requires strong collar ties to prevent wall push-out. |
| Aesthetic Profile | Creates a unified top roofline; changes ridge height slightly. | Preserves the main roof ridge line for architectural hierarchy. |
Roof pitch is equally vital. Standard architectural asphalt shingles require a minimum roof slope of 4-in-12 (4 inches of vertical rise per 12 inches of horizontal run) to ensure water sheds effectively. If your shed dormer roof pitch drops below 4:12 due to ceiling height constraints, you cannot use standard shingles; you must switch to a specialized low-slope membrane system like self-adhered modified bitumen or standing seam metal roofing.
When tying into a non-structural ridge, you must install horizontal collar ties across the upper third of the rafters. These ties lock the new dormer rafters to the existing rafters on the opposite roof slope, counteracting the outward horizontal thrust that pushes against the dormer's front exterior wall.
Step-by-Step DIY Shed Dormer Framing and Construction
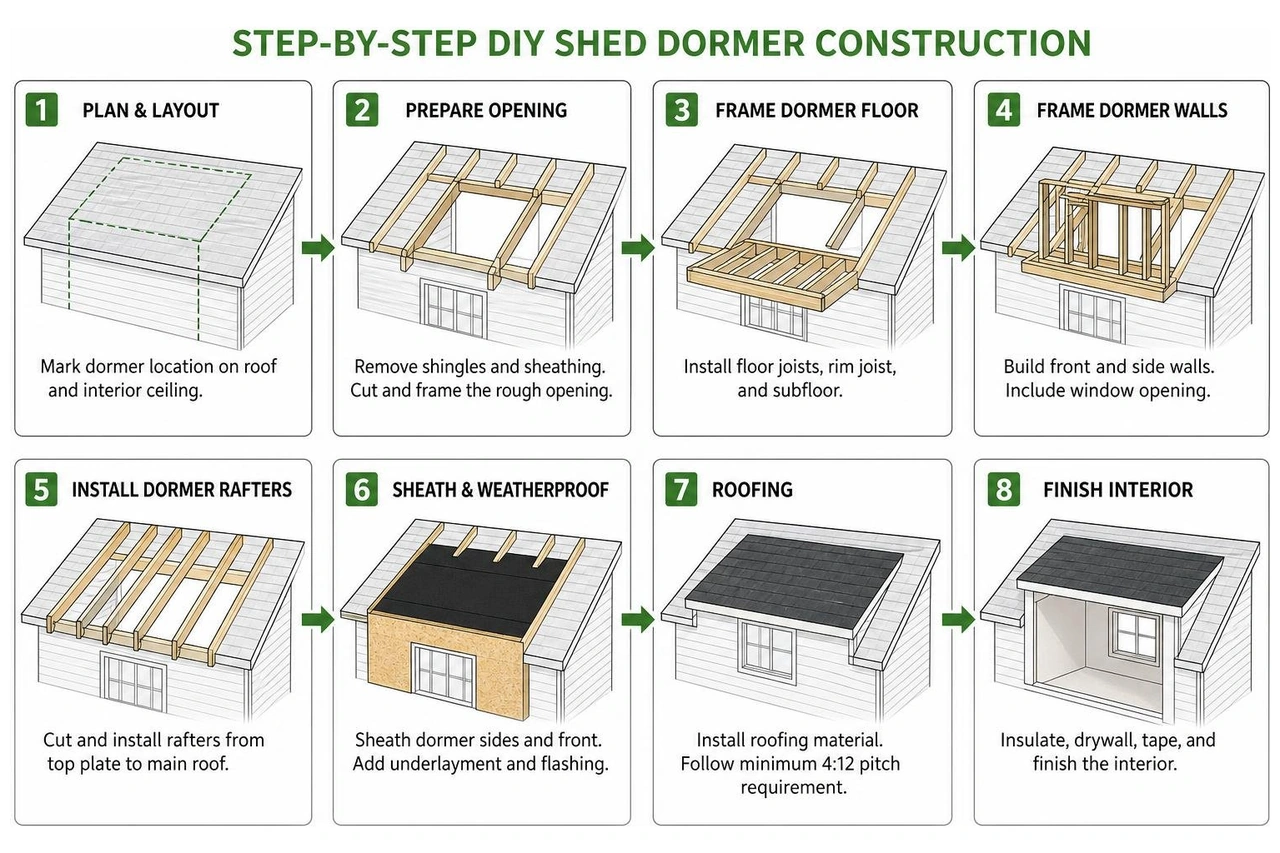
Framing a classic shed dormer requires steady carpentry, strict adherence to load paths, and solid temporary bracing. When you cut through existing rafters, you temporarily compromise the structural integrity of your roof deck. Following a verified classic shed dormer framing guide guarantees you maintain structural support at every phase of the build.
Essential Tools and Lumber for a DIY Shed Dormer
Having the right framing lumber, structural fasteners, and safety gear organized on-site before cutting will keep your build safe and efficient:
- Framing Lumber: Dimensional #2 SPF (Spruce-Pine-Fir) or Douglas Fir lumber (typically 2x4 or 2x6 for exterior walls; 2x6, 2x8, or 2x10 for roof rafters depending on span and insulation requirements).
- Engineered Lumber: Laminated Veneer Lumber (LVL) beams for oversized window headers and main structural opening headers.
- Sheathing Panels: 1/2-inch or 5/8-inch CDX plywood or OSB rated for exterior roof and wall shear.
- Structural Hardware: Metal hurricane ties, joist hangers, rafter ties, structural framing screws, and 16d common framing nails.
- Carpentry Power Tools: Heavy-duty circular saw, reciprocating saw with bi-metal demo blades, miter saw, and a pneumatic 21-degree or 30-degree framing nailer.
- Layout Tools: 24-inch carpenter's level, magnetic torpedo level, framing square with stair gauges, chalk line, and heavy-duty tape measures.
- Fall Protection & Safety Gear: OSHA-compliant full-body harness systems, roof anchor brackets, heavy-duty safety ropes, hard hats, work gloves, and eye/ear protection.
Cutting Roof Openings and Erecting Dormer Walls
- Install Temporary Shoring: Inside the attic, construct a temporary 2x4 support wall underneath the rafters you plan to cut. Wedge this wall tightly between the attic floor joists and the rafters roughly 12 to 18 inches outside your planned cut lines.
- Strip the Exterior Shingles: Strip the roofing shingles and underlayment from the work area, exposing the roof sheathing at least 12 inches beyond your cut lines on all sides.
- Cut the Deck and Rafters: Snap chalklines along your cut boundaries. Use a circular saw set to the exact depth of the sheathing to remove the decking. Switch to a reciprocating saw to cut cleanly through the exposed structural rafters.
- Double the Trimmer Rafters: Sister full-length rafters immediately adjacent to both sides of the rough opening with matching dimensional lumber. Nail these doubled trimmers together with two rows of 16d nails spaced every 12 inches.
- Install the Lower Header: Insert a doubled structural header between the doubled trimmers at the bottom of the rough cut. Secure it with heavy-duty metal joist hangers. This header supports the tail ends of the cut rafters and provides a level base for your dormer's front wall.
- Frame and Stand the Front Wall: Build the front window wall flat on the attic subfloor. Space wall studs 16 inches on center, framing your rough window openings with doubled jack and king studs beneath properly sized headers. Stand the wall, check for plumb with a 6-foot level, and secure it to the lower header. Lean the front wall slightly inward—about 1/8 inch—before fastening temporary diagonal braces; the weight of the new roof rafters will push it perfectly plumb as the framing settles.
- Frame the Side Cheek Walls: Nail a continuous bottom plate along the top of the doubled outer trimmer rafters on both sides. Plumb up from this bottom plate to the underside of the outer dormer shed rafters, cutting individual stud heights to match the pitch angle of the main roof.
Framing Rafters, Headers, and Ridge Connections
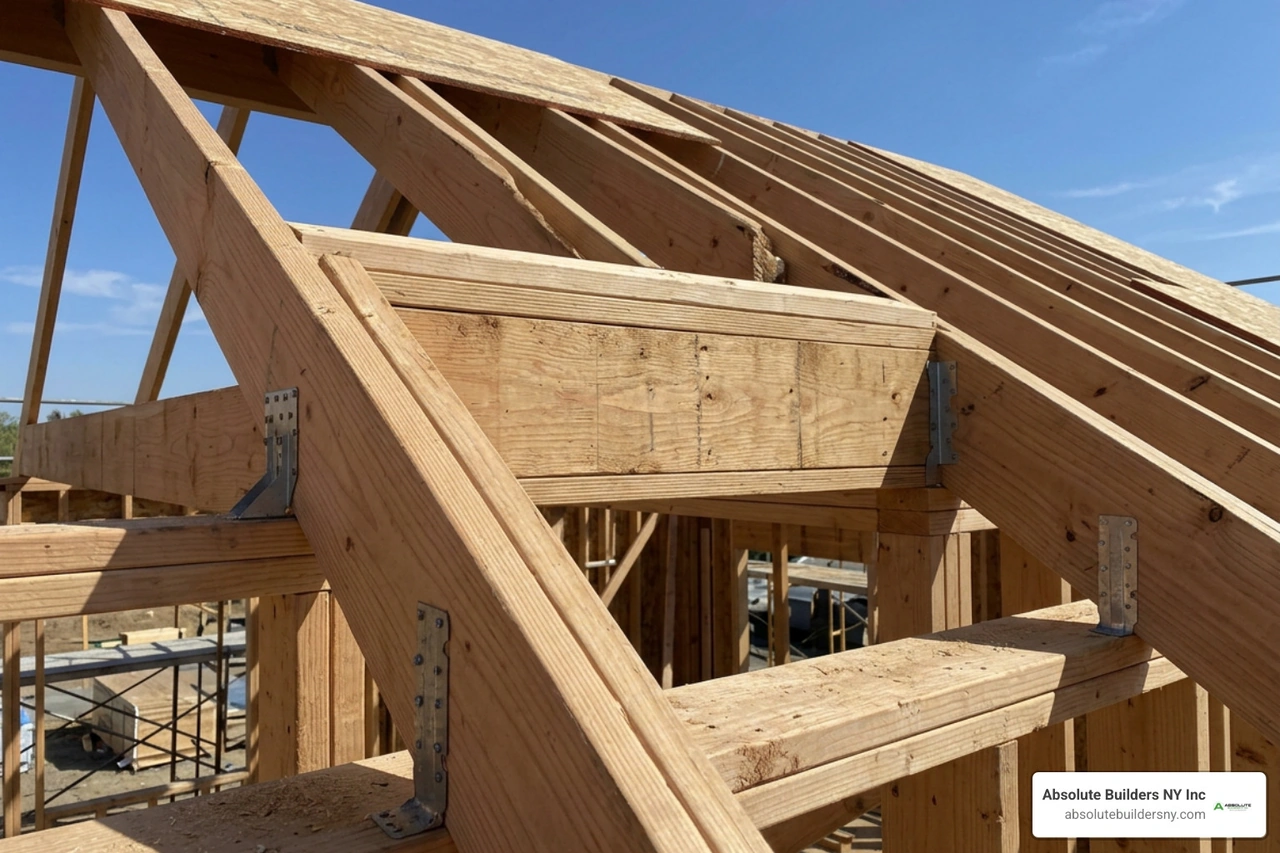
Once your dormer front wall and cheek walls are secured and diagonally braced, you can frame the single-slope shed roof. While similar to framing a gable dormer, shed dormer rafters span continuously in a single plane from the high tie-in point down to the front wall.
Cut a test pattern rafter from a straight board. At the top end, make a plumb cut matching your calculated dormer slope to seat cleanly against the ridge board or upper header. At the bottom end, cut a bird's mouth notch—consisting of a level seat cut that rests across the full width of the front wall top plate and a plumb heel cut that bears against the outside edge of the plate. Test-fit this pattern rafter at both ends and the middle of the dormer span to check for framing variations before cutting the rest of your rafters.
Install the shed rafters at 16 inches on center. Fasten each rafter to the top plate using metal hurricane ties (such as Simpson Strong-Tie H2.5A clips) and structural framing screws. If your dormer ties into an upper header below the main ridge, run short cripple rafters from the top of that header up to the existing ridge board at 16-inch intervals to support the remaining upper roof deck.
Finally, sheathe the cheek walls with 1/2-inch CDX plywood before applying roof sheathing. Cut the top edge of the cheek sheathing roughly 1/4 inch short of the rafter tops; this expansion gap prevents the cheek wall plywood from pushing upward against the roof deck as framing lumber naturally dries and settles.
Weatherproofing: Underlayment, Flashing, Siding, and Roofing
Once your framing is complete, you must immediately dry in the structure. An unsealed roof cutout leaves your home vulnerable to sudden rainstorms and interior water damage.
Begin weatherproofing by installing self-adhering ice and water protection membrane along all roof valleys, eaves, and dormer-to-roof junctions. Cover the dormer roof deck with heavy-duty 30 lb asphalt-saturated felt or synthetic roofing underlayment, overlapping each horizontal run by a minimum of 4 inches and end laps by 6 inches. Fasten the underlayment with plastic-capped roofing nails to seal fastener penetrations.
Installing Step Flashing and Valley Waterproofing
The intersection where the vertical dormer cheek walls meet the sloped main roof is the most vulnerable point for water intrusion on the entire house. This junction requires layered metal step flashing rather than a single continuous piece of metal.
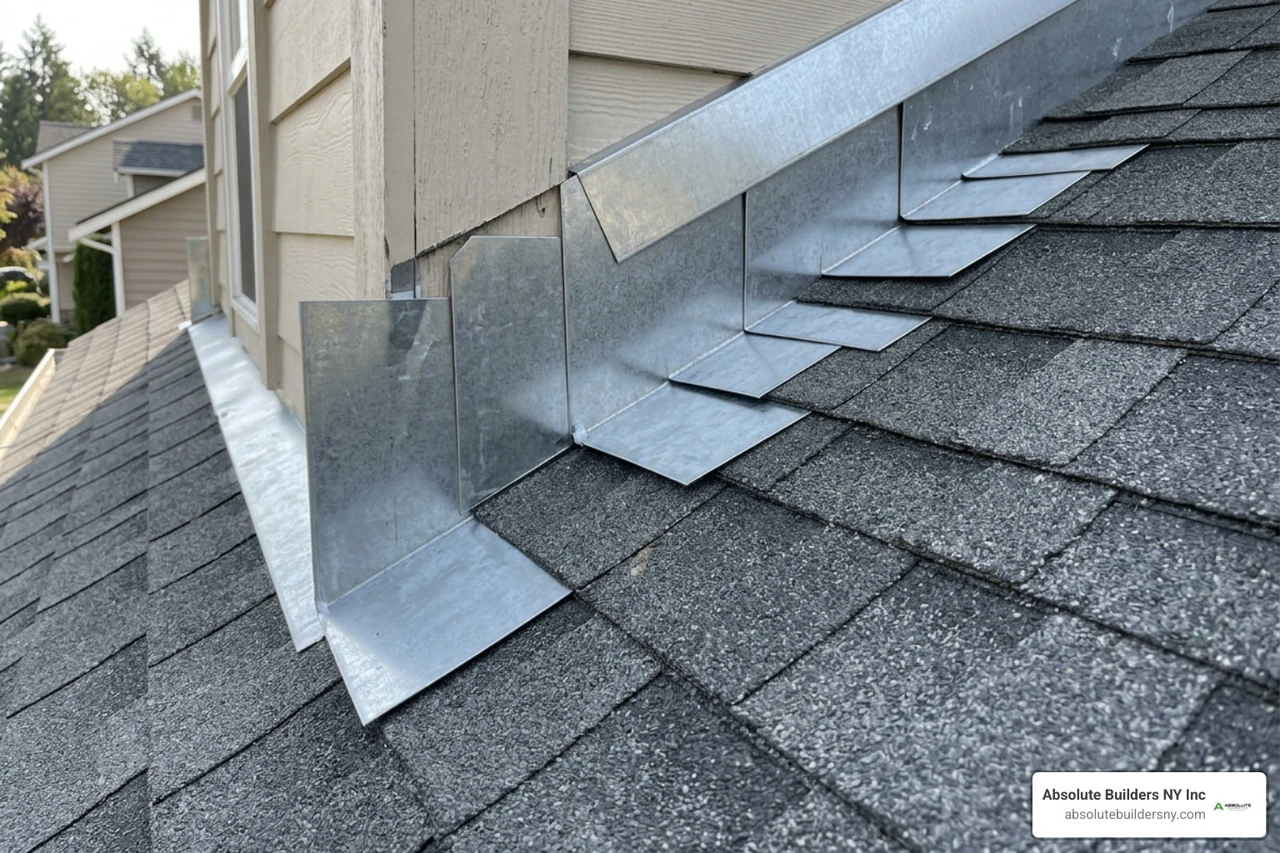
- Fabricate Step Flashing Cards: Use corrosion-resistant aluminum or copper step flashing bent at a 90-degree angle (typically 8 inches long, bent to 4 inches by 4 inches).
- Integrate with Shingles: As you lay each course of shingles up the main roof slope, place one step flashing card over the end of the shingle against the dormer cheek wall. The bottom of the flashing card should sit just above the exposure line of the shingle course.
- Fasten the Flashing: Nail each flashing card high up into the vertical wall framing—never nail down through the horizontal roof deck tab, as this creates a direct leak path.
- Overlap Successive Layers: Lay the next shingle course directly over the horizontal leg of the flashing card, completely concealing it while leaving the vertical leg resting against the dormer wall.
- Install Base Apron Flashing: At the bottom front corners of the dormer, install a seamless soldered copper or pre-bent aluminum apron flashing pan. This channels runoff safely away from the wall corners and onto the lower roof shingles.
- Apply Counter Flashing: Install metal counter flashing or tuck your weather-resistive barrier (housewrap) over the upright legs of the step flashing to prevent wind-driven rain from getting behind the metal.
Siding, Windows, and Exterior Envelope Protection
Protecting the exterior envelope requires layering housewrap, flashing window rough openings, and installing durable siding.
- Wrap Exterior Walls: Cover cheek and front walls with a premium weather-resistive barrier (WRB), wrapping all corners by at least 12 inches and taping every seam with approved builder's tape.
- Flash Window Openings: Apply self-adhering flashing tape along the window rough sills, folding it down over the housewrap. Install your dormer window units plumb, level, and square using exterior casing nails.
- Tape Window Flanges: Apply vertical flashing tape over the side nail fins, followed by a final top flashing strip extending past the sides. Fold the upper housewrap flap down over the top tape to maintain a watershed shingle-lap.
- Install Siding: Choose fiber cement, cedar shakes, or vinyl siding that complements the existing home. Maintain a 1-inch clearance between the bottom edge of the siding planks and the sloped roof deck to prevent moisture wicking and premature rot. For detailed exterior trim patterns, review our guide on shed dormer exterior siding.
Insulating and Finishing the Interior Space
With the shell dried-in and weatherproofed, you can turn your attention to framing out the interior living space. Proper thermal insulation and roof ventilation are critical in an attic dormer to prevent ice dams in the winter and sweltering room temperatures during the summer.
- Maintain Continuous Rafter Ventilation: If you are building a vented roof assembly, install continuous rigid foam baffles (air chutes) along the underside of the roof sheathing between every rafter bay. This maintains a 1- to 2-inch unobstructed air gap from the dormer soffit vents up to the main ridge vent, preventing hot air and moisture from becoming trapped against the roof deck.
- Insulate to Energy Code Standards: Pack rafter and stud cavities with high-density mineral wool batts, closed-cell spray foam, or rigid polyiso foam boards to achieve your local climate's required thermal R-values (typically R-38 to R-49 for roof assemblies and R-21 for exterior walls).
- Air-Seal Cavities: Seal every joint, wire penetration, and junction box using expanding acoustic foam sealant and vapor-permeable membrane tape. Air leakage causes more winter moisture problems than missing insulation.
- Hang Wallboard and Drywall: Hang 1/2-inch or 5/8-inch Type X fire-rated drywall across all ceiling joists and wall studs. Fasten boards with 1-1/4-inch drywall screws every 12 inches along framing members.
- Tape, Sand, and Prime: Tape and apply three thin coats of joint compound across all drywall seams, feathering the edges smooth. Sand flush and apply a high-solids PVA primer to seal the paper face before painting, converting your raw framing into a beautiful attic conversion.
Frequently Asked Questions About Building a Shed Dormer
How steep does a shed dormer roof need to be?
A shed dormer roof should maintain a slope of at least 4-in-12 (4 inches of vertical rise per 12 inches of run) when installing conventional roofing materials like fiberglass architectural shingles or cedar shakes.
If your ceiling height constraints force a shallower slope (such as 2-in-12 or 3-in-12), you must use a continuous, low-slope membrane system such as fully-adhered EPDM rubber, TPO, or double-coverage self-adhered modified bitumen. Standard shingles installed on slopes flatter than 4:12 will fail to shed water under wind pressure, leading to chronic leaks.
Is tying into the ridge easier than cutting in below it?
Yes, tying shed dormer rafters directly into the main roof ridge is generally easier to frame. When you tie into a structural ridge beam, your dormer rafters meet the existing ridge at a single plumb cut, and load calculations are straightforward.
Framing below the ridge requires installing a heavy structural header between doubled common rafters, calculating load transfers, and measuring, notching, and fastening individual cripple rafters from the header up to the ridge.
When should a DIYer hire a professional framing contractor?
While intermediate DIYers can handle interior drywall, painting, insulation, and siding, you should hire a licensed framing contractor if your project involves:
- Removing or cutting load-bearing collar ties, ceiling joists, or multiple roof rafters.
- Installing structural multi-ply LVL beams spanning more than 8 feet.
- Working on steep roof pitches (8:12 or greater) where staging scaffolding and fall-arrest systems requires specialized commercial equipment.
- Completing structural roof cuts and dry-in during tight weather windows where leaving the roof open risks severe structural water damage.
Conclusion
Framing a shed dormer is one of the most cost-effective ways to add headroom, natural daylight, and usable floor space to your home. By taking the time to review structural load paths, lay out full-scale chalklines on your subfloor, install layered flashing, and insulate according to local codes, you can successfully turn a dark, cramped attic into an expansive living space.
When projects involve complex structural engineering, large spans, or tight weather windows, working with an experienced builder provides peace of mind. Absolute Builders NY Inc specializes in custom dormer additions across Long Island, New York—including West Babylon, Huntington, Westhampton, Massapequa, Bayville, and communities throughout Nassau and Suffolk County. Our team brings precision craftsmanship, dedicated partnership, and deep framing expertise to every roof modification. Contact us today to discuss your professional dormer addition and let us help you turn your attic vision into a lasting reality.