
How to Plan Your Own Home Addition Without Losing Your Mind
Why Do It Yourself Home Addition Plans Can Make or Break Your Project
Do it yourself home addition plans are the foundation of any successful expansion project — and getting them right before you break ground can save you thousands of dollars and months of frustration.
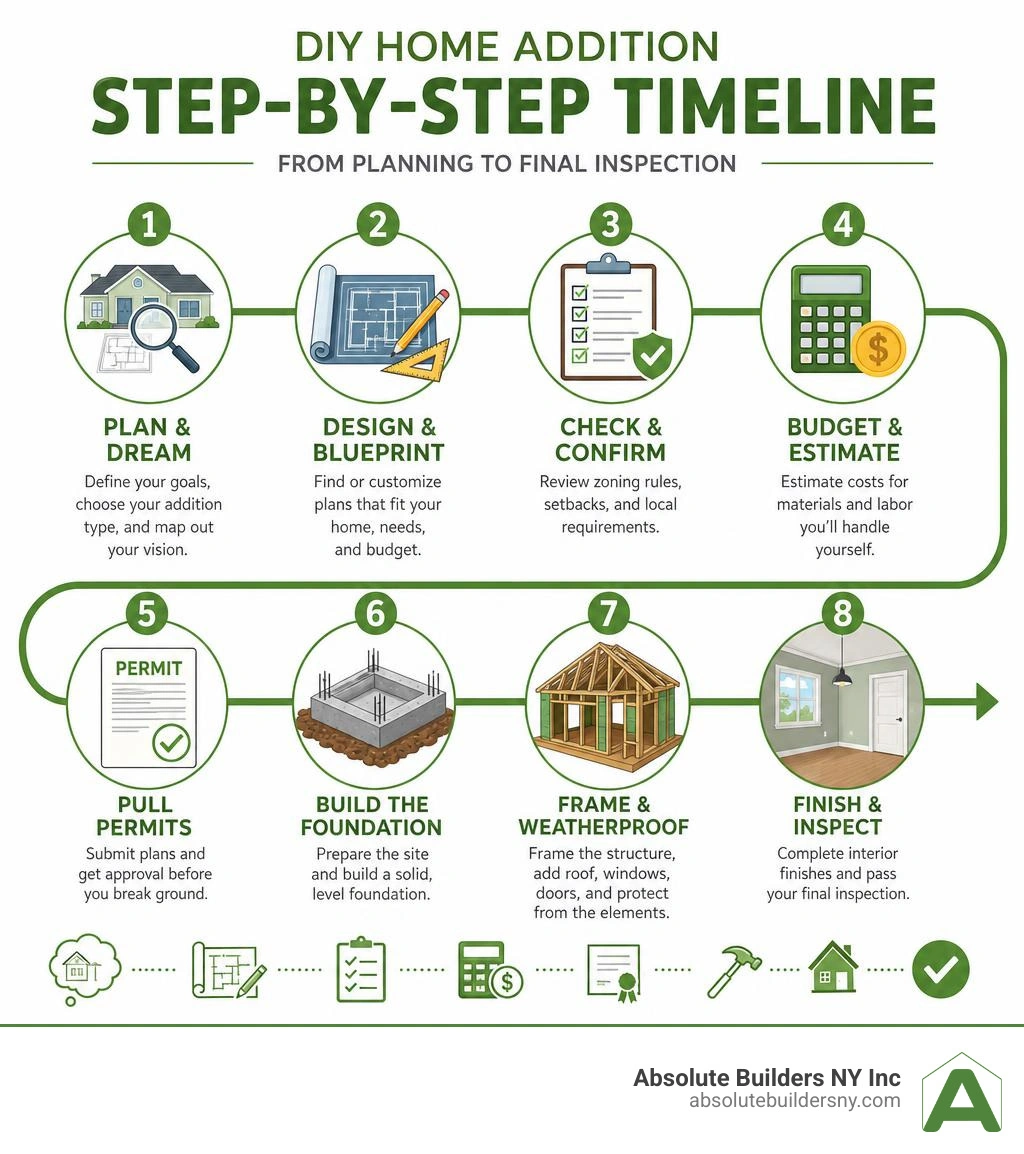
Quick answer: Here's how to approach DIY home addition planning:
- Choose your addition type — sunroom, bump-out, dormer, bedroom, attic conversion, or ADU
- Source a pre-designed plan or customize blueprints to match your home's style and lot
- Check local zoning rules and confirm setbacks, lot coverage limits, and permit requirements
- Estimate your budget based on square footage, materials, and labor you'll handle yourself
- Pull permits before you build — unpermitted work can hurt your resale value
- Execute in phases — foundation, framing, weatherproofing, then interior finishing
Expanding your home is one of the smartest investments you can make. A high-quality addition can return 77% to 91% of its initial cost at resale. A basement finish averages around 70% ROI. Even a dormer — which adds headroom and light to an attic — can transform dead space into a livable room.
But the planning stage is where most homeowners stumble.
Without the right plans, you risk permit rejections, structural problems, and costly do-overs. The good news? With the right blueprint and a clear step-by-step process, a DIY addition is absolutely achievable — even on Long Island, where zoning rules and building codes add extra layers of complexity.
I'm Jacolyn Gleason, a Senior Vice President at 5W Public Relations with years of experience translating complex topics — including home improvement and construction — into clear, actionable guidance for homeowners navigating projects like do it yourself home addition plans. Having worked across industries where getting the details right truly matters, I'll walk you through everything you need to know to plan your addition with confidence.
Important do it yourself home addition plans terms:
Understanding Your Options for Do It Yourself Home Addition Plans

When you begin looking at do it yourself home addition plans, you will quickly discover that "additions" are not one-size-fits-all. The approach you take depends on your budget, your yard space, and your comfort level with structural construction.
To help you choose the right path, we have outlined the primary ways you can expand your living space in our comprehensive Home Addition Plans Guide 2026. Let's look at the most popular addition types:
- Conventional Stick-Built Additions: This is the traditional way to build. You pour a foundation, frame the walls with lumber on-site, and tie a new roofline into your existing home. It offers complete design freedom but requires advanced carpentry skills.
- Bump-Outs: If you only need a few extra feet for a walk-in closet, a window nook, or a double vanity in the bathroom, a bump-out is your best friend. Because they "float" off the existing structure on cantilevered joists, they often cost 15% to 30% less than conventional additions because they do not require foundation work.
- Sunrooms and Patio Enclosures: These are highly popular DIY projects because they focus heavily on glass and pre-engineered framing. They let in massive amounts of natural light and are excellent for intermediate DIYers.
- Accessory Dwelling Units (ADUs): Whether detached or attached, ADUs are fully independent living spaces complete with a kitchen and bathroom. They are incredible for multigenerational living but require complex utility integration.
Sourcing and Customizing Do It Yourself Home Addition Plans
You do not need to hire an expensive architect from scratch to get started. Sourcing pre-designed blueprints is a highly cost-effective alternative. Many online catalogs offer complete sets of working drawings that have been structurally engineered and are ready for customization.
For those on a tight budget, starting with Free Home Addition Plans can give you a solid baseline layout to study. If you want something modular and highly adaptable, kits like the Big Enchilada House Plans Kit – 14×24 Core, 1–3 Bed Expandable Cottage | CountryPlans are fantastic. This system allows you to build a small core structure first and add perpendicular wings, gables, or sunrooms over time as your family’s needs and budget grow.
When customizing any plan, always ensure the architectural style matches your existing home. A modern, flat-roofed addition slapped onto a classic Long Island colonial will look out of place and could hurt your home's resale value.
Comparing Stick-Built Additions and Pre-Fabricated Kits
If you want to speed up the process, you might consider modular, steel-frame, or pre-fabricated addition kits instead of traditional stick building.
Steel-frame and panelized "dry-in" kits arrive at your property with the wall panels and roof trusses pre-engineered and ready to bolt together. These steel systems offer natural resistance to termites, mold, rot, and warping, and they can cut your framing timeline down to just a few days.
Here is how these methods stack up:
| Feature | Traditional Stick-Built | Pre-Fabricated / Steel-Frame Kits | Modular Additions |
|---|---|---|---|
| DIY Friendliness | Moderate (Requires solid carpentry skills) | High (Pre-cut parts, "lego-like" assembly) | Low (Requires heavy cranes to set modules) |
| Design Flexibility | Unlimited | Moderate (Based on manufacturer templates) | Low to Moderate |
| Construction Speed | Slower (Weeks of on-site framing) | Fast (Dry-in stage reached in days) | Fastest (Built off-site, installed in hours) |
| Relative Cost | Baseline | 10% to 15% cheaper than stick-built | 10% to 20% cheaper than stick-built |
Step-by-Step Guide to Planning and Executing Your DIY Addition

Once you have selected your do it yourself home addition plans, it is time to roll up your sleeves. A successful build relies on executing each phase in the correct order. For a deep dive into laying the groundwork, check out our guide on how to Make Some Home Addition Plans for That Ultimate Upgrade.
Foundation and Framing Fundamentals
Every great structure starts with a solid foundation. Depending on your local frost line and soil conditions, you will typically choose between a thickened-edge monolithic concrete slab or a pier-and-beam foundation.
Before you dig, always call 811 to locate underground utilities. Use batter boards and the classic 3-4-5 triangulation method to ensure your layout is perfectly square. A mistake of just half an inch at the foundation stage will multiply into massive headaches when you try to install your roof rafters.
When it comes to framing, we highly recommend using 2x6 studs spaced 16 inches on center for your exterior walls instead of traditional 2x4 framing. This structural approach is detailed beautifully in the How to Build a Multi Generational Junior ADU in 250 Square Feet - OjamboShop blueprint. Framing with 2x6s creates deeper wall cavities, allowing you to pack in high-R-value insulation for superior energy efficiency.
Always crown your studs in the same direction, stagger your plywood subfloor joints, and use high-quality subfloor adhesive to prevent squeaks down the road.
Weatherproofing and Interior Finishing
Getting your addition "dried in" (fully protected from the elements) is your primary milestone. Once your roof sheathing is up, install a high-quality synthetic underlayment and wrap the exterior walls in a continuous house wrap. Use flashing tape around all window and door rough openings to block water intrusion.
Inside the house, focus on thermal and acoustic comfort. We recommend using mineral wool insulation rather than standard fiberglass. Mineral wool provides superior fire resistance, does not sag over time, and acts as an exceptional sound barrier.
Once your insulation is inspected, install a vapor barrier on the warm side of the walls, hang your drywall, and lay down durable flooring like luxury vinyl plank (LVP). To understand how these material choices pay off over time, read about The Benefits of Building an Energy Efficient Home.
Comparing Costs, Timelines, and ROI of Popular DIY Additions
Before swing-starting your hammer, you must understand the financial commitment. Estimating your project accurately ensures you do not end up with a half-finished structure in your backyard.
For detailed project cost calculators, you can explore the Home Addition - Ideas, Costs, Tips and Plan tool. Additionally, the Forbes Home Addition Cost Guide provides excellent national benchmarks.
However, if you live in our neck of the woods, local factors play a huge role. Regional material costs, local labor rates, and municipal permit fees can significantly impact your overall budget on Long Island.
Sunrooms, Offices, and Bedroom Expansions
Let's break down what you can expect to spend and the return on investment (ROI) for common projects:
- Sunrooms: A standard sunroom or patio enclosure typically costs between $15,000 and $22,000 to build and generally recovers about 50% of its cost at resale.
- Home Offices and Bedroom Expansions: Building a dedicated workspace or an extra bedroom can cost anywhere from $80 to $200 per square foot depending on the finishes.
- The 21% Rule: To protect your home's resale value, a great rule of thumb is to limit your total addition project cost to no more than 21% of your home’s current post-project market value.
For more tips on setting budgets, refer to The Spruce House Addition Planning Guide.
Attic Conversions and Dormer Additions
If you want to expand your livable square footage without sacrificing your yard, look up! Converting your attic into a bedroom or office can recover up to 56% of its value at resale.
However, attic conversions require adequate headroom. To meet building codes, at least half of the finished attic ceiling must reach a height of seven feet. If your roof slope is too low, you can solve this by adding a dormer.
To learn how dormers can transform your home, read What Are Dormers: A Guide to Adding Space Value and Functionality. For local pricing on these structural upgrades, check out our guide on the Cost to Dormer a House Long Island.
Navigating Permits, Zoning, and Structural Safety
We cannot emphasize this enough: never bypass the permit process. Building without a permit can make your home difficult to sell, invalidate your homeowner's insurance in the event of a claim, and result in costly fines.
While looking at standard, pre-approved structural layouts like the Santa Clara County Pre-Approved ADU Plans can show you what code-compliant construction documents look like, you must follow the rules of your specific municipality.
On Long Island, zoning laws dictate:
- Setbacks: How close your addition can sit to your front, side, and rear property lines (often a minimum of 4 to 10 feet).
- Lot Coverage: The maximum percentage of your lot that can be covered by buildings.
- Fire Separation: If your addition sits within 5 feet of a property line, you will need specialized fire-rated exterior walls.
For specific local rules, you should consult your local town hall or municipal building department in Suffolk County and Nassau County to understand the exact requirements for setbacks, lot coverage, and fire safety in your specific neighborhood.
If you want to ensure your project meets these strict standards, working with a licensed local professional who understands the unique building codes of West Babylon, Huntington, and the surrounding Long Island areas is highly recommended.
Common Mistakes to Avoid with Do It Yourself Home Addition Plans
Even with great plans, DIYers often fall into preventable traps. Here are the most common mistakes to watch out for:
- Ignoring the Existing Foundation: Assuming your current foundation can support a second-story addition without an engineering evaluation is a recipe for structural failure.
- Utility Mismatch: Adding a bathroom or bedroom without checking if your current electrical panel, hot water heater, or HVAC system can handle the extra load.
- Inadequate Drainage: Failing to grade the ground around your new addition. You must maintain a 5% slope away from the new foundation for at least 10 feet to prevent water from pooling.
If you are building in Suffolk County, make sure you coordinate directly with your local town office, such as the Town of Brookhaven Building Division, to verify local code amendments before pouring any concrete.
Frequently Asked Questions about DIY Home Additions
Can I draw my own home addition plans?
Yes, you can draft your own plans using modern CAD software, but they must meet strict architectural and local building department standards. Most municipalities on Long Island require a licensed structural engineer or architect to review and stamp your plans before they will issue a building permit.
How much does a DIY home addition cost compared to hiring a contractor?
Handling the labor yourself can save you 30% to 50% of the total project cost. However, you must factor in the cost of specialized tools you may need to purchase, the price of materials (contractors often get trade discounts), and the cost of hiring licensed subcontractors for specialized trade work like electrical and plumbing hookups.
What is the highest ROI home addition?
Major kitchen remodels and expansions consistently offer the highest return, recouping up to 93% of their cost at resale. Garage conversions (up to 80% ROI) and high-quality room additions or dormers (77% to 91% ROI) are also exceptionally strong investments.
Conclusion
Planning and building your own home addition is an incredibly rewarding journey that can dramatically increase your livable square footage and boost your property value. But it requires meticulous planning, precise craftsmanship, and a deep respect for local building codes.
If you find that the structural engineering, foundation work, or framing of your project feels a bit too overwhelming to tackle on your own, we are here to help.
At Absolute Builders NY Inc, we specialize in high-quality home additions and professional dormer construction across Long Island, including Suffolk County and Nassau County. We bring precision craftsmanship and a dedicated partnership to every project, ensuring your architectural vision is built safely, beautifully, and fully up to code.
Ready to take the next step toward your dream space? Explore our Absolute Builders Home Addition Service page today, and let's build something incredible together!