
Room to Grow: The Ultimate Guide to Extending a Dormer Window
What You Need to Know About Extending a Dormer Window
Extending a dormer window is one of the smartest ways to unlock more living space in your home — without expanding your footprint.
Here's a quick answer if that's all you need:
- Is it possible? Yes. Most existing dormers can be widened or extended, often under Permitted Development Rights.
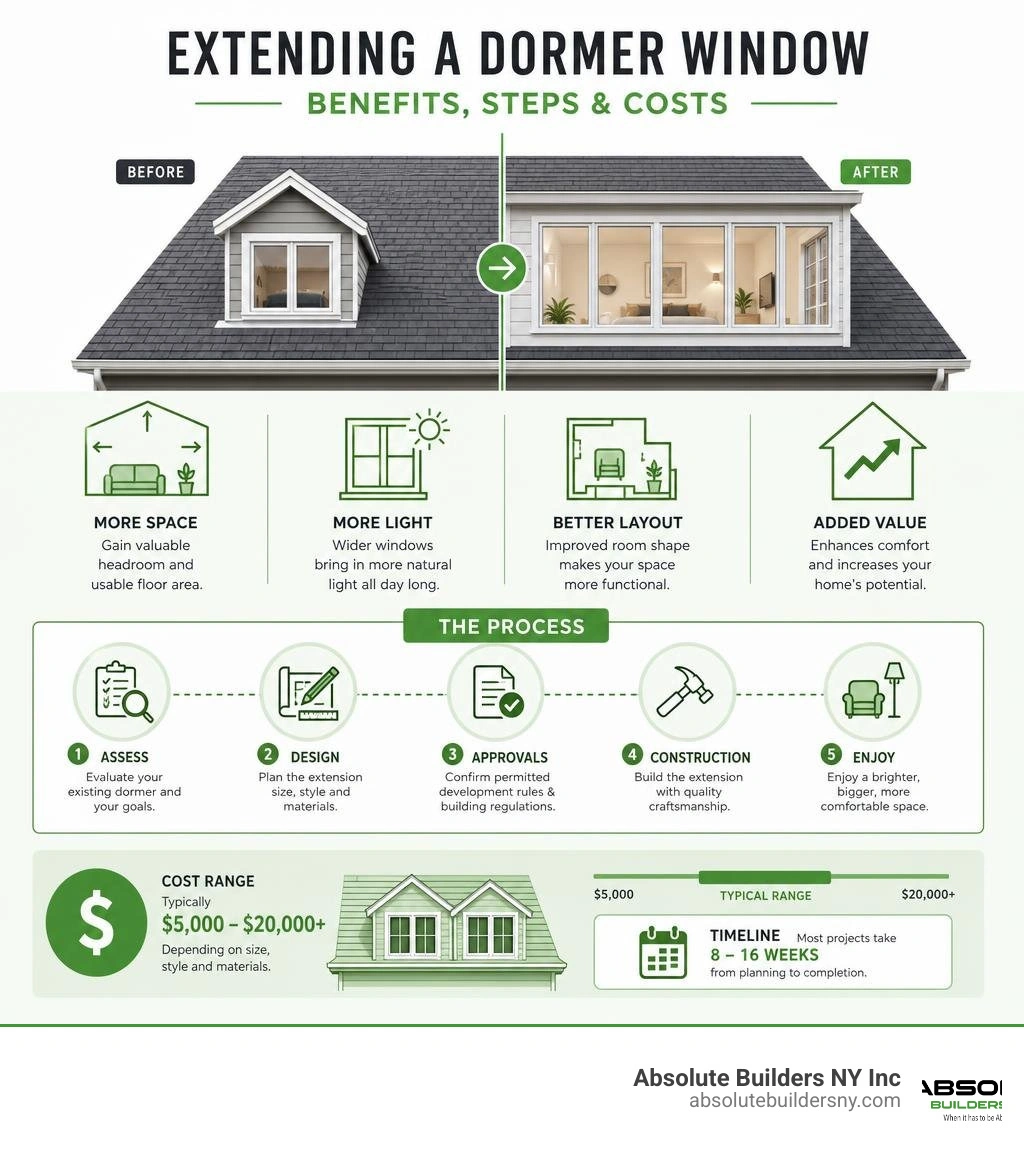
- Why do it? More headroom, better natural light, usable square footage, and improved room shape.
- Do you need planning permission? Not always — but you do need building regulations approval. Front dormers usually require planning permission; rear dormers often don't.
- How much does it cost? Dormer window costs typically range from $5,000 to $20,000+, depending on size, style, and materials.
- How long does it take? Most projects run 8 to 16 weeks from planning to completion.
If you have an existing dormer, you may be wondering whether you can push it further — maybe extend it to full width, add ceiling height, or simply make that awkward attic room actually livable. The good news is that it's almost always possible, and the results can transform how your home feels and functions.
I'm Jacolyn Gleason, a communications professional with deep experience connecting homeowners with the expertise they need for complex renovation projects, including extending a dormer window to maximize living space. In this guide, I'll walk you through everything you need to know — from permits and structural checks to costs and design options — so you can move forward with confidence.
Why Homeowners Choose to Extend an Existing Dormer
Many homes across Long Island were built with small, traditional dormer windows. While these classic accents look charming from the street, they often leave the interior feeling like a cramped, dark tunnel. Homeowners frequently reach out to us when they realize their existing attic space has so much more potential than just storing holiday decorations.
The primary driver for extending a dormer window is the massive boost in usable headroom. When you expand a narrow dormer into a wider structure, you effectively "square off" those awkward, sloped ceilings. Suddenly, a space where you had to duck to avoid hitting your head becomes a room where you can walk freely. This structural change makes the entire floor feel less like a dusty attic and more like a natural extension of your main living areas.
Beyond physical space, an extended dormer floods the upper floor with natural light. Instead of a single, narrow beam of light cutting through a dark room, a wider dormer allows for larger window banks or multiple adjacent panes. This makes the space highly functional for modern needs, such as:
- A Bright Home Office: Working from home is much more pleasant when you have an expansive view and plenty of daylight.
- A Master Suite Retreat: Widening your dormer can create enough space to comfortably fit a king-sized bed, built-in wardrobes, and even a full master bathroom.
- Additional Bedrooms: For growing families, extending a dormer is a cost-effective way to add one or two extra bedrooms without sacrificing yard space.
To understand how these structures function fundamentally, you can read our guide on What Are Dormers: A Guide to Adding Space, Value and Functionality. Additionally, projects like this offer a fantastic return on investment, which is beautifully detailed in this article on Using Dormers in a Home Renovation to Increase Space | Carrie Lucke Design.
Planning Permission and Permitted Development for Extending a Dormer Window

One of the first questions we get from homeowners in West Babylon, Huntington, and across Suffolk and Nassau Counties is: "Do I need planning permission to extend my dormer?"
In many regions, extending an existing dormer is possible under what is known as Permitted Development Rights, meaning you don't necessarily need full, formal planning permission. However, this is highly dependent on specific limits and conditions:
- Volume Limits: The extended structure must not exceed a certain volume limit beyond the original roof space.
- Placement: Extensions on the rear of the property are far more likely to fall under permitted development than those on the front. A front-facing dormer almost always requires formal planning permission because of its direct impact on the neighborhood's streetscape.
- Materials: The exterior finishes of the extended dormer should closely match or complement the existing house.
While these general rules apply broadly, local municipal zoning laws in Long Island can vary significantly between townships. What is allowed without a variance in Massapequa might require special approval in Bayville or Westhampton.
Before lifting a single hammer, it is crucial to consult with your local planning authority or an experienced local contractor to verify your town’s exact building codes. If your project involves a substantial expansion, such as converting a small window into a Full Rear Dormer, we will need to submit comprehensive architectural plans to ensure absolute compliance with your local municipality.
For those interested in how these standards compare internationally, particularly with strict modern energy frameworks, you can explore Dormer Window Glazing for Loft Conversions 2026 | Axiom.
Structural Feasibility and Roof Framing
Before you get swept away by interior design mood boards, we must look at how your house is held together. The feasibility of extending a dormer window depends heavily on your existing roof framing.
- Stick-Framed Roofs: If your home has a traditional stick-framed roof (built with individual rafters and ceiling joists), it is highly adaptable. This setup naturally leaves the attic open, making it relatively straightforward for our structural engineers to modify the rafters, install load-bearing headers, and widen the dormer opening.
- Truss-Framed Roofs: If your home was built using pre-fabricated W-shaped trusses, the process is much more complex. Trusses are engineered as webbed units; cutting even one cord can compromise the structural integrity of your entire roof. While not impossible, extending a dormer on a truss roof requires extensive engineering, temporary support systems, and structural retrofitting.
A structural engineer must assess how the new, larger dormer will distribute its weight. Widening a dormer means removing load-bearing rafters, which requires us to install heavy-duty double or triple headers and support posts to safely transfer the structural load down to the foundation.
Building Regulations and Safety Compliance
Even if your project doesn't require a zoning variance, it will absolutely require building regulations approval and local building permits. These codes exist to ensure your new space is safe, warm, and structurally sound.
Key compliance areas include:
- Fire Safety: If the dormer extension creates a third story, local codes require specific fire-rated doors, mains-powered smoke alarms, and a protected escape route to the outside.
- Egress Windows: Bedrooms in the newly extended space must feature at least one egress window of a specific size to allow for emergency escape and rescue access.
- Thermal Insulation: Modern energy codes are strict. The walls, floor, and roof of your extended dormer must meet specific R-value (thermal resistance) requirements to prevent heat loss in the winter and overheating in the summer.
Design Options and Materials for Your Dormer Extension
When extending a dormer window, you have the opportunity to completely reimagine the look of your home. You can choose to make the extension blend seamlessly with your original roofline, or you can opt for a modern design contrast.
The most common structural styles include:
- Shed Dormers: These feature a single-planed roof that slopes at a shallower angle than the main roof. This style is the absolute best for maximizing internal headroom and usable floor space.
- Gable Dormers: Featuring a classic triangular, pitched roof, a Gable Dormer is highly aesthetic and excellent for traditional curb appeal, though it offers slightly less interior space than a shed dormer.
- Double Dormers: Pairing two smaller dormers side-by-side can maintain a traditional look while significantly increasing light and space inside.
For the exterior cladding, you can select from a wide variety of materials to match your existing home:
- Vinyl Siding: Cost-effective, low-maintenance, and available in virtually any color to match your main exterior.
- Wood Shingles or Cedar Shakes: Classic Long Island styling that weathers beautifully over time.
- Composite or Fiber Cement Boards: Highly durable, fire-resistant, and insect-proof.
- Metal Cladding (Zinc or Aluminum): Perfect for contemporary designs, offering a sleek, minimalist look.
Regardless of the material, proper weatherproofing is paramount. The junctions where the new dormer cheeks meet your existing roof slope are prime areas for water leaks. We install high-quality step flashing, ice-and-water shields, and custom metal valleys to ensure your home remains completely dry.
Architectural Styles for Extending a Dormer Window
The architectural style of your home dictates how the extended dormer should look. For instance, if you own a classic Dormer Ranch Style House, a wide rear shed dormer can practically double your second-floor square footage without disrupting the clean, low-profile look of your front facade.
Our goal is always architectural harmony. The extended dormer should look like it was part of the original blueprint, matching the pitch of your roof, the overhang of your eaves, and the style of your trim.
Glazing and Ventilation Options When Extending a Dormer Window
The windows you choose for your extended dormer will dictate your comfort levels year-round. Because attic spaces are naturally prone to temperature swings—rising heat in the winter and direct sun exposure in the summer—investing in high-performance glazing is essential.
- Double or Triple Glazing: Modern double-glazed units filled with argon gas are the standard. If your dormer faces north or is highly exposed to coastal winds, upgrading to triple glazing can significantly reduce drafts and heating bills.
- Solar Control Glass: If your extended dormer windows face south or west, solar control coatings will block out excessive infrared heat while still letting in beautiful, natural light.
- Trickle Vents: To prevent condensation and mold, your windows should include built-in trickle vents to allow continuous, controlled background ventilation.
Cost Analysis: Widening an Existing Dormer vs. Building New
A major decision point for homeowners is whether to widen their existing dormer or tear it down and build a brand-new one from scratch.
Generally, widening an existing dormer is highly cost-effective because we can utilize some of the existing structural framing, electrical runs, and interior finishes. However, if the older dormer was poorly insulated or has structural rot, starting fresh is often safer and cheaper in the long run.
The cost to extend a dormer is typically calculated by the square foot, ranging from $100 to $350 per square foot depending on materials, structural complexity, and local labor rates. To get an in-depth look at how these numbers shake out in our region, check out our guide on the Cost to Dormer a House Long Island.
Below is a general cost comparison of widening an existing dormer versus installing a new one:
| Project Type | Average Cost Range | Key Cost Drivers | Space Gained |
|---|---|---|---|
| Widening an Existing Dormer | $5,000 – $15,000 | Header installation, window matching, localized roofing integration | Moderate to High |
| Building a New Single Dormer | $10,000 – $25,000 | Complete structural framing, full roofing installation, new siding | Moderate |
| Full Rear Shed Dormer Addition | $30,000 – $60,000+ | Major structural engineering, extensive roofing, multiple window units | Maximum |
Step-by-Step Process of a Dormer Extension Project
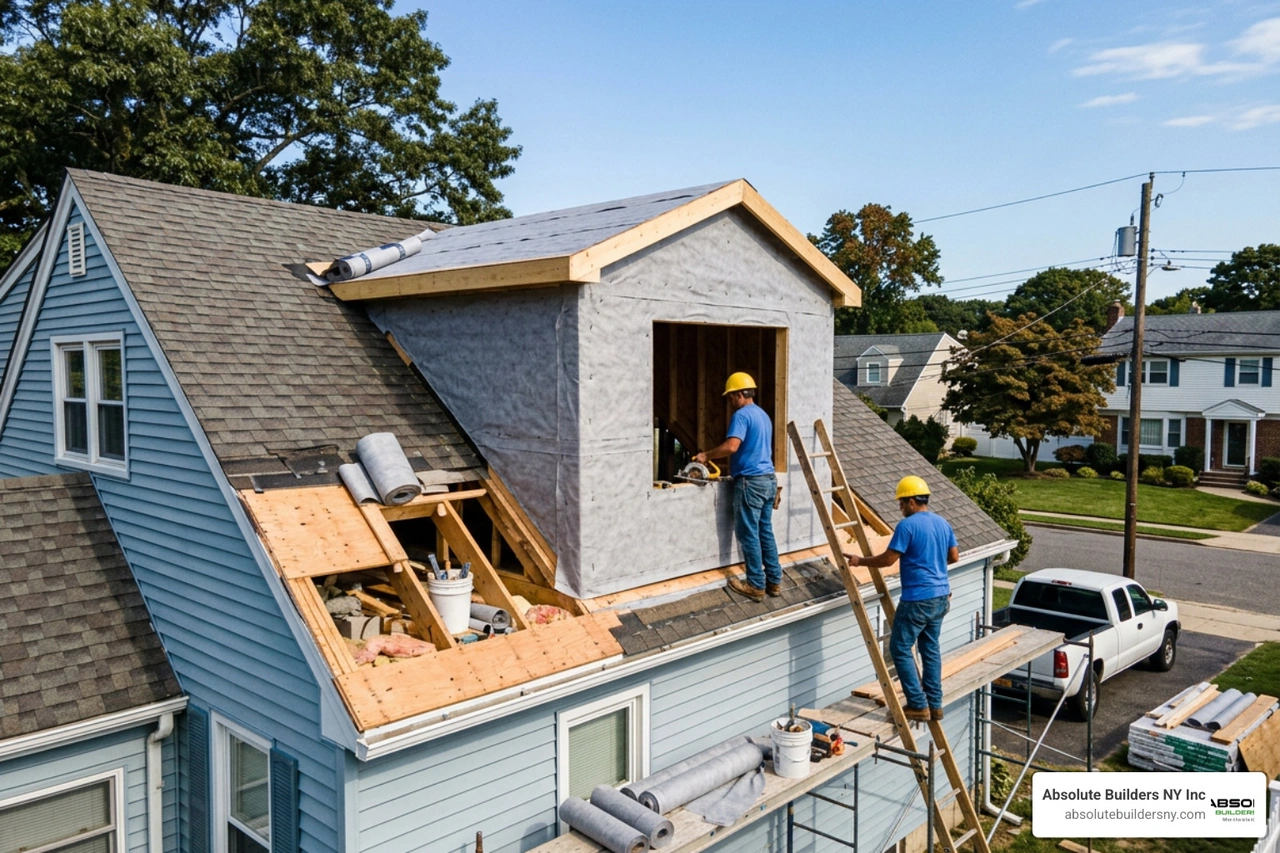
When you partner with us for your dormer extension, we guide you through a highly structured, professional process to minimize disruption and ensure precision craftsmanship.
Phase 1: Planning and Permits
We begin with a thorough structural survey of your roof framing. Our architects draft precise plans, and our engineers perform load calculations. We then submit these documents to your local Long Island town hall to secure all necessary building permits.
Phase 2: Site Preparation and Scaffolding
To protect your home and keep our crew safe, we erect secure scaffolding around the work area. We also install heavy-duty, weather-resistant tarps over the roof slope to protect your home from sudden rainstorms during construction.
Phase 3: Structural Framing
Our carpenters carefully cut away the existing roof section and structural framing. We immediately install engineered structural headers and support posts to reinforce the roof opening. Next, we build the new dormer cheeks, face wall, and roof frame.
Phase 4: Weatherproofing and Windows
With the frame in place, we wrap the exterior in a high-performance house wrap. We install custom flashing, roof shingles, siding, and your chosen high-efficiency windows, making the structure completely weather-tight.
Phase 5: Insulation and Utilities
Inside, we run any necessary electrical lines, HVAC ductwork, or plumbing lines. We then install dense, high-R-value insulation in the walls and ceiling to meet or exceed local energy codes.
Phase 6: Drywall and Interior Finishes
We hang, tape, and finish the drywall. Our team then installs trim, doors, flooring, and paint, transforming the space into a beautiful, ready-to-use room.
To see what this transformation looks like in real life, browse through our gallery of Attic Dormer Before and After projects.
Frequently Asked Questions about Dormer Extensions
Can you extend an existing dormer to full width?
Yes, in most cases you can extend an existing dormer to full width, often creating a full rear shed dormer. This is an incredible way to maximize your home's square footage. However, this requires substantial structural support, including engineered beams to carry the load of the newly opened roofline. You will also need to submit detailed plans to your local town building department for approval.
How long does a dormer extension project take?
The active construction phase of a dormer extension typically takes 8 to 16 weeks. This timeline is split into phases: structural framing and dry-in usually take 2 to 3 weeks, while plumbing, electrical, insulation, drywall, and interior finishes make up the remainder of the time. Weather delays can occasionally impact the initial framing phase, but we use protective scaffolding systems to minimize this risk.
Does extending a dormer increase property value?
Absolutely. Adding functional square footage, extra bedrooms, or a master suite is one of the most reliable ways to increase your home's resale value. A well-designed dormer extension can yield a 70% to 80% return on investment (ROI), while significantly boosting your home's curb appeal and making it much more attractive to future buyers in the competitive Long Island real estate market.
Conclusion
Extending a dormer window is a highly rewarding home improvement project that turns cramped, dark attics into bright, spacious, and highly functional rooms. Whether you want to build a quiet home office, add a bedroom for a growing family, or design a luxury master suite, expanding your dormer is a smart alternative to a costly ground-floor addition.
At Absolute Builders NY Inc, we specialize in high-quality dormer construction and home additions across Long Island, from West Babylon and Huntington to Suffolk and Nassau Counties. Our commitment to precision craftsmanship and dedicated partnership means we handle every detail—from initial structural engineering and local town permits to the final brush of paint—with absolute care.
If you are ready to unlock the hidden potential of your home, contact us today to schedule your consultation. Let's build your dream space together. Learn more about our services and start planning your project by visiting our Dormer Addition service page.