
Unlock Cramped Attics by Adding a Second Floor Dormer

How Adding a Dormer to a House Opens Up Attic Space
Adding a dormer to a house can turn part of a cramped attic into usable space. A dormer extends outward from a sloped roof, creating more headroom and bringing in daylight. Start by deciding how you want to use the space. Then have a qualified professional check the roof structure, sketch a dormer that fits your home, and confirm local permit requirements before construction begins.
The right design depends on your goal. A wider shed dormer can open up more of the attic, while a smaller gable dormer can add height and light in a focused area. On Long Island, the key is to gain space without making the new roofline look out of place.
I'm Jacolyn Gleason, a public relations professional with experience making complex consumer topics clear. I bring that research and communication background to this guide on adding a dormer to a house.

Adding a dormer to a house further reading:
Understanding Dormer Styles and Functional Architecture

Before picking up a hammer or cutting into your rafters, it helps to understand what a dormer is and how different styles function. In simple terms, a dormer is a roofed structure containing a window that projects vertically beyond the plane of a pitched roof. While simple in concept, their execution dictates both how much usable interior volume you unlock and how your home looks from the street.
Homeowners frequently ask us about understanding dormers on a house because matching the dormer's pitch, scale, and window alignment to the existing architecture is critical. When designed poorly, a dormer looks like an awkward box perched on the roof. When engineered properly, it appears as though the home was originally drafted that way from day one.
Gable, Shed, and Hip Dormers Compared
Every dormer style delivers a distinct balance of interior square footage, structural complexity, and exterior character. Choosing between them comes down to your primary goal: maximum floor area or focused architectural charm.
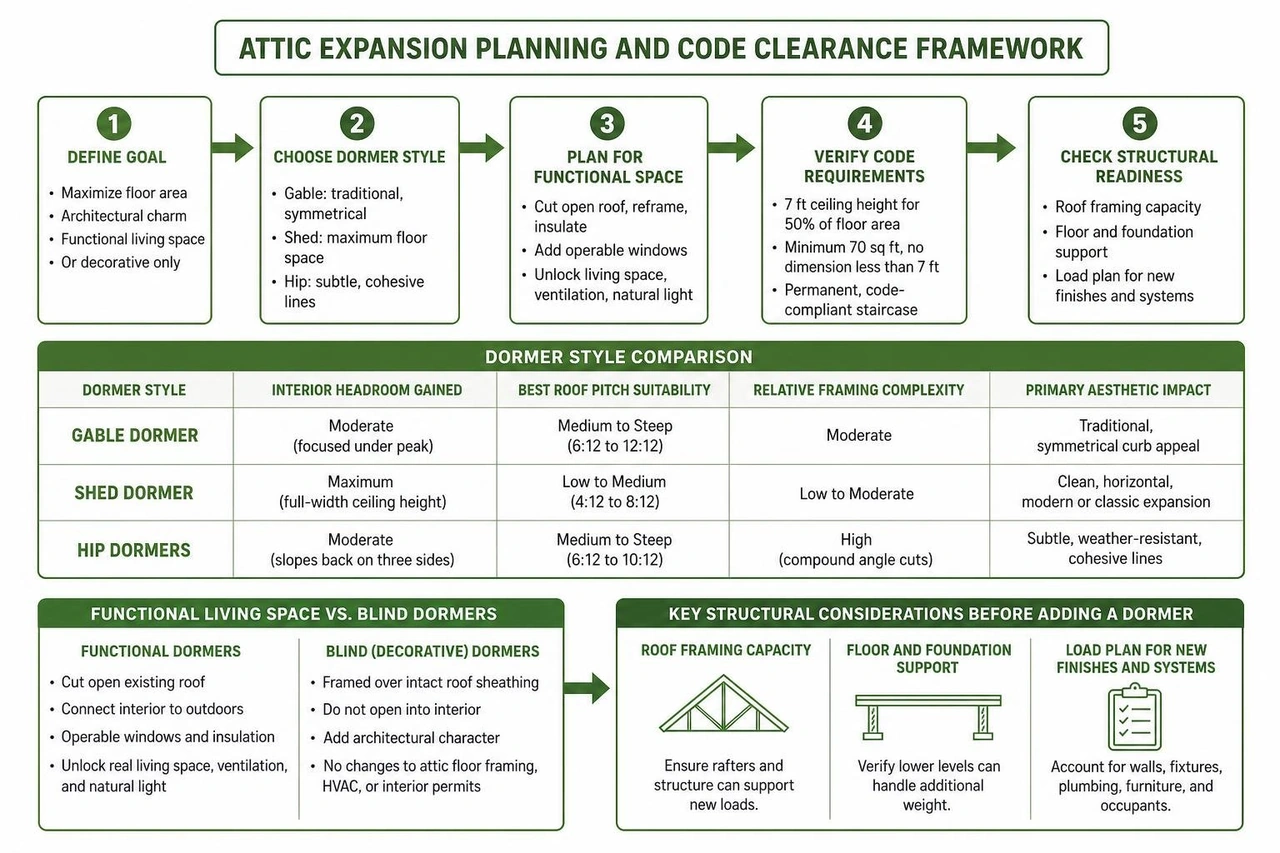
| Dormer Style | Interior Headroom Gained | Best Roof Pitch Suitability | Relative Framing Complexity | Primary Aesthetic Impact |
|---|---|---|---|---|
| Gable Dormer | Moderate (focused under peak) | Medium to Steep (6:12 to 12:12) | Moderate | Traditional, symmetrical curb appeal |
| Shed Dormer | Maximum (full-width ceiling height) | Low to Medium (4:12 to 8:12) | Low to Moderate | Clean, horizontal, modern or classic expansion |
| Hip Dormers | Moderate (slopes back on three sides) | Medium to Steep (6:12 to 10:12) | High (compound angle cuts) | Subtle, weather-resistant, cohesive lines |
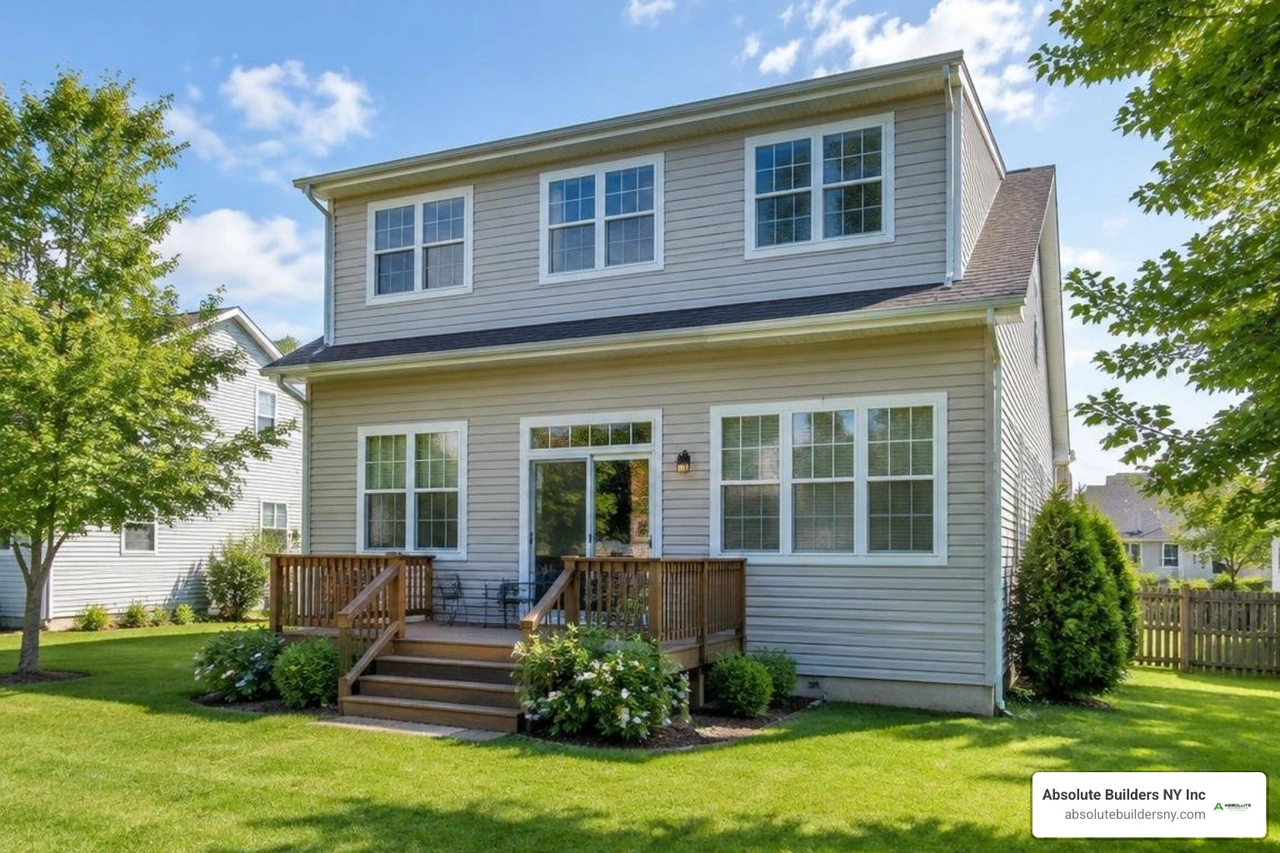
A shed dormer expansion is the undisputed champion for maximizing floor space. Because its roof slopes in a single plane away from the main ridge at a shallower angle, it creates uniform, standing-height ceilings across entire rooms. This makes shed dormers ideal for rear-facing expansions where you want to add bedrooms or bathrooms without disrupting the front facade.
In contrast, classical gable dormer framing methods use two sloping roof planes that meet at a central ridge, creating a triangular peak. A standard 6-foot-wide gable dormer reaching 9 feet from floor to peak adds roughly 30 square feet of standing headroom. While it yields less total floor area than a shed dormer, it introduces balanced vertical lines that elevate traditional home designs. For an in-depth breakdown of standard carpentry techniques, check out How to Frame a Gabled Dormer to see how rafters and wall plates interconnect.
Hip dormers feature roofs that slope back on three sides toward a central point. While their compound valley and hip framing require advanced carpentry, their sloped profiles blend seamlessly into hipped main roofs and handle coastal winds exceptionally well.
Functional Living Space vs. Blind Dormers
Not all dormers are built to create livable rooms. A functional dormer cuts open the existing roof deck, restructures the rafters, and connects the interior attic to the outdoors with operable windows and insulation. This unlocks real living space, ventilation, and natural light.
On the other hand, decorative fake dormers on rooflines—often called blind or false dormers—are framed directly over intact roof sheathing. They do not open into the interior space below. Homeowners often choose blind dormers when they want to break up vast, dark roof expanses or restore architectural symmetry to a ranch-style or colonial facade without altering their existing attic floor framing, routing HVAC ducts, or pulling comprehensive interior permits.
Planning Your Attic Expansion and Architectural Purpose
Transforming dead attic storage into everyday living space requires careful planning. You cannot simply install drywall over collar ties and call it a bedroom. A proper second floor dormer addition must satisfy local building codes and modern safety standards.
Under residential building codes, finished attic spaces must meet specific dimensional criteria to be officially classified as habitable square footage:
- Ceiling Height: At least 50% of the required floor area must have a clear ceiling height of at least 7 feet.
- Minimum Floor Area: Habitable rooms must generally offer at least 70 square feet of floor space, with no horizontal dimension less than 7 feet.
- Permanent Access: Pull-down ladders do not count. The space must be serviced by a permanent, code-compliant staircase with appropriate tread depth, riser height, and continuous handrails.
Key Structural Considerations Before Adding a Dormer to a House
Before finalizing blueprints, our engineering team evaluates whether the lower levels can support the new structural loads. Your roof rafters were designed primarily to shed rain and snow, not necessarily to hold up finished walls, furniture, plumbing fixtures, and occupants.
Our comprehensive attic remodel structural guide emphasizes three critical structural checks:
- Floor Joist Sizing: Existing ceiling joists are often 2x6 framing designed only for drywall and light storage. Converting the space to living quarters typically requires sistering existing joists with 2x8, 2x10, or engineered lumber to prevent floor deflection and bouncy floors.
- Load-Bearing Path: The weight of the new dormer walls, roof headers, and floor loads must transfer down through load-bearing interior or exterior walls directly to the foundation.
- Roof Framing Type: Traditional stick-framed roofs (using individual rafters and ridge boards) are relatively straightforward to modify for dormers. In contrast, roofs built with engineered trusses require stamped structural engineering plans, as cutting truss webs compromises the roof's structural integrity.
Designing for Specific Rooms: Bedrooms, Bathrooms, and Offices
The intended purpose of your attic space dictates window placement, plumbing lines, and electrical layout:
- Attic Bedrooms: When creating attics converted into bedrooms, life safety is paramount. Building codes mandate properly sized dormer egress windows that provide clear emergency exit paths with minimum opening dimensions (typically at least 5.7 square feet of net clear opening).
- Attic Bathrooms: Planning a dormer bathroom addition requires stacking plumbing lines directly over first-floor wet walls whenever possible. This minimizes the length of horizontal drain pipe runs through floor joists and simplifies tying into the main soil stack and venting through the roof.
- Attic Offices: If you are converting attic to home office use, prioritize direct natural light on work surfaces without screen glare. Ensure dedicated 20-amp electrical circuits for computer hardware and supplemental split-system HVAC for cooling during warm summer afternoons.
The Real Costs and ROI of Adding a Dormer to a House
Understanding the investment required helps keep your remodeling budget grounded. Nationwide, homeowners typically invest between $20,000 and $60,000 to construct a dormer addition, though total pricing ranges from $12,000 for compact architectural cut-ins to $70,000 or more for comprehensive multi-room buildouts.
For transparent regional breakdowns, review national resources like the Dormer Addition Cost: Price Guide 2026. Local factors such as permit requirements, material handling, and coastal framing specifications influence final costs, which is why examining local dormer addition cost factors is essential for realistic project budgets.
Factors Influencing Dormer Addition Pricing
Several distinct variables drive the overall pricing of your project:
- Dormer Footprint and Style: A small 6-foot shed or gable dormer on an accessible single-story roof can cost around $8,000 to $15,000 in framing and shell construction. A 12-to-20-foot full-width dormer spanning multiple rooms runs between $25,000 and $45,000 before interior upgrades.
- Window Specifications: High-performance dormer window installation with argon-gas fills and low-E coatings protects against summer heat gain and winter drafts.
- Roofing and Exterior Siding: Matching aged architectural asphalt shingles, cedar shakes, or modern composite siding requires skilled blending to eliminate visible transition lines.
- Permit and Review Fees: Municipal building permit fees and zoning reviews generally run from $300 to $2,500 depending on your local town requirements.
- Interior Finish Level: Hardwood flooring, custom built-ins, and tiled luxury bathrooms add to the baseline framing cost.
Return on Investment and Property Resale Value
A well-executed dormer addition consistently ranks among the most cost-effective structural home improvements. Adding functional living space can raise overall market valuation by up to 15%.
According to market research published in 14 Home Addition Ideas for Increasing Square Footage, attic living space expansions recover roughly 56% of their initial construction cost directly at resale. When you factor in avoiding the substantial transaction costs, transfer taxes, and moving expenses of buying a larger home in competitive communities like Huntington or West Babylon, dormering your existing roof is a smart long-term investment.
Construction, Framing, and Weatherproofing Execution
Building a dormer requires opening your home's roof to the elements, making precise execution and weather protection essential.
Step-by-Step Construction Stages for Adding a Dormer to a House
A durable dormer build follows a structured construction sequence:

- Permits and Engineering Review: Draft architectural blueprints, calculate load transfers, and secure municipal building permits.
- Site Staging and Weather Planning: Set up scaffolding, arrange dumpster drops, and monitor local multi-day weather forecasts before cutting the roof.
- Roof Tear-Off and Opening: Strip existing shingles, remove roof sheathing, and cut through existing rafters along the engineered perimeter.
- Structural Framing: Install doubled or tripled trimmer rafters along the sides, set heavy headers top and bottom, erect side cheek walls, and set the dormer ridge board and rafters.
- Weatherproofing and Dry-In: Fasten plywood or OSB sheathing, apply self-adhering ice and water shield membranes along valleys and transitions, and wrap cheek walls with breathable weather barriers.
- Roofing, Siding, and Windows: Install windows, integrate continuous metal step flashing along dormer sidewalls, lay matching shingles, and finish exterior siding.
- Interior Rough-Ins and Insulation: Route electrical lines, extend plumbing and HVAC, install high-R-value closed-cell spray foam or mineral wool, and complete professional drywall and trim.
Common Pitfalls and Weatherproofing Mistakes to Avoid
Even small oversights during framing or flashing can lead to chronic leaks and energy loss. Be sure to avoid these critical mistakes:
- Improper Valley Flashing: The junction where the dormer roof ties back into the main roof creates a water valley. Failing to overlap underlayment from bottom to top or using cheap flashing guarantees water intrusion during heavy winter downpours.
- Inadequate Roof Ventilation: Dormers alter the natural airflow path of your attic. Installing dedicated ridge vents or soffit intake points alongside a proper dormer vent installation prevents moisture buildup and ice damming.
- Thermal Envelope Gaps: Dormer cheek walls and sloped ceilings are exposed to extreme outdoor temperatures. Complying with strict attic insulation requirements using dense-pack or spray-applied insulation prevents uncomfortable hot and cold spots.
- Disproportionate Exterior Massing: Sizing dormers too large for the main roofline overwhelms the house and hurts curb appeal. Maintaining balanced margins between dormer walls, eaves, and the main ridge keeps the profile visually appealing.
Frequently Asked Questions About Dormer Additions
How long does it take to build a dormer addition?
The structural framing and exterior dry-in of a standard dormer typically takes about 4 to 6 work days of focused carpentry. Completing the entire project—including rough plumbing, electrical wiring, spray insulation, drywall hanging, trim carpentry, painting, and final inspections—generally spans 6 to 12 weeks depending on weather conditions and material lead times.
Do I need a building permit to add a dormer to my roof?
Yes. Adding a dormer involves modifying primary roof framing members, altering the exterior building envelope, and adding electrical or plumbing circuits. Your local town or village building department requires structural plans prepared by a licensed architect or professional engineer, zoning compliance checks, and scheduled inspections throughout construction.
Can my existing roof structure support a dormer addition?
In most traditional stick-framed homes built with individual dimensional lumber rafters, existing roofs can readily support a dormer once structural openings are framed with doubled trimmer rafters and engineered headers. If your home was constructed with engineered light-frame roof trusses, modifications require custom engineered design plates and structural calculations to redistribute roof loads safely down to the foundation.
Conclusion
Expanding into your attic by building a second-floor dormer is one of the most effective ways to add functional living space, flood upper levels with natural light, and enhance your home's character without sacrificing your yard. Whether you need a spacious primary bedroom suite, a quiet executive home office, or an extra bathroom for a growing family, a well-planned dormer unlocks usable space right beneath your roof.
At Absolute Builders NY Inc, our team brings precision craftsmanship and dedicated partnership to every residential project across Long Island, including West Babylon, Huntington, and throughout Nassau and Suffolk counties. When you are ready to explore structural options tailored to your home's design, contact us for professional home addition services and start planning your attic transformation today.