
What Does It Take to Build a Classic Gable Dormer from Scratch?
How Gable Dormer Construction Starts
To build a gable dormer, start with a plan for its size, window, and roof pitch. Have a qualified builder check how the existing roof carries weight before cutting it. Then brace and frame the opening, build the dormer walls and roof, and tie the new framing into the approved load path. Finish with sheathing, flashing, roofing, insulation, and ventilation.
For a Long Island homeowner, that work can turn a cramped attic into brighter, more useful space. But the dormer also needs to look at home on the roof and keep water out where the two roofs meet.
I'm Jacolyn Gleason, a public relations professional who works to make complex topics clear; my background is in communications, not hands-on gable dormer construction. This guide walks through the planning and building steps to discuss with your contractor.
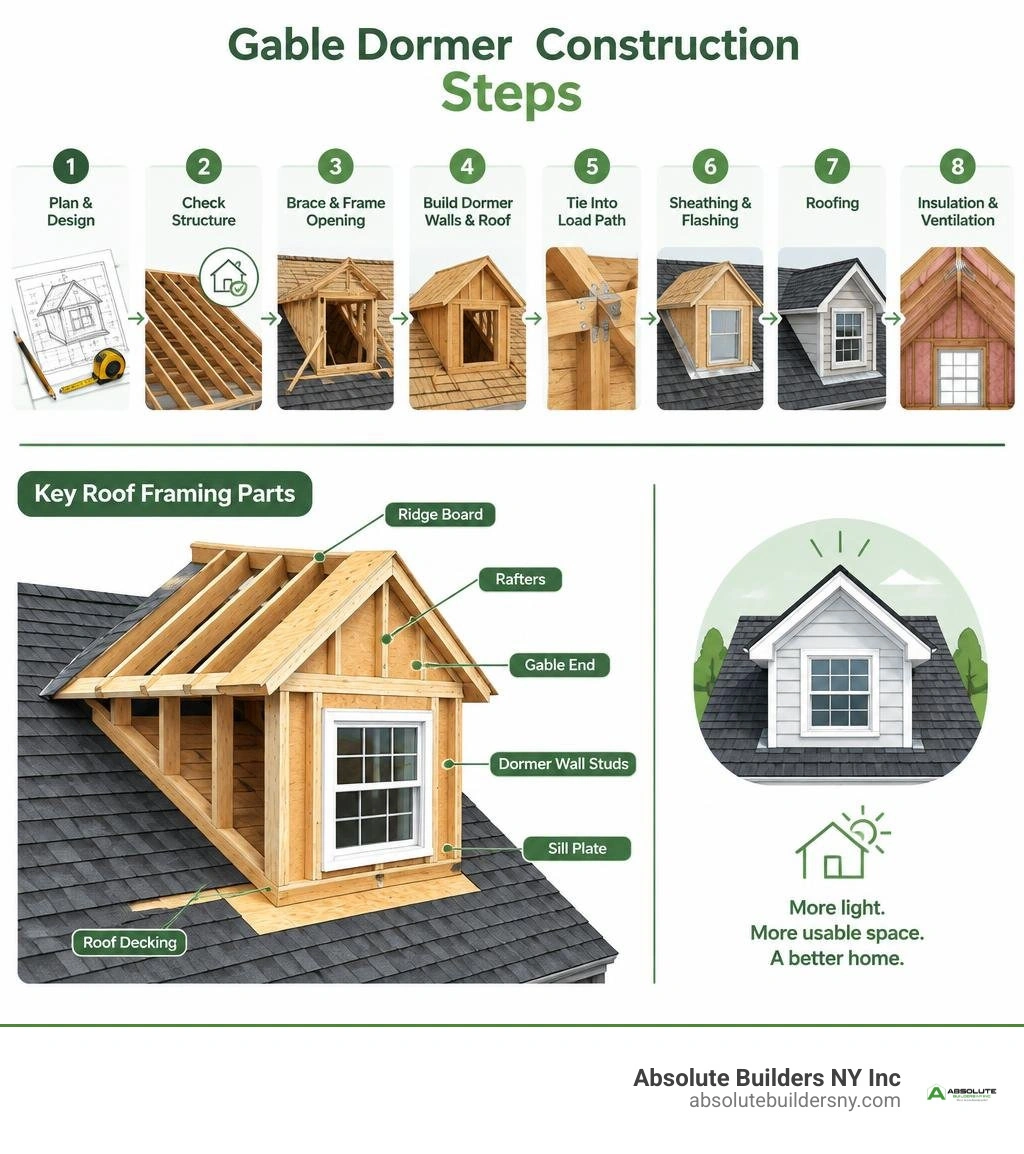
Important gable dormer construction terms:
Architectural Sizing, Egress, and Roof Pitch Planning
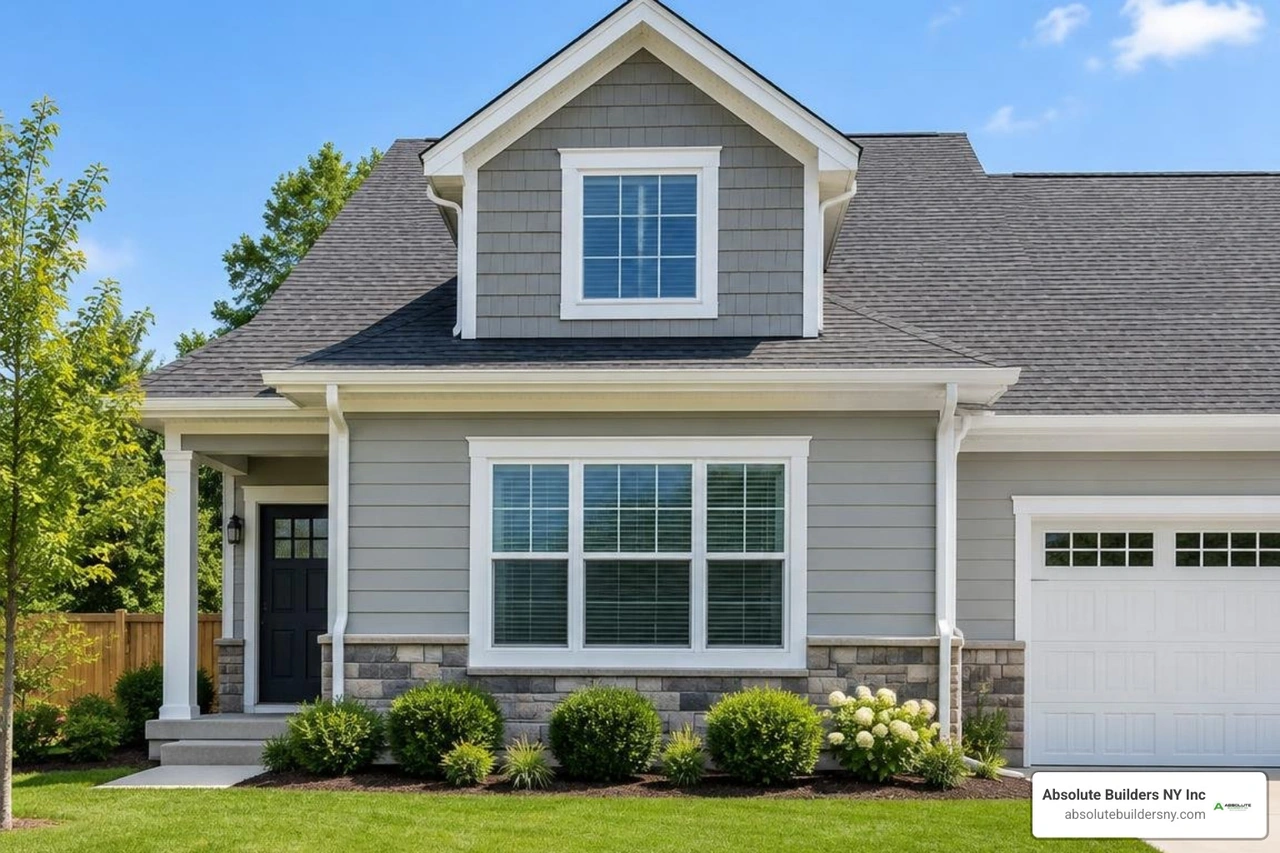
A well-designed gable dormer should complement the house rather than overwhelm it. When dormers are built too large, the home can look top-heavy. Architectural balance relies on proportional scaling.
As a rule of thumb, sizing dormer windows means scaling them down by 10% to 25% compared to the first-floor windows directly below them, while preserving the exact same aspect ratio. Architecturally, the total width of the gable dormer should match the window opening below, including its exterior trim. Trim components on the dormer itself should also be scaled down by 10% to 25% to keep sightlines refined.
Roof pitch alignment is equally critical. For classic symmetry, the dormer roof slope typically matches the primary roof pitch (often between 8-in-12 and 10-in-12 across Long Island Capes and Colonials). However, if a pedimented Greek Revival aesthetic is desired, a lower pitch—down to 5-in-12—can be used intentionally.
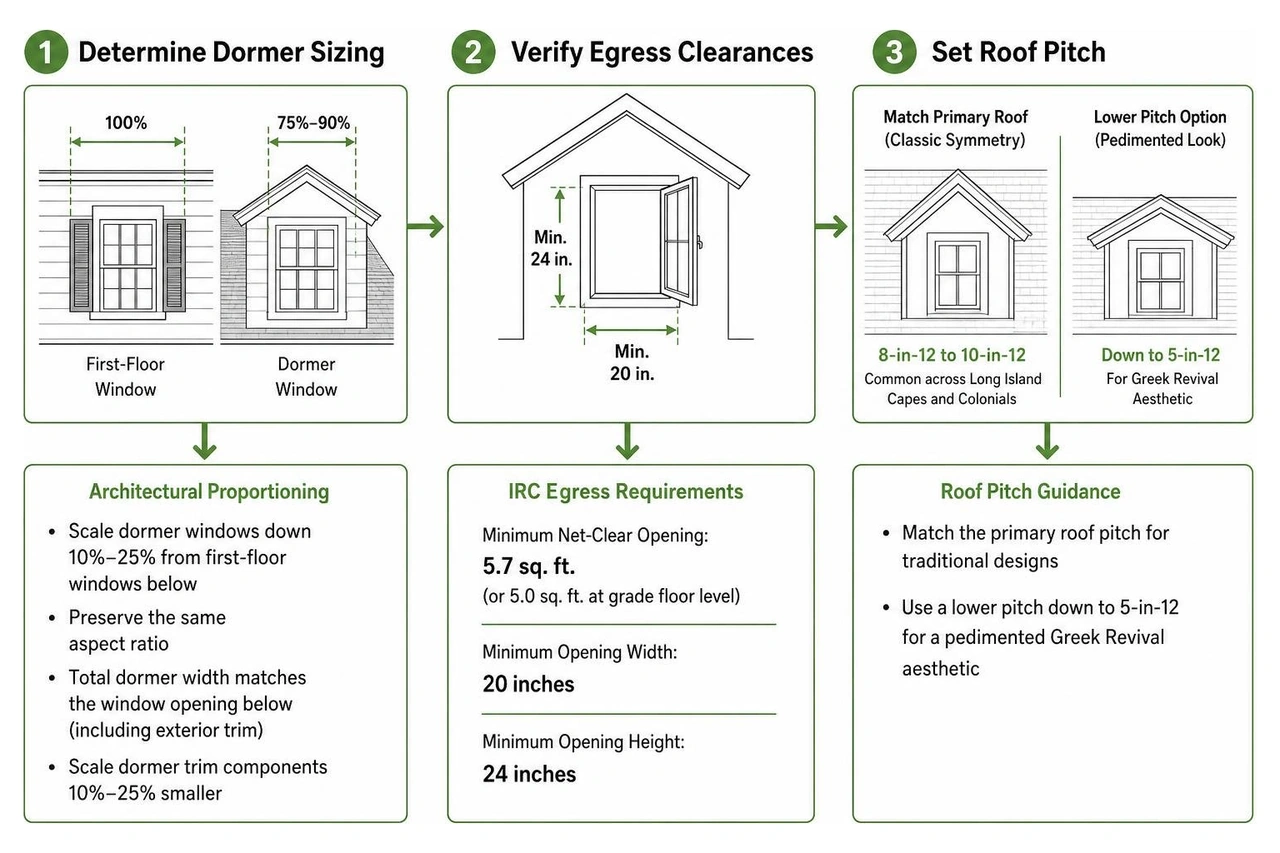
When adding habitable attic bedrooms or living spaces, window sizing must satisfy strict emergency escape and rescue opening (egress) standards under the International Residential Code (IRC):
- Minimum Net-Clear Opening: 5.7 sq. ft. (or 5.0 sq. ft. at grade floor level).
- Minimum Opening Width: 20 inches.
- Minimum Opening Height: 24 inches.
- Maximum Sill Height: 44 inches above the finished floor.
- Roof Clearance: Window sills must sit at least 2 inches off the finished roof plane to clear snow and driving rain.
Achieving code compliance in a compact dormer face often hinges on sash choice. A 20-inch-wide double-hung window only yields about 4.2 sq. ft. of net-clear opening area because the sashes overlap, failing egress standards. In contrast, an outward-swinging casement window with identical exterior dimensions can provide up to 8.4 sq. ft. of clear egress space.
Review our detailed gable dormer window guide and check out municipal dormer egress requirements before locking in your architectural plans.
Structural Load Paths and Roof Integration Framing
Cutting into an existing roof skeleton requires a clear understanding of load paths. Under IRC Section 802.2 and Section 802.9, any interrupted structural framing members must have their dead and live loads safely transferred around the opening down to exterior foundation-bearing walls.
When existing common rafters are severed, doubled or tripled trimmer rafters are installed along the sides to carry the load of the dormer cheek walls. Upper and lower doubled headers span between these trimmers to support the severed rafter tails.
For builders looking into engineering insights for framing a gable dormer, the extended valley rafter method is an effective alternative. In this system, the valley rafter bears continuously from the primary roof ridge down to the exterior wall top plate, bypassing mid-span roof headers entirely. Understanding the difference between a gable and a dormer helps clarify how these intersecting roof planes function as independent structural systems.
A standard gable dormer spanning up to 6 feet generally falls within prescriptive IRC framing guidelines. However, when building a large 15-foot wide dormer, the scale exceeds prescriptive residential building tables. Wide dormers impose heavy, asymmetric snow and wind loads onto the main roof framing. In such scenarios—or when modifying engineered trusses or timber post-and-beam framing—a licensed New York structural engineer must specify engineered LVL trimmers, upgraded rafter spacing (such as tightening 24" o.c. layouts down to 12" o.c.), or structural ridge beams.
Step-by-Step Gable Dormer Construction and Framing Sequence
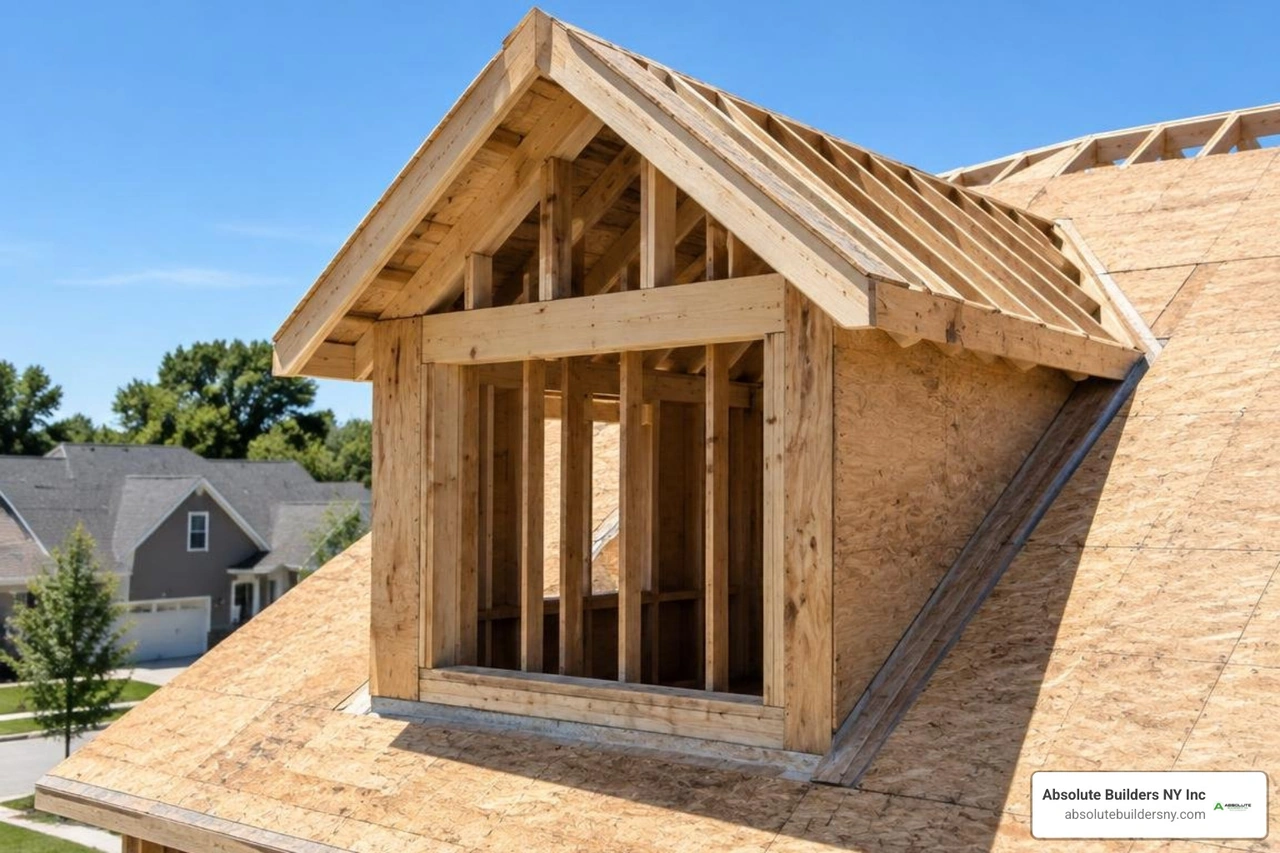
Framing requires precision geometry, square lines, and safe site prep. Once safety scaffolding and interior weather-protection tarps are in place, the roof rough opening can be prepared.
Cutting the Roof Opening and Cheek Wall Framing
- Temporary Structural Shoring: Build a temporary stud support wall beneath the rafters inside the attic before cutting any wood.
- Rough Opening Cuts: Strip existing shingles, mark layout lines, and cut the roof sheathing using a circular saw set precisely to the sheathing thickness (typically 1/2" or 5/8") to avoid clipping hidden rafter nails.
- Placing Sole Plates & Studs: Anchor 2x4 or 2x6 sole plates onto the doubled trimmer rafters. Set the front wall studs plumb over the exterior wall or dedicated floor joists below.
- Cheek Wall Assemblies: Install vertical wall studs at 16" o.c., running them up from the angled sole plate on the trimmer rafter to meet a horizontal, plumb double top plate.
- Plumb and Square: Cross-brace the side cheek walls to guarantee both sides remain plumb and parallel across the dormer width.
Explore our deep-dive tutorial on gable dormer framing for detailed timber cutting schedules and framing specs.
Valley Rafters, Ridge Board, and Roof Sheathing
When the dormer roof pitch matches the primary roof slope, the intersecting valley rafters create a predictable 45-degree angle in plan view.
- Calculate Rafter Geometry: Use the Pythagorean theorem ($A^2 + B^2 = C^2$) to calculate your valley length, treating the dormer run as side $A$ and the common rafter length as side $B$.
- Cut Valley Rafters & Ridge Board: Make a 45-degree bevel top plumb cut where the valley meets the dormer ridge, and a compound birdsmouth plumb seat cut where it rests on the double top plate. Set a 2x8 or 2x10 dimensional ridge board level between the front gable truss and the main roof intersection.
- Install Common and Jack Rafters: Fasten common rafters from the ridge to the side top plates, then install valley jack rafters, spaced at 16" or 24" o.c., using compound side cuts to land flush against the valley board.
- Roof Sheathing: Fasten 1/2" or 5/8" CDX plywood or OSB panels across the dormer roof planes, leaving an 1/8-inch gap at panel edges for thermal expansion, staggered over the primary roof joints.
Essential Structural Tools and Fasteners for Gable Dormer Construction
Choosing the right structural hardware ensures the dormer withstands coastal wind loads and heavy winter snow.
| Component / Connection | Framing Lumber / Material Grade | Recommended Fastener Schedule | Structural Hardware Type |
|---|---|---|---|
| Cheek Wall Studs & Plates | 2x4 or 2x6 Spruce-Pine-Fir (SPF) #2 / Hem-Fir | (3) 16d common nails per stud end | Simpson Strong-Tie framing angles (optional) |
| Trimmer & Valley Rafters | 2x8 to 2x12 #1 Douglas Fir or Structural LVL | (2) 16d nails every 12" o.c. staggered | Engineered structural joist/rafter hangers |
| Rafter-to-Top-Plate Tie | 2x6 or 2x8 Dimensional Lumber | (3) 10d sinkers (toe-nailed) | H1Z / H2.5A hurricane ties |
| Ridge Board Connections | 2x8 to 2x12 Sawn Lumber or LVL | (3) 16d common face-nailed per rafter pair | Simpson ridge rafter connectors |
| Roof & Wall Sheathing | 1/2" or 5/8" APA Rated OSB / CDX Plywood | 8d ring-shank nails (6" edge / 12" field) | Edge spacing clips (H-clips) on roof runs |
Waterproofing, Flashing, and Ventilation Best Practices
Water management is the most important part of exterior envelope detailing. The junction where a vertical cheek wall meets a sloped roof plane is a common source of leaks if flashed incorrectly.
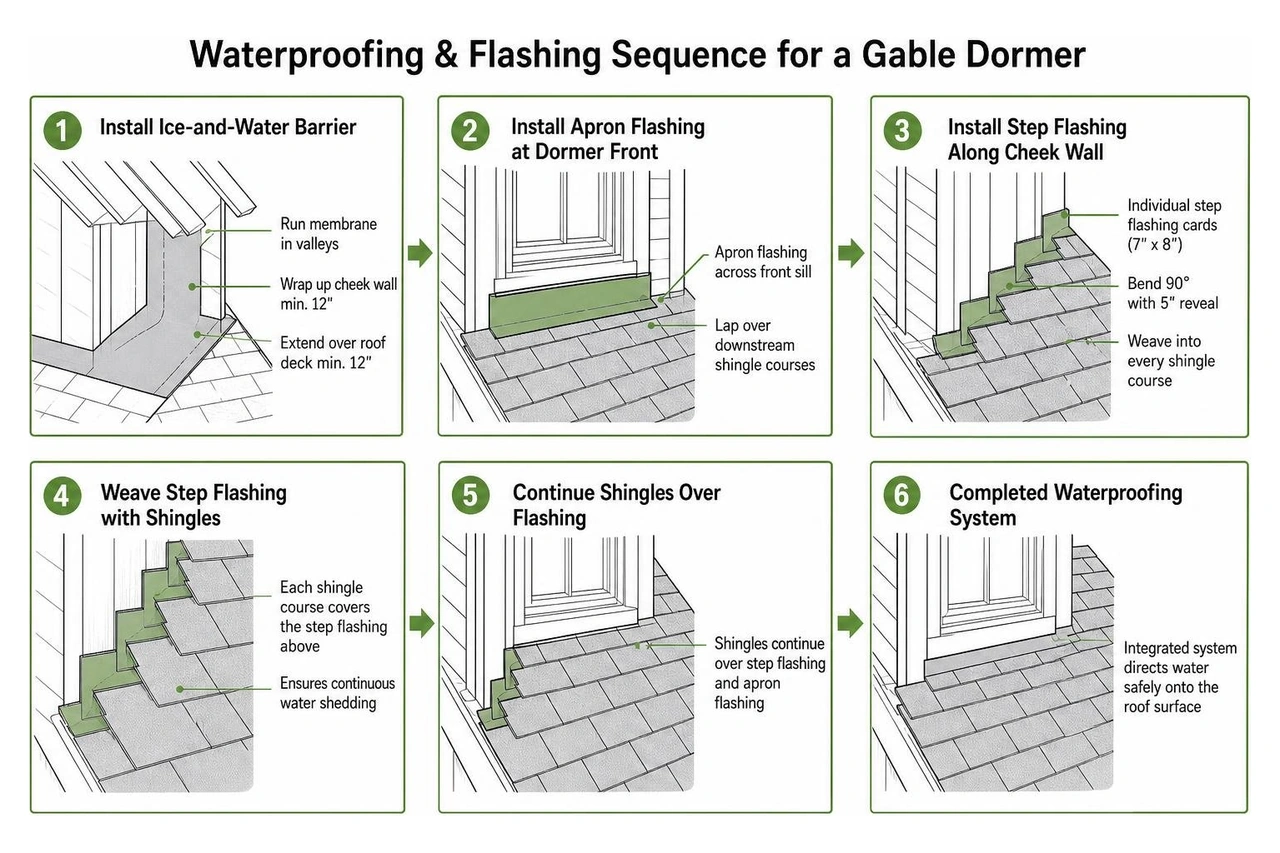
Avoiding Critical Flashing and Water Intrusion Mistakes in Gable Dormer Construction
- Self-Adhering Membrane Base: Apply continuous, rubberized ice-and-water barrier membrane starting in the dormer valleys, wrapping at least 12 inches up the cheek wall and 12 inches over the roof decking.
- Seamless Apron Flashing: Install an apron flashing across the dormer front sill before setting window packages, lapping over the downstream asphalt shingle courses.
- Individual Step Flashing: Do not rely on continuous L-metal channels along the cheek walls. Install individual 7"x8" aluminum or copper step flashing cards bent at 90 degrees with a 5-inch reveal, woven into every single course of roofing shingles.
- Kickout Flashing Diverters: Place kickout flashing diverters at the lowest corner where the dormer wall terminates near the main roof eaves to channel water away from exterior siding.
- Counter-Flashing & Siding Clearances: Step flashing must be protected by house wrap, counter-flashed, and covered by siding that stops a minimum of 2 inches above the shingle deck to prevent capillary rot.
For step-by-step flashing integration, consult our guide to dormer window installation.
Thermal Envelope, Vapor Barriers, and Attic Airflow
Dormers can cause localized energy loss and ice damming if the attic thermal envelope is improperly insulated or unventilated.
- Vented Assemblies: For dormers tied into open attic spaces, install continuous baffle chutes along the underside of the dormer roof deck to maintain a minimum 1-inch free-air channel. Intake air travels from the dormer soffit vents directly to a continuous ridge vent.
- Unvented Cathedral Assemblies: When designing vaulted ceilings without an attic void, fill the rafter bays completely with closed-cell spray polyurethane foam (minimum R-38 to R-49 depending on local New York energy codes). Closed-cell foam creates a seamless air barrier and Class II vapor retarder, eliminating condensation along the underside of the roof sheathing.
Learn more about managing attic climates in our comprehensive attic dormer addition guide.
Frequently Asked Questions about Gable Dormers
When does a gable dormer require a structural engineer's stamp?
A licensed structural engineer is required whenever a dormer exceeds standard prescriptive building code limits (typically widths over 6 to 8 feet, including large 15-foot spans), whenever engineered roof truss webs must be cut or modified, or when installing heavy architectural features that transfer point loads past existing floor framing.
What is the ideal window-to-dormer proportion ratio?
The most visually balanced ratio scales dormer windows down by 10% to 25% relative to the first-floor windows, while matching the total dormer outer wall width to the window-plus-trim width below. The dormer face should have 2 to 4 inches of cheek siding exposed beside the window trim for balanced massing.
How does an extended valley rafter differ from a headered dormer opening?
A headered opening relies on doubled horizontal headers supported by doubled rafter trimmers at the top and bottom of the roof cut. In contrast, an extended valley rafter spans continuously from the main ridge down to the exterior load-bearing wall plate. This eliminates horizontal headers and allows for open, vaulted interior ceilings.
Conclusion
Building a classic gable dormer adds natural light, usable floor space, and architectural character to your home. Long-term structural performance relies on solid engineering: following code-compliant load paths, nailing down rafter geometry, and executing watertight step flashing.
Whether you are expanding an attic living suite in Nassau County or updating a classic Cape in Suffolk County, partner with professionals who understand local framing codes and precision weatherproofing. Contact Absolute Builders NY Inc to discuss our expert dormer addition services and start planning your project.